At Superfloor Australia, we’re excited to share our expertise on do-it-yourself concrete floors. This budget-friendly option offers homeowners a chance to transform their spaces with a durable and stylish flooring solution.
In this guide, we’ll walk you through the process of creating stunning concrete floors in your home, from preparation to finishing touches. Get ready to unleash your creativity and elevate your living space with this practical DIY project.
Why DIY Concrete Floors Make Sense
DIY concrete floors have become a popular choice for homeowners seeking a practical and stylish flooring solution. Let’s explore the compelling reasons why you should consider this option for your next home improvement project.
Significant Cost Savings
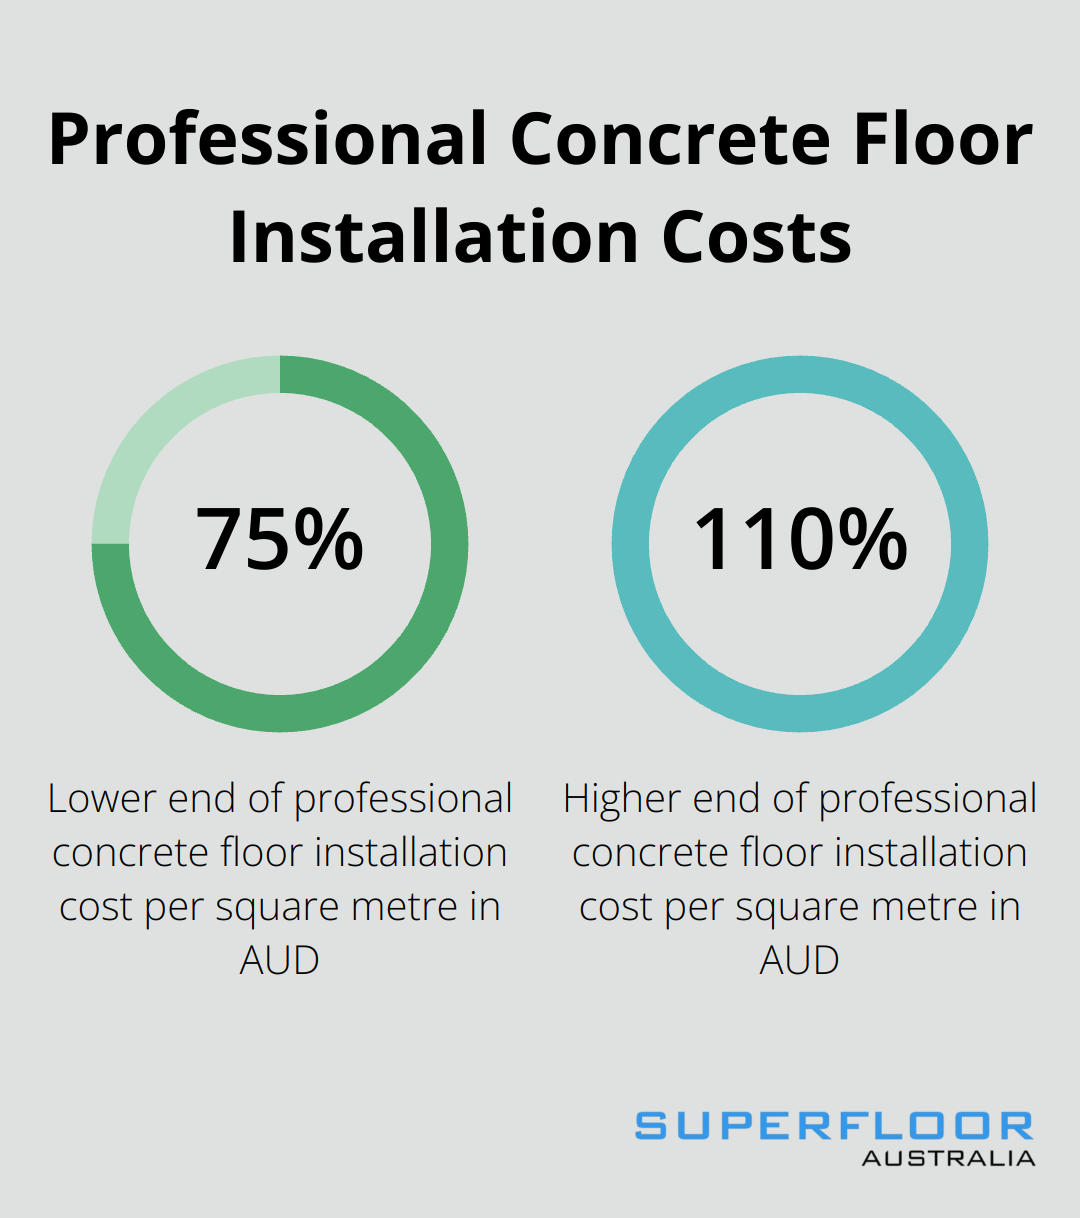
The potential for substantial cost savings stands out as one of the most attractive aspects of DIY concrete floors. Professional concrete floor installation can cost anywhere from AUD 75 to 110 per square metre. However, tackling the project yourself can dramatically reduce this expense. This makes it an incredibly budget-friendly option for those who want to renovate without breaking the bank.
Endless Design Possibilities
DIY concrete floors offer unparalleled design flexibility. Unlike pre-fabricated flooring options, you can customise concrete to match your exact preferences. You can experiment with various techniques such as:
- Acid staining for bold colours and unique designs
- Exposed aggregate to reveal beautiful, multi-coloured stones
- Creating patterns by painting concrete in multiple colours
These techniques open up a world of creative possibilities, allowing you to craft a truly personalised space that reflects your style and personality.
Durability That Lasts
Concrete floors are renowned for their longevity and resilience. When you install and maintain them properly, they can last for decades without showing signs of wear. This durability makes them an excellent choice for high-traffic areas in your home. Moreover, concrete slab floors provide good thermal mass, which works particularly well in cool climates and climates with a high day–night temperature range.
Low Maintenance Requirements
The minimal upkeep needed for concrete floors adds to their appeal. Unlike carpets that require frequent vacuuming or hardwood floors that need regular polishing, concrete floors demand little attention. A simple sweep and occasional mop will keep them looking pristine for years. This low-maintenance nature saves you time and money in the long run, making it an ideal choice for busy households.
Environmentally Friendly Option
For the eco-conscious homeowner, DIY concrete floors present an environmentally friendly flooring solution. Concrete is made from abundant natural materials and can incorporate recycled content (such as fly ash or slag). Its longevity means fewer replacements over time, reducing waste. Additionally, concrete’s thermal mass properties can help regulate indoors temperatures, potentially lowering energy consumption for heating and cooling.
As you consider the benefits of DIY concrete floors, you’ll want to ensure you’re well-prepared for the installation process. Let’s move on to discuss how to prepare your space for this exciting project.
How to Prepare Your Space for DIY Concrete Floors
Assess Your Existing Floor
Start with a thorough examination of your current flooring. Remove all kinds of substances and agents on the concrete that may inhibit the overlay from bonding. Eliminate spoiled concrete. Look for cracks, unevenness, or signs of moisture. Address these issues before you proceed. For larger cracks or significant damage, consult a professional to ensure the subfloor is structurally sound.
Gather Your Tools and Materials
Collect the necessary tools and materials for your project. Essential items include:
- Concrete mix
- Trowels (both flat and edging)
- Concrete float
- Protective gear (gloves, safety glasses, dust mask)
- Mixing bucket or wheelbarrow
- Power drill with mixing attachment
- Level
- Tape measure
- Concrete sealer
Factor in additional materials like reinforcing mesh or fibre, depending on your specific project requirements.

Protect Surrounding Areas
Concrete work can create a mess. Protect your walls, baseboards, and any adjacent surfaces with plastic sheeting and painter’s tape. This step prevents concrete splatter from damaging your home’s other surfaces.
For outdoor projects, cover nearby plants or grass to shield them from potential concrete runoff.
Create a Proper Subfloor
A stable subfloor ensures the longevity of your concrete floor. If you’re working with an existing concrete slab, clean it thoroughly and remove all debris. For wooden subfloors, install a layer of cement board to provide a suitable base for the concrete.
Pay attention to levelling. Use a long level to check for any low spots or slopes. Fill these areas with a self-levelling compound to create an even surface. This step results in a smooth, professional-looking finish.
Consider installing a moisture barrier, especially if you’re working in areas prone to dampness (like basements). This extra layer of protection helps prevent future moisture-related issues with your concrete floor.
With your space properly prepared, you’re now ready to move on to the exciting part of your DIY project – pouring and finishing your new concrete floor. The next chapter will guide you through this process step by step, ensuring you achieve the best possible results for your home.
How to Install Your DIY Concrete Floor
Mixing the Concrete
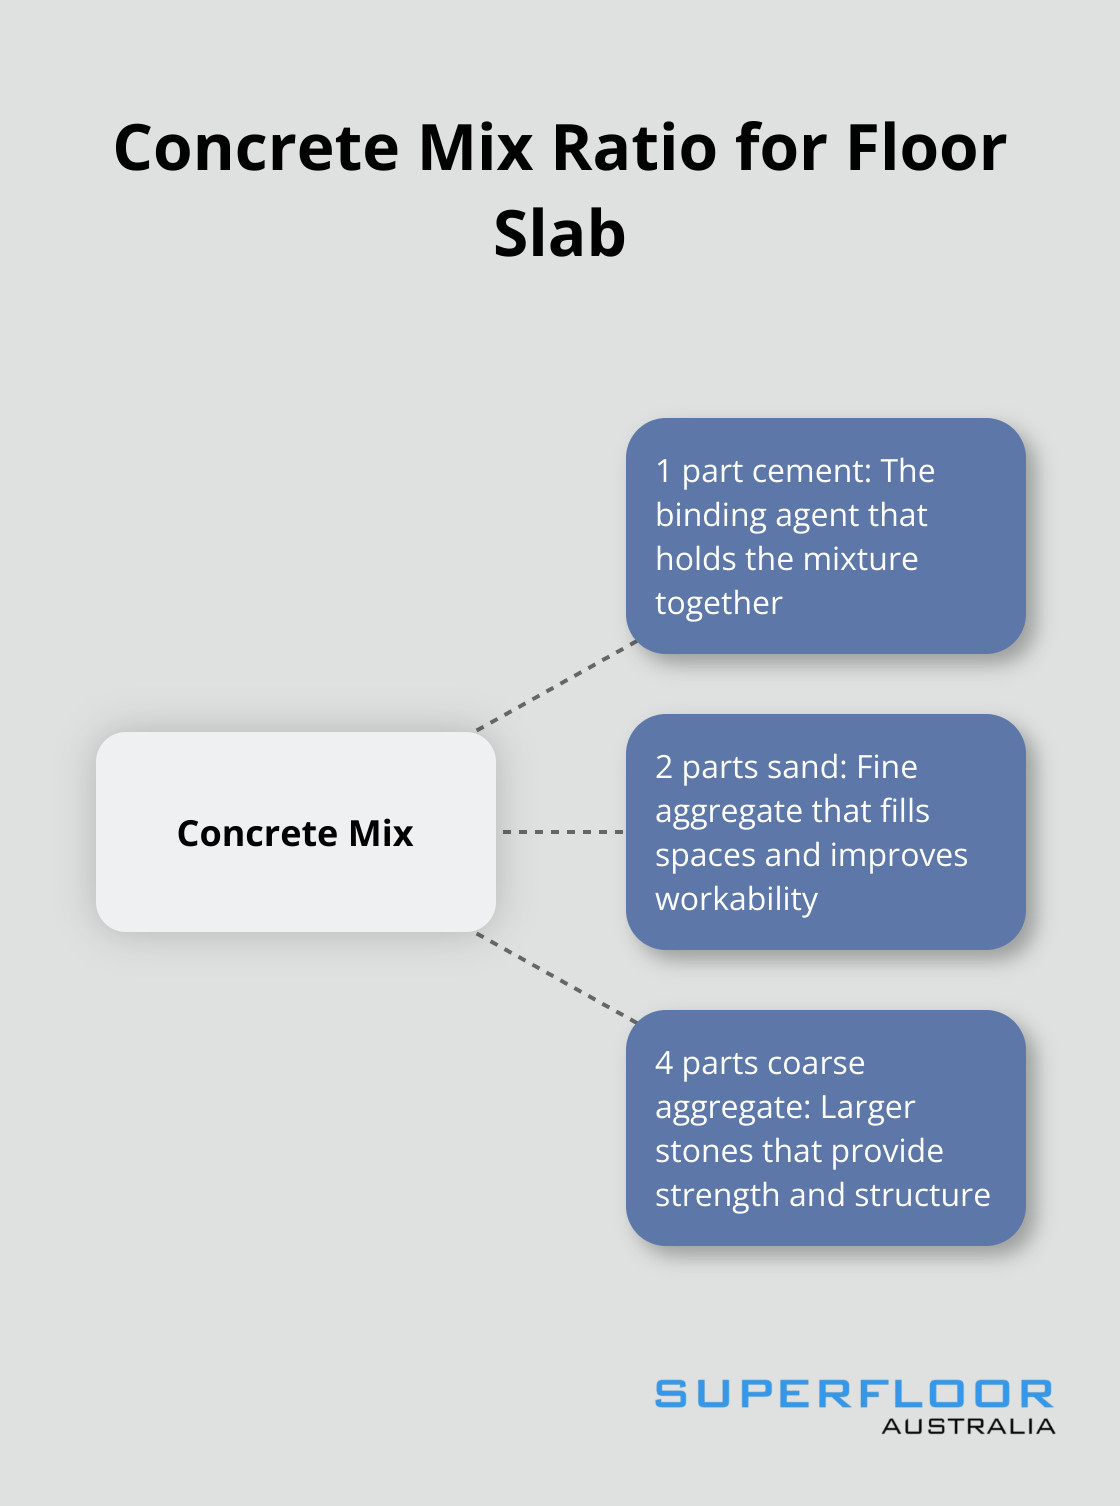
Start by preparing your concrete mix. Use a concrete mix ratio of 1 part cement, 2 parts sand, and 4 parts coarse aggregate for a concrete floor slab. This combination provides a strong, durable base for your floor.
Use a power drill with a mixing attachment to blend the components thoroughly. Add water gradually until you achieve a consistency similar to thick oatmeal. Avoid adding too much water, as this can weaken the final product.
Pouring and Spreading
Once mixed, you have about 30 minutes to work with the concrete before it starts to set. Pour the mixture onto your prepared subfloor, starting at the farthest corner from the exit. Use a long-handled squeegee to spread the concrete evenly across the surface.
Levelling and Smoothing
After pouring, level and smooth the surface. Use a screed board (a straight piece of lumber) to level the concrete, moving it back and forth in a sawing motion across the surface. This step ensures an even thickness throughout your floor.
Next, use a bull float to smooth out any imperfections and force larger aggregate below the surface. Work quickly but carefully, as timing is critical in achieving a smooth finish.
Troweling for a Perfect Finish
Once the concrete has set slightly (when you can press your thumb into the surface and leave a slight indentation), it’s time for troweling. Use a magnesium float first to smooth the surface further, then switch to a steel trowel for a final, glass-like finish.
Adding Visual Interest
To add colour or patterns to your concrete kitchen floors, mix concrete dye into your final layer of concrete before pouring. For more intricate designs, use stencils or stamps while the concrete is still wet.
For a unique look, try the exposed aggregate technique. After pouring and levelling the concrete, wait until it’s partially set, then use a brush and light spray of water to gently brush and wash away the top layer of cement, revealing the pebbles beneath.
Sealing and Curing
After your concrete has cured for at least 28 days, apply a sealer. This step protects your floor from stains, moisture, and wear. Choose a high-quality concrete sealer and apply it according to the manufacturer’s instructions, typically using a roller or sprayer.
For proper curing, keep the surface damp for at least seven days after pouring. You can do this by misting the floor with water several times a day or covering it with plastic sheeting to retain moisture.
During this time, avoid walking on the floor or placing any heavy objects on it. The concrete will continue to gain strength over the next 28 days, so allow it to cure fully before subjecting it to normal use.
Final Thoughts
Do-it-yourself concrete floors transform living spaces with durability and style. The process requires careful planning and execution, but yields professional-looking results that stand the test of time. Proper maintenance (regular sweeping and occasional mopping) will keep your new floor pristine for years to come.
While DIY concrete floors demand effort and patience, the end result justifies the investment. You’ll create a cost-effective flooring solution that enhances your home’s aesthetic appeal. The project might seem daunting, but with the right tools, materials, and knowledge, you can successfully complete this home improvement task.
For those seeking professional assistance or exploring more concrete flooring options, Superfloor Australia offers expert help. Our team specialise in polished concrete flooring solutions for homes, commercial spaces, and industrial environments in Brisbane. We provide high-quality results for those who prefer professional installation over the DIY route.