At Superfloor Australia, we know that installing polished concrete floors can transform any space.
This step-by-step guide will walk you through how to install polished concrete floors, from surface preparation to the final polish.
We’ll cover essential techniques, tools, and tips to help you achieve a stunning, durable finish.
How to Prepare Your Concrete Surface
At Superfloor Australia, we understand that proper surface preparation is the cornerstone of a successful polished concrete floor installation. This chapter will guide you through the essential steps to prepare your concrete surface for polishing.
Remove Existing Flooring
The first task is to strip away any existing flooring and adhesives. This process can be labour-intensive and may require specialised equipment. For tile or hardwood, use a floor scraper or chisel to pry up the material. Cut carpet into manageable strips and roll it up. Adhesive removal often calls for a grinder with a diamond cup wheel or a chemical stripper.
Repair Imperfections
Inspect the concrete for cracks, holes, or other flaws. Fill small cracks (less than 1/4 inch wide) with a concrete patching compound. Larger cracks may need epoxy injection. Use a concrete resurfacer for holes or spalling. Proper repair can extend concrete life by 10-20 years, depending on traffic level and climate conditions.
Clean Thoroughly
A pristine surface is vital for proper adhesion and a smooth finish. Start by sweeping and vacuuming to remove loose debris. Then, apply a degreaser to eliminate any oil or grease stains. A pressure washer can effectively tackle stubborn stains. Deep cleaning is essential for preparing your concrete floor.
Apply Moisture Barrier
Moisture can silently destroy concrete floors. If your concrete slab is on or below grade, a moisture barrier is essential. Conduct a calcium chloride test to measure moisture vapour emission rates. Apply a moisture barrier if levels exceed 3 pounds per 1,000 square feet in 24 hours. Epoxy-based barriers are popular due to their effectiveness and ease of application.
Test for Suitability
Before proceeding with polishing, test the concrete’s hardness and porosity. Use a Mohs hardness test kit to determine if the concrete is suitable for polishing (it should rate at least 5 on the Mohs scale). Perform a water drop test to assess porosity; if water beads up, the surface may need additional preparation.
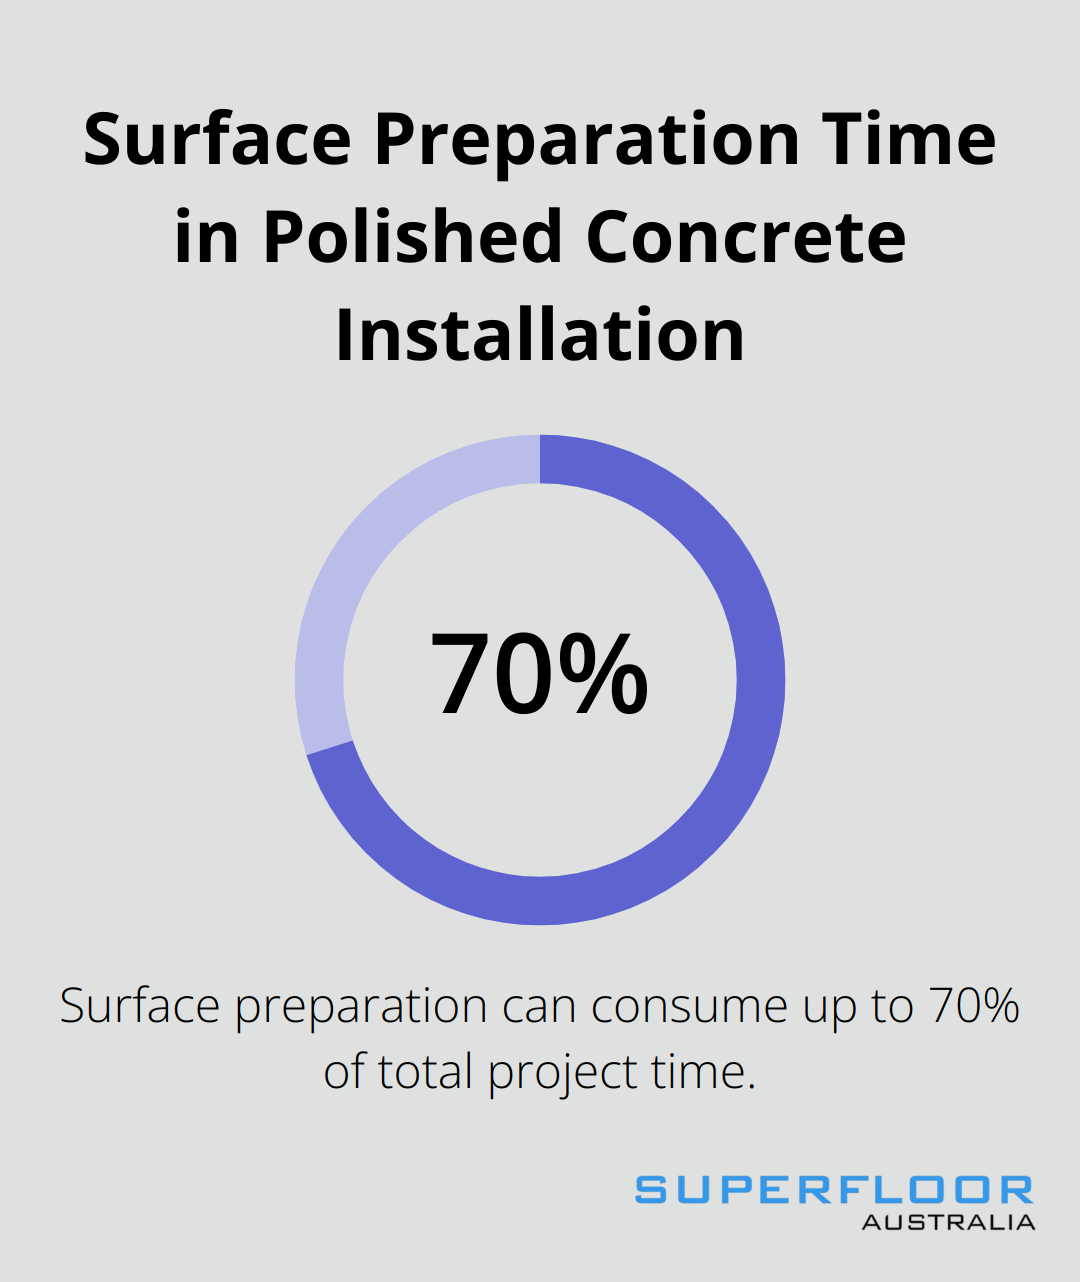
Proper surface preparation can consume up to 70% of your total project time, but it’s an investment in the quality and longevity of your polished concrete floor. With the surface now primed for polishing, let’s move on to the exciting process of grinding and polishing your concrete floor to perfection.
How to Grind and Polish Concrete Floors
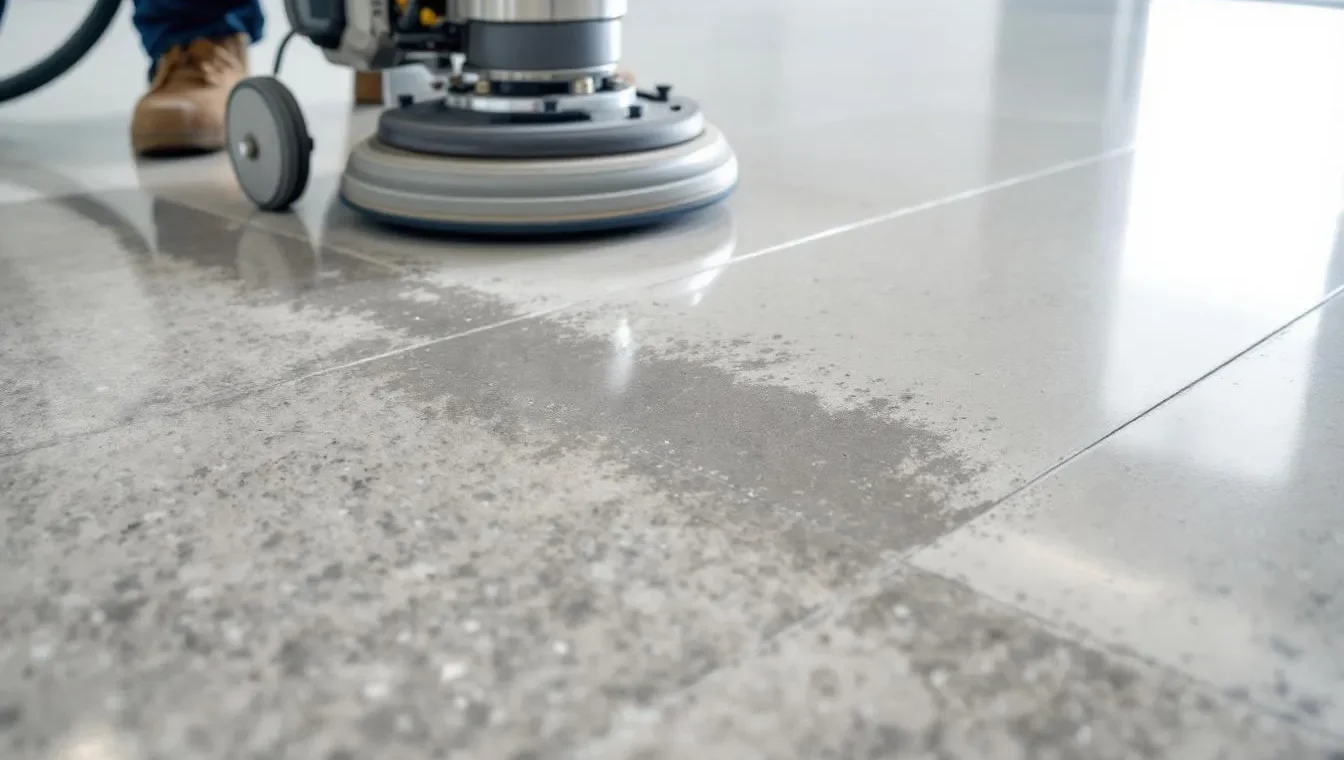
The Grinding Stage
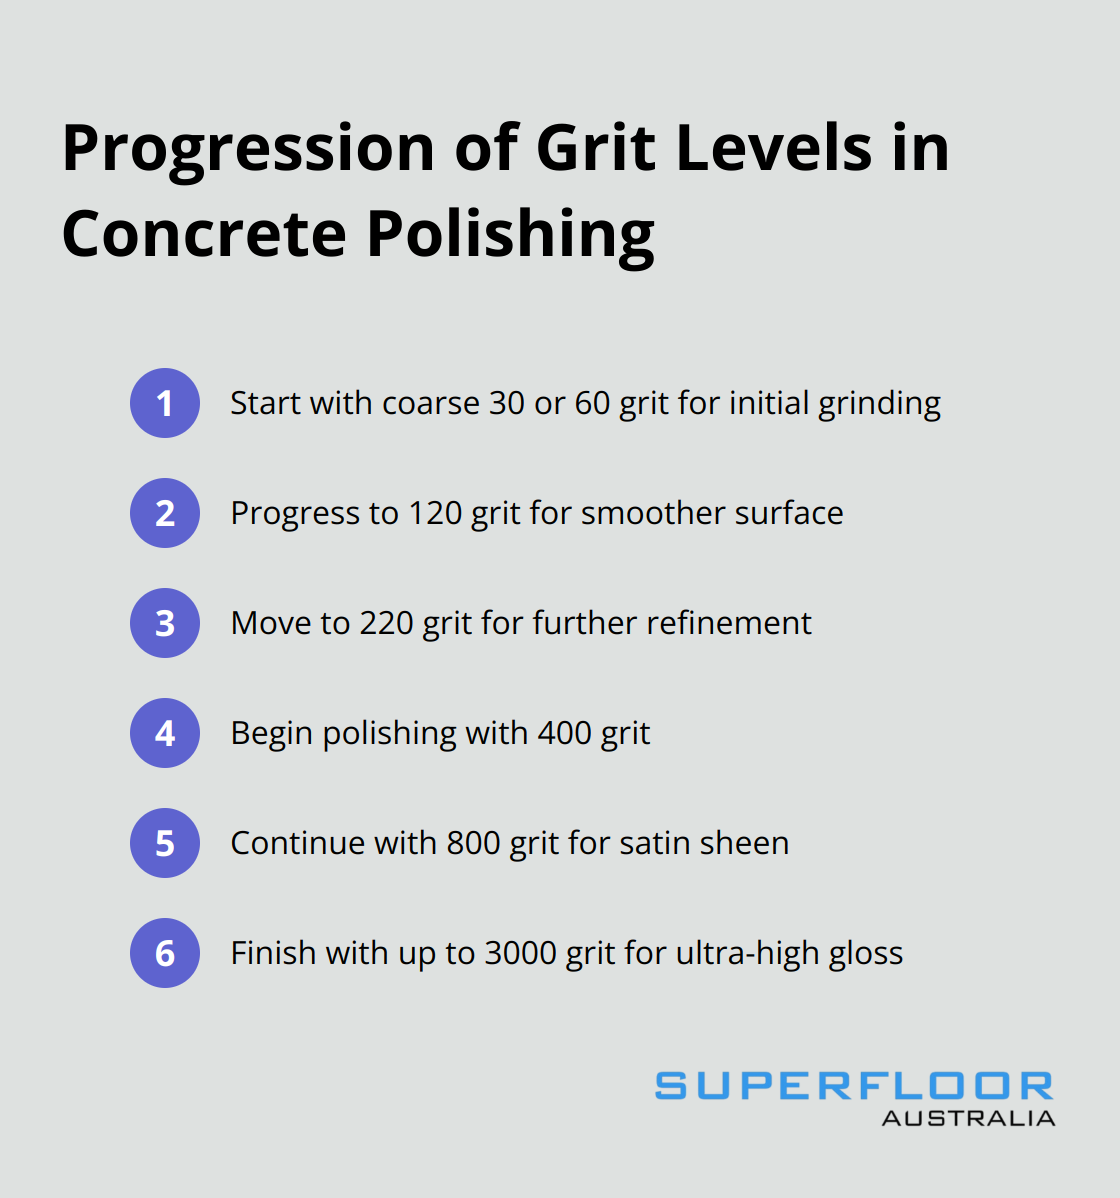
At Superfloor Australia, we start the transformation process with coarse diamond grinding pads (typically 30 or 60 grit). These aggressive pads remove remaining adhesives, minor imperfections, and the top layer of concrete to expose the aggregate beneath. This step creates a uniform surface and may require several passes depending on the floor’s condition.
We then progress to finer grits – 120, then 220. Each step eliminates the scratches left by the previous grit, gradually smoothing the surface. This progression is essential to achieve that mirror-like finish our clients love.
Applying the Densifier
After completing the initial grinding stages, we apply a concrete densifier. This chemical solution penetrates the concrete surface, increasing its density by sealing pores. The densifier improves the concrete’s ability to take a high polish and increases its resistance to stains and abrasions.
We allow the densifier to cure for 24 hours before proceeding. This patience ensures a more durable and lustrous finish.
The Polishing Stage
With the densifier cured, we move to higher grit diamond pads. We begin with 400 grit and work up to 3000-grit (or higher) for an ultra-high gloss finish. Each increase in grit brings out more shine and clarity in the concrete’s surface.
The number of grits used varies based on the desired finish. For a satin sheen, we might stop at 800 grit. For a high-gloss mirror finish, we’ll go all the way to 3000. The choice often depends on the specific needs of the space and the client’s preferences.
Throughout this process, we use planetary grinders. These machines have multiple heads that rotate in different directions, ensuring even coverage and eliminating any directional marks in the finished floor.
Sealing for Protection
The final step in our process involves applying a stain guard or sealer. This protective layer helps resist stains and makes the floor easier to maintain. We use a high-quality, breathable sealer that doesn’t trap moisture (preventing potential issues down the line).
Application technique is key here. We use a microfibre applicator and work in thin, even coats. Typically, two coats suffice, but high-traffic areas might benefit from a third.
The entire grinding and polishing process can take several days (depending on the size of the area and the level of finish desired). However, the results justify the time investment. A properly polished concrete floor can last for decades with minimal maintenance, making it an excellent choice for both residential and commercial spaces.
While DIY polishing is possible, achieving professional-grade results requires specialised equipment and expertise. That’s why many property owners in Brisbane trust Superfloor Australia for their polished concrete needs. Our team’s experience ensures a flawless finish every time, transforming ordinary concrete into extraordinary flooring.
Now that we’ve covered the grinding and polishing process, let’s explore the finishing touches and maintenance required to keep your polished concrete floors looking their best for years to come.
Perfecting Your Polished Concrete Floor
Curing Period
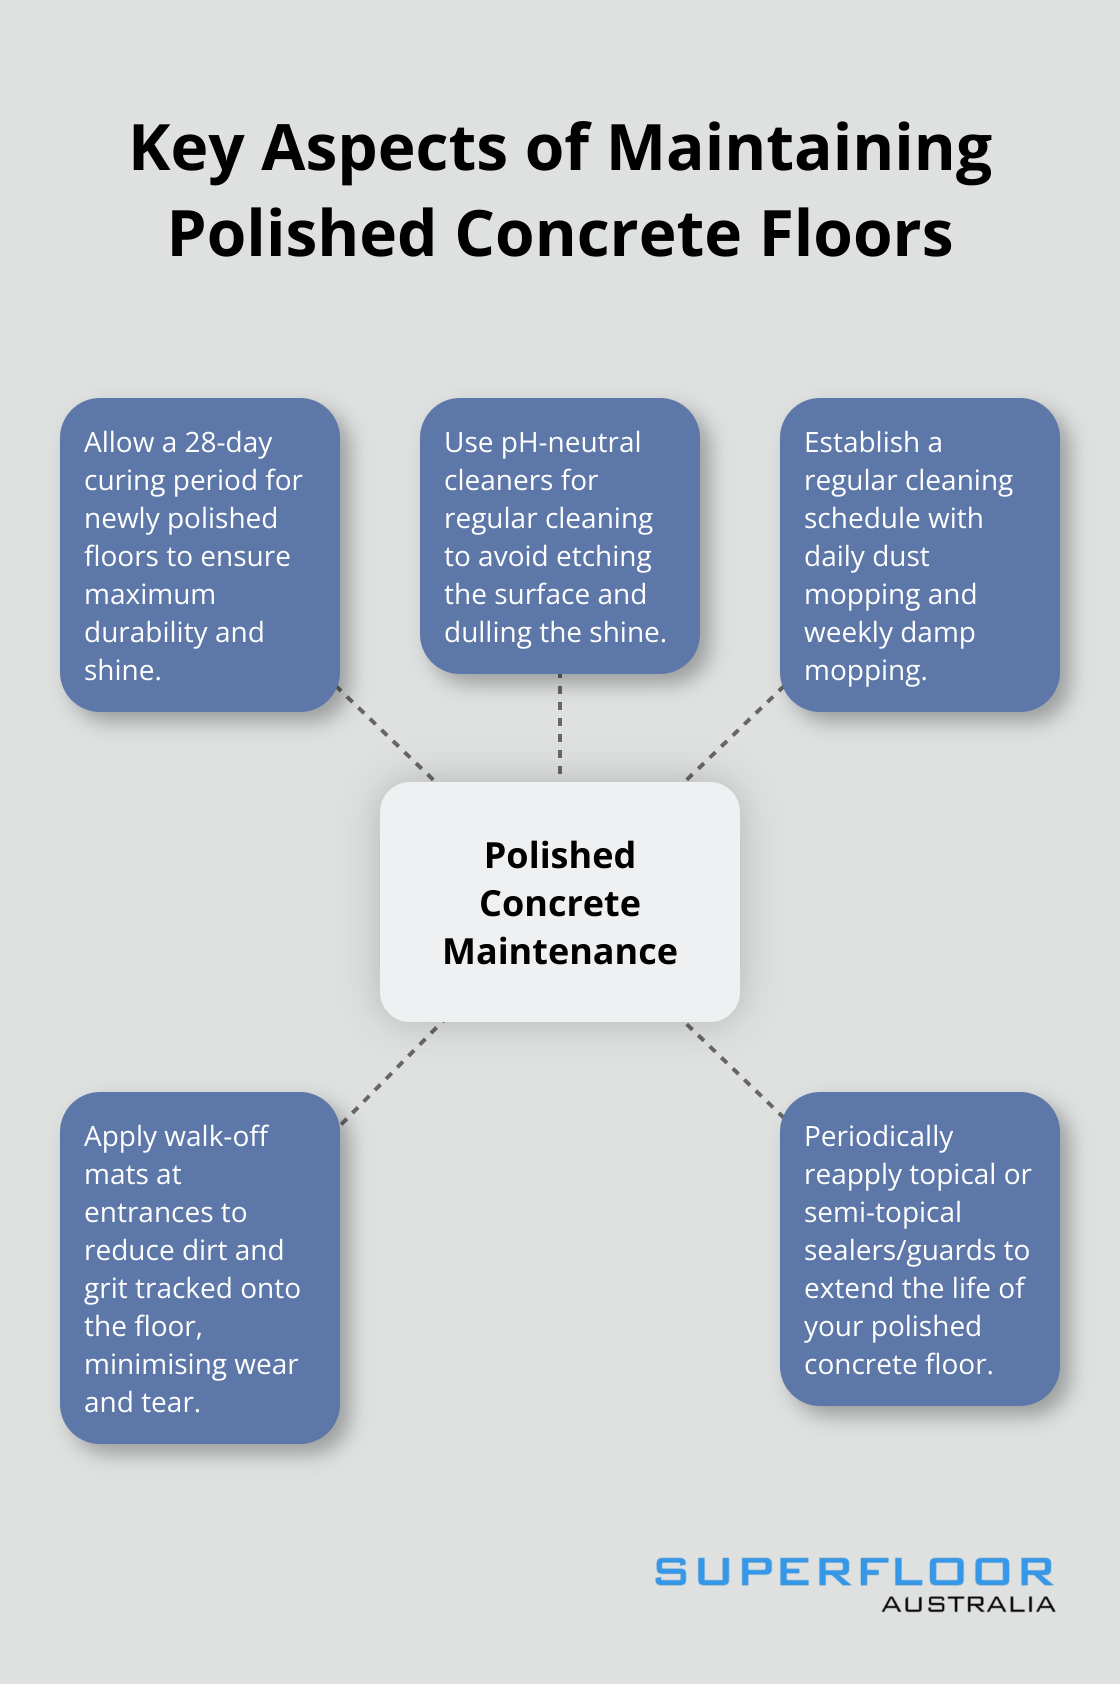
We recommend a 28-day curing period for newly polished concrete floors. This time allows the densifier and sealers to fully bond with the concrete, which ensures maximum durability and shine. During this period, avoid heavy foot traffic or placing furniture on the floor.
Post-Installation Cleaning
After the curing period, clean your floor with a pH-neutral cleaner. Avoid acidic or alkaline cleaners as they can etch the surface and dull the shine. Use a microfibre mop for daily cleaning to prevent scratches. For stubborn stains, a soft-bristled brush can effectively remove them without damaging the surface.
Enhancing the Shine
To boost the floor’s lustre, apply a thin coat of wax or polish. This step isn’t always necessary, but it can add an extra layer of protection and enhance the floor’s reflectivity. Apply the wax or polish using a microfibre applicator, work in small sections, and follow the manufacturer’s instructions for drying times.
Maintaining Your Polished Concrete
Establish a regular cleaning schedule to keep your polished concrete floor looking its best. Daily dust mopping and weekly damp mopping with a pH-neutral cleaner are usually sufficient. For high-traffic areas, you might need to clean more frequently (up to twice daily in some cases).
Periodic reapplication is needed for polished floors with topical or semi-topical sealers/guards. This simple step can significantly extend the life of your polished concrete floor.
Preventive Measures
In commercial settings, use walk-off mats at entrances to reduce the amount of dirt and grit tracked onto the floor, which minimises wear and tear. For office spaces, place chair mats under rolling chairs to prevent scratches and maintain the floor’s pristine appearance.
While polished concrete is highly durable, it’s not indestructible. Avoid dragging heavy furniture across the surface and clean up spills promptly to prevent staining. With proper care, your polished concrete floor can maintain its beauty for decades (making it a wise investment for any space).
Final Thoughts
Installing polished concrete floors transforms spaces with durability, easy maintenance, and modern aesthetics. The process requires careful preparation, skilled execution, and proper maintenance to achieve a stunning, long-lasting finish. Polished concrete offers numerous benefits, including environmental friendliness, enhanced lighting, and hypoallergenic properties.
Professional installation often yields superior results due to the expertise required for surface preparation and specialised equipment operation. For those in Brisbane seeking expert assistance with how to install polished concrete floors, Superfloor Australia offers top-notch services. Their team can transform ordinary concrete into extraordinary flooring, ensuring a flawless finish.
Polished concrete floors represent a fusion of functionality and aesthetics, providing a long-lasting solution for both residential and commercial properties. With proper installation and maintenance, these floors can elevate any space for decades. The investment in polished concrete floors pays off in both beauty and performance.