
Proper floor preparation determines whether your flooring installation succeeds or fails. Most installation problems stem from inadequate groundwork, not faulty materials.
We at Superfloor Australia see countless projects where rushed preparation leads to costly repairs within months. This guide covers the essential steps that separate professional results from amateur mistakes.
What Should You Check Before Starting Floor Preparation
The foundation inspection phase separates successful installations from expensive failures. Start with moisture tests using a concrete moisture meter and target readings below 4% for most flooring types. The National Wood Flooring Association explores the relationships between moisture and wood as related to flooring installation methods. Test multiple areas across the substrate, especially near exterior walls and plumbing fixtures where moisture penetration occurs most frequently.
Structural Integrity Assessment
Walk the entire floor area and listen for hollow sounds, squeaks, or movement that indicate loose subflooring or structural damage. Check for cracks wider than 2mm, as these require repair before installation. Use a 2-metre straight edge to identify high and low spots that exceed 3mm variation over any metre span. Document these areas with chalk marks for targeted repair.
Concrete slabs that show signs of dusting, scaling, or previous coating failures need grinding to achieve proper adhesion. Temperature variations between 18-24°C and relative humidity between 30-50% create optimal installation conditions.
Essential Tool Requirements
Your success depends on professional-grade equipment from day one. A concrete grinder removes old adhesives and levels surfaces effectively, while a moisture meter prevents costly moisture-related failures. Self-levelling compound, primer, and appropriate mixing tools handle surface irregularities.
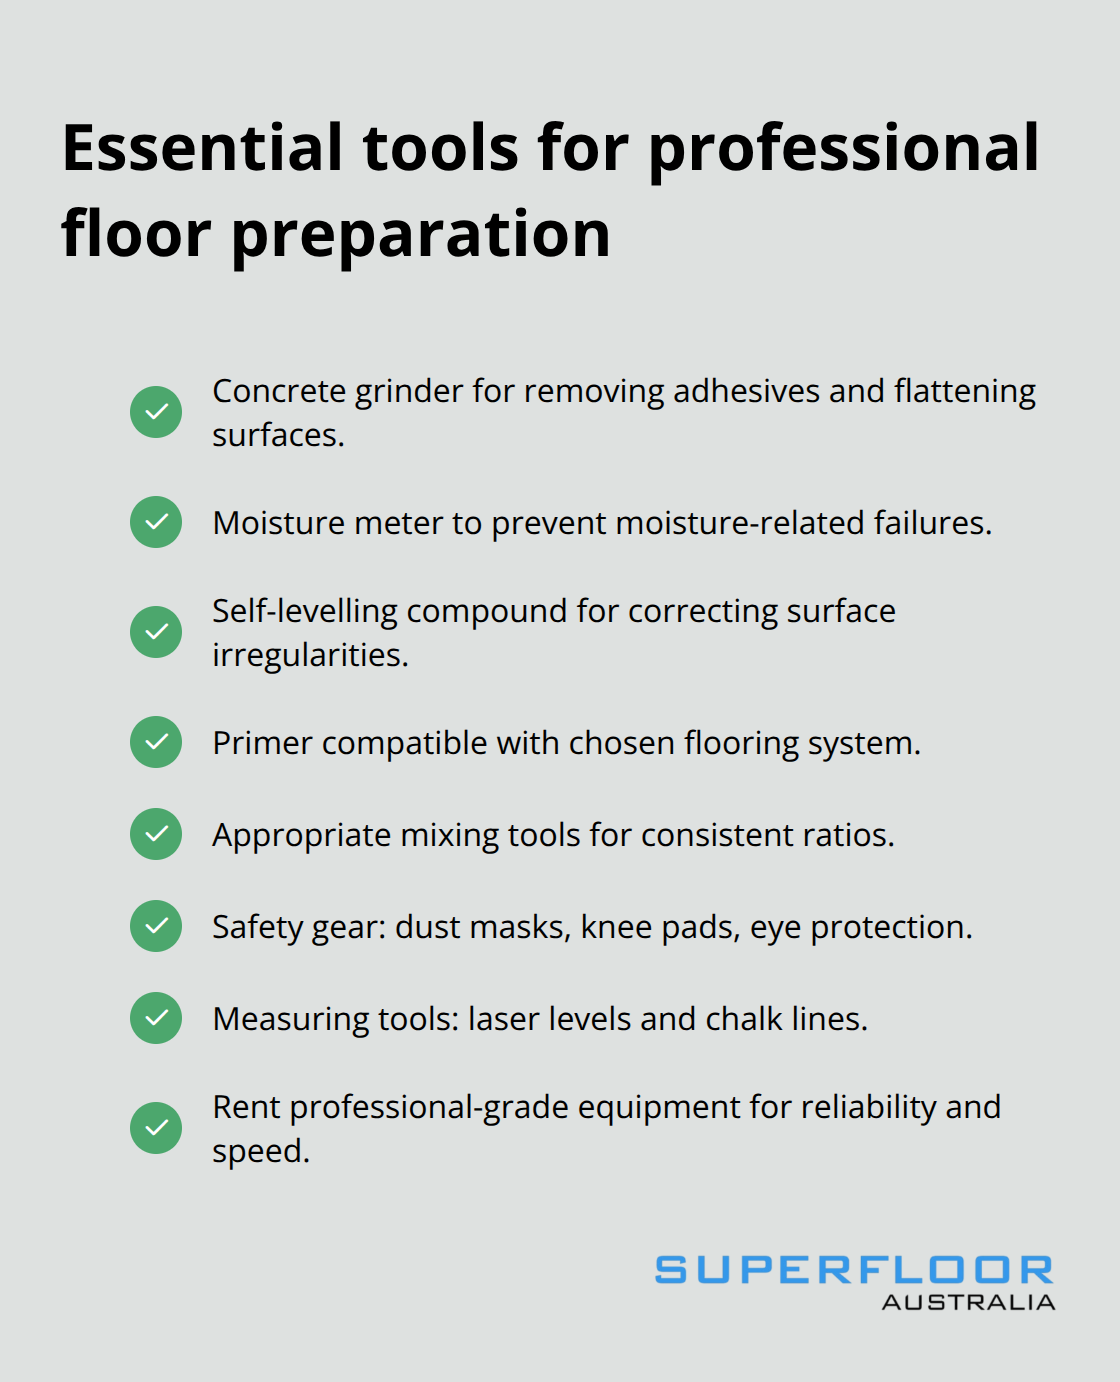
Safety equipment (dust masks, knee pads, and eye protection) remains non-negotiable. Quality measuring tools like laser levels and chalk lines maintain accuracy throughout the process. We recommend rental of professional equipment rather than purchase of consumer-grade alternatives that compromise results and extend project timelines significantly.
Material Compatibility Check
Different flooring types demand specific substrate conditions and preparation methods. Vinyl requires perfectly smooth surfaces, while engineered timber tolerates minor imperfections. Check manufacturer specifications for your chosen flooring material before you begin any preparation work.
Test adhesion on small areas using the same products you plan for full installation. This prevents compatibility issues that surface only after you complete major preparation work.
How Do You Remove Old Materials and Level Surfaces
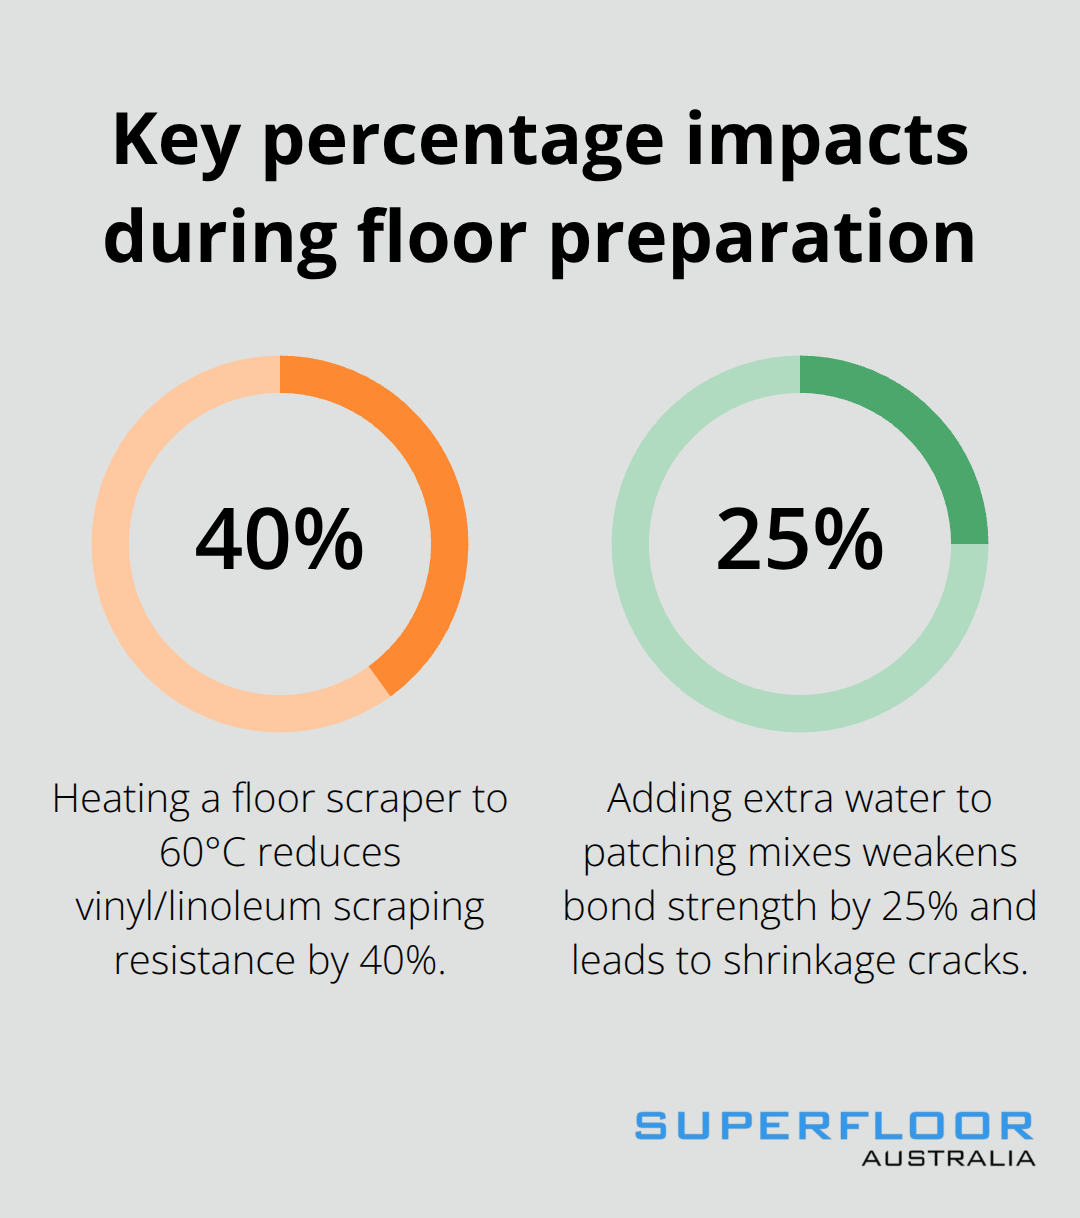
Old flooring removal requires a systematic approach that starts with the hardest materials first. Strip vinyl and linoleum with a floor scraper heated to 60°C, which softens adhesive bonds and reduces scraping resistance by 40% according to flooring contractor data. Concrete grinding removes stubborn adhesive residues that chemical strippers leave behind, creating the clean surface bond that prevents future delamination. Projects fail when contractors skip this grinding step to save time, only to face adhesion failures within six months.
Crack Repair Techniques
Hairline cracks under 1mm width need flexible sealant injection, while structural cracks that exceed 3mm require concrete patching compound. Mix patching materials to manufacturer specifications exactly – extra water weakens bond strength by 25% and causes shrinkage cracks. Apply the sealant with steady pressure to fill the entire crack depth, then smooth the surface with a putty knife.
Temperature control during application prevents rapid drying that creates surface tension cracks. Work in sections to maintain consistent application conditions throughout the repair process.
Surface Levelling Methods
Self-levelling compounds require proper surface preparation to ensure clean, dry, and debris-free conditions for optimal adhesion. Pour the compound in a continuous motion to avoid lap marks and use a gauge rake to spread it evenly. Professional floor grinders achieve precise surface preparation, while consumer equipment typically produces variations that telegraph through finished flooring.
Mix compounds according to manufacturer ratios (typically 5:1 water to powder ratio) and work within the 15-minute pot life to prevent lumping.
Diamond Grinding Process
Diamond grinding removes surface laitance and opens concrete pores for optimal primer penetration. Start with 40-grit diamonds for heavy removal, then progress to 80-grit for smooth finishes. Vacuum dust immediately after each pass to prevent contamination of subsequent surface treatments.
Moisture testing after grinding often reveals higher readings than initial tests, as grinding exposes internal moisture that requires 24-48 hour drying time. Apply primer within 2 hours of final grinding to prevent dust accumulation that reduces bond strength.
The prepared surface now needs thorough inspection and environmental conditioning before installation begins.
Is Your Floor Ready for Installation
Final surface inspection requires precision tests that prevent installation failures. Use a 2-metre straight edge to verify levelness within 3mm tolerance across the entire substrate. Concrete moisture readings must stay below 4% with a penetrating moisture meter, not surface readings that miss internal moisture problems. Test ambient air temperature between 60-80°F and maintain relative humidity for optimal adhesion conditions. Surface hardness tests with a coin scratch reveal weak concrete that requires additional primer application.
Environmental Control and Installation Timing
Installation timing affects bond strength more than most contractors realise. Schedule work during stable weather periods when temperature and humidity stay consistent for 48 hours before and after installation. Heat systems should run continuously during winter installations to prevent condensation under materials.
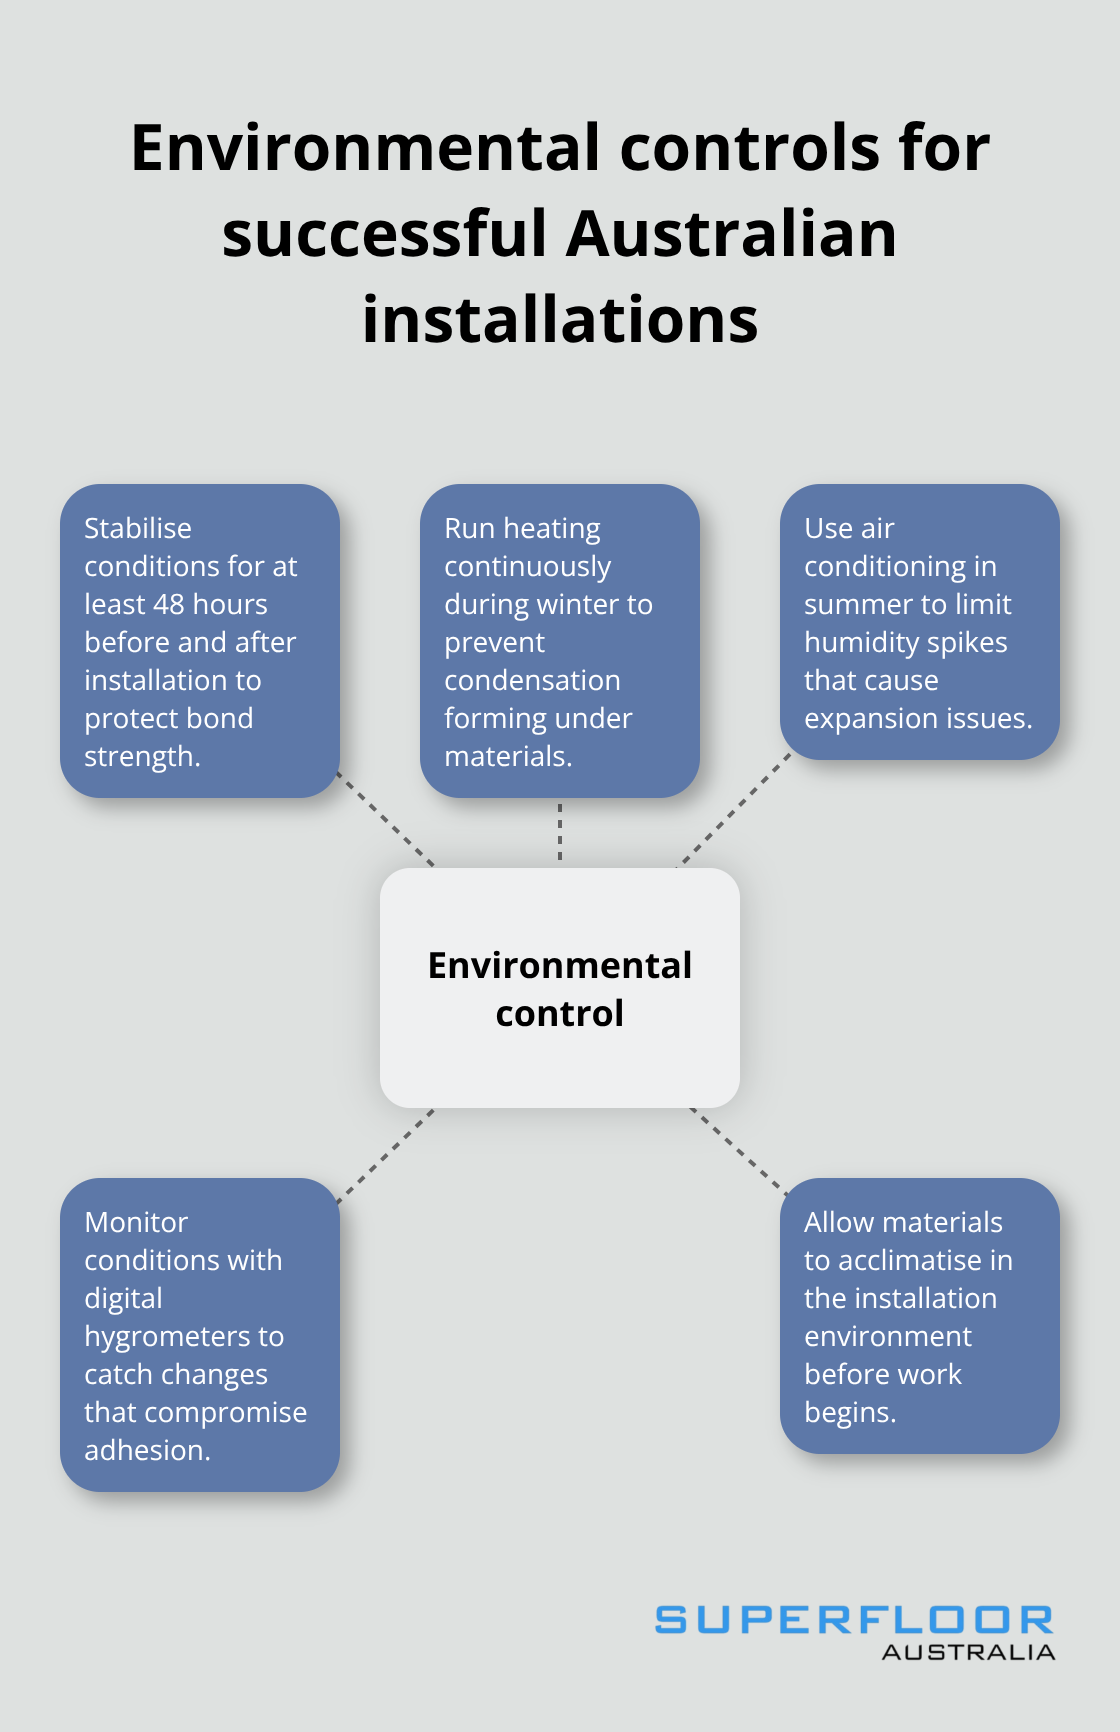
Summer installations require air conditioning to control humidity spikes that cause expansion problems.
Digital hygrometers alert you to environmental changes that compromise installation quality. Allow materials to acclimatise properly in the installation environment before you begin work.
Site Preparation Standards
Clear the workspace of furniture and obstacles to create unobstructed pathways for material movement and tool access. Protect adjacent surfaces with plastic sheeting and tape all seams to prevent dust migration. Position dust extraction equipment at work locations and maintain negative air pressure to control airborne particles.
Electrical power sources must supply adequate amperage for professional grinders and equipment without circuit overloads. Mark utility locations and establish emergency shut-off procedures for all power tools.
Safety Equipment Requirements
Personal protective equipment prevents injury during extended floor preparation work. N95 respirators filter concrete dust particles that damage respiratory systems over time. Safety glasses protect eyes from debris during surface preparation (especially important during diamond work). Knee protection reduces joint stress during extended floor-level tasks.
First aid supplies should remain accessible throughout the workspace. Emergency contact information must be posted clearly for all team members to reference during accidents or equipment failures.
Final Thoughts
Floor preparation determines installation success more than any other factor. Moisture tests below 4%, structural integrity checks, and proper surface levelling prevent 90% of flooring failures. Projects that skip these steps face costly repairs within months.
Professional preparation delivers consistent results through specialised equipment and experience. Diamond grinding, precise moisture control, and environmental conditioning require expertise that DIY approaches often lack (especially for complex concrete substrates). The time investment in proper preparation pays dividends through extended flooring lifespan and reduced maintenance costs.
Temperature control, dust management, and safety protocols separate successful projects from problematic installations. Professional contractors understand material compatibility requirements and timing considerations that amateur installers frequently overlook. We at Superfloor Australia provide expert floor preparation services that address every requirement from moisture testing to surface conditioning.