
Most flooring projects fail before they even start. The concrete beneath your feet determines whether your polished floor lasts decades or fails within years.
At superfloor australia, we’ve seen countless Brisbane projects derailed by rushed or incomplete preparation. Precision concrete prep isn’t optional-it’s the difference between a floor that performs and one that cracks, peels, and costs you thousands in repairs.
What Happens When Concrete Prep Goes Wrong
Moisture vapour destroys polished concrete floors faster than almost any other factor. Skipping moisture testing on a concrete slab guarantees failure within months-we’ve watched polished concrete installations in Brisbane develop blistering, peeling, and adhesion failure because moisture vapour moved up through the slab after installation. Calcium chloride testing or relative humidity probes reveal whether your concrete is ready, but many projects ignore this step entirely. If moisture levels exceed 3 pounds per 1,000 square feet per 24 hours, your floor will fail. That’s not opinion-that’s physics. High moisture traps water vapour beneath the coating, creating pressure that eventually separates the finish from the concrete.
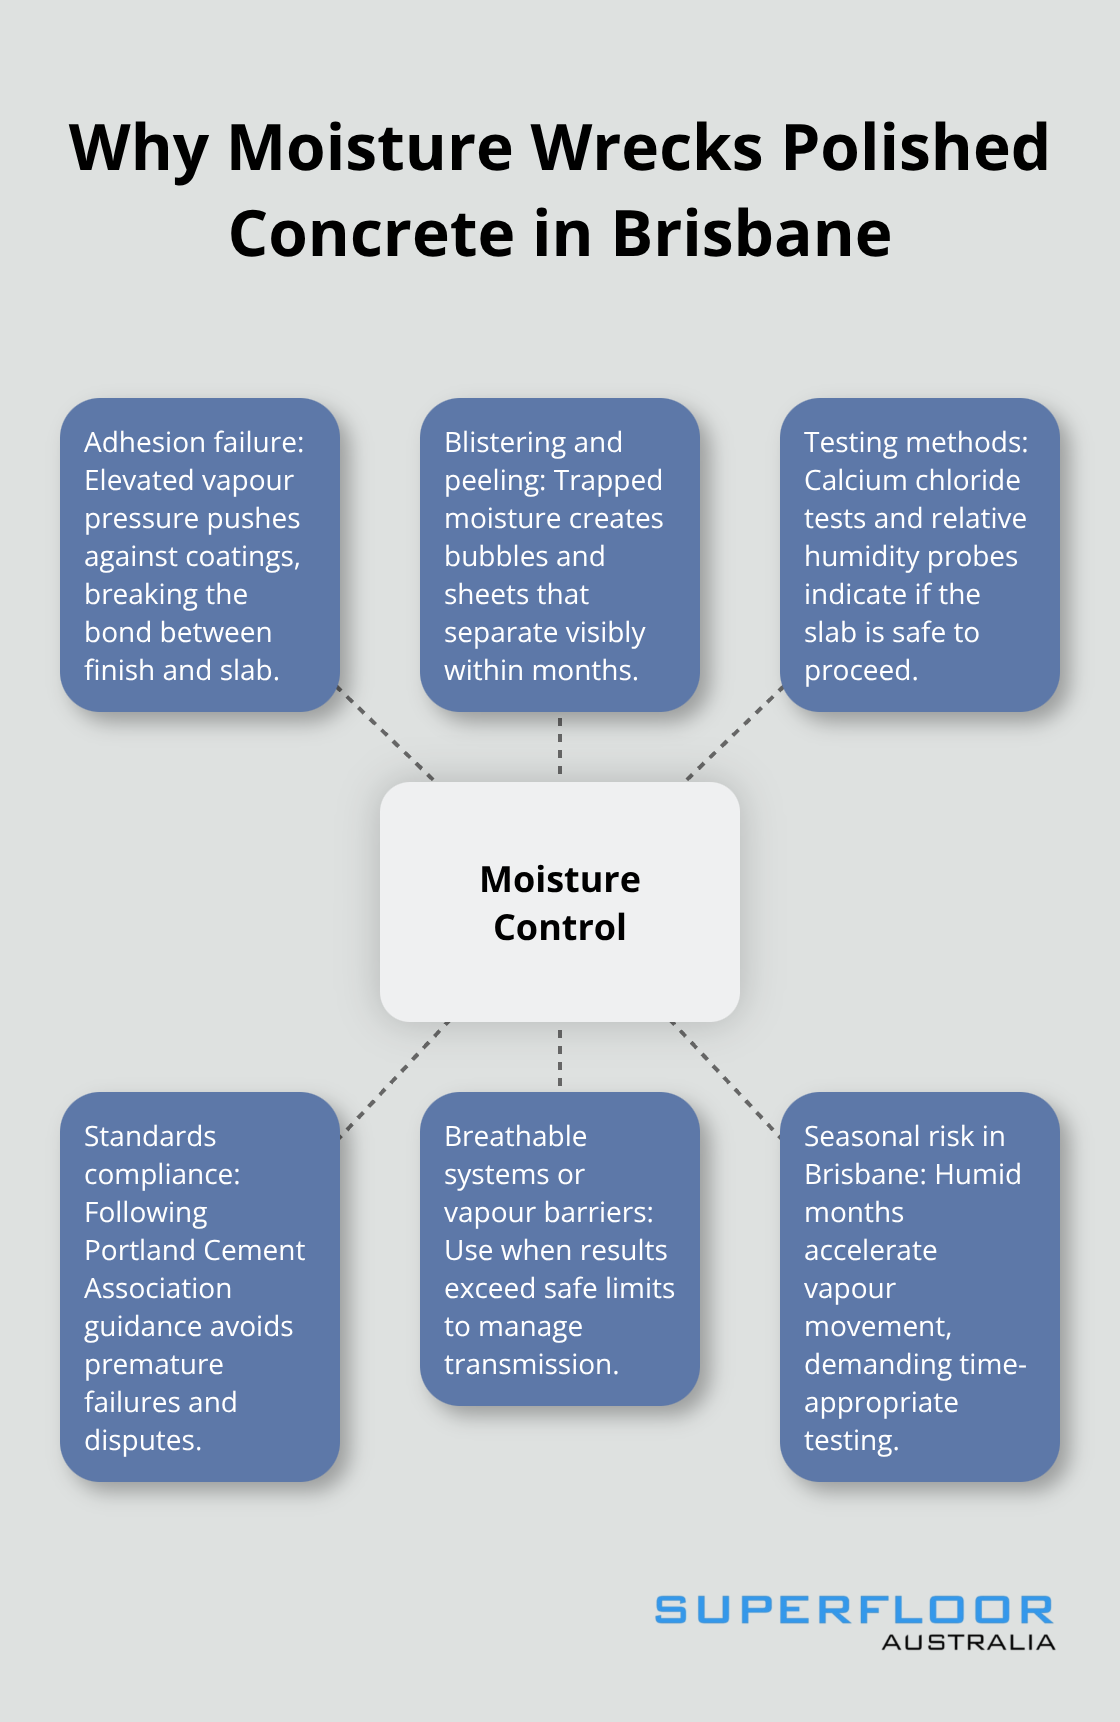
The Portland Cement Association standards exist for a reason: they prevent these expensive problems.
High Spots and Valleys Destroy the Final Result
Inadequate grinding that leaves high spots and valleys ruins the polished finish. A straightedge or laser scan across your concrete will expose deviations that hand-checking misses entirely. If your slab varies more than 3 millimetres over 3 metres, the polished finish telegraphs every imperfection back to the surface. Equipment wear accelerates in industrial settings when forklifts navigate uneven floors, and in commercial spaces, your retail customers notice the visual inconsistency immediately. Diamond grinding removes these high spots and creates a uniform substrate that accepts polish evenly. Laser screeds and ride-on power trowels during the initial concrete placement prevent these problems from starting, but existing slabs require skilled operators and proper assessment to map topology accurately before any grinding work begins.
Old Sealers and Coatings Block Adhesion
Failing to remove sealers and coatings before prep work guarantees adhesion failure. Epoxy, polyurethane, paint, and old concrete sealers create a barrier that prevents new polishing compounds and bonding agents from reaching the concrete itself. Mechanical removal using diamond grinding or specialised equipment strips these layers away, but this step gets overlooked when budgets tighten. Surface preparation is foundational-there’s no shortcut. The concrete must be clean, bare, and ready to accept new finishes. Residues like thin-set mortar, tile adhesive, and old paint require the same aggressive removal approach. State-of-the-art equipment reduces the need for harsh chemicals during this process, protecting worker health while delivering the clean substrate your flooring demands.
The assessment phase reveals exactly what your concrete needs before any polishing work can begin.
How to Assess and Prepare Your Concrete Before Polishing
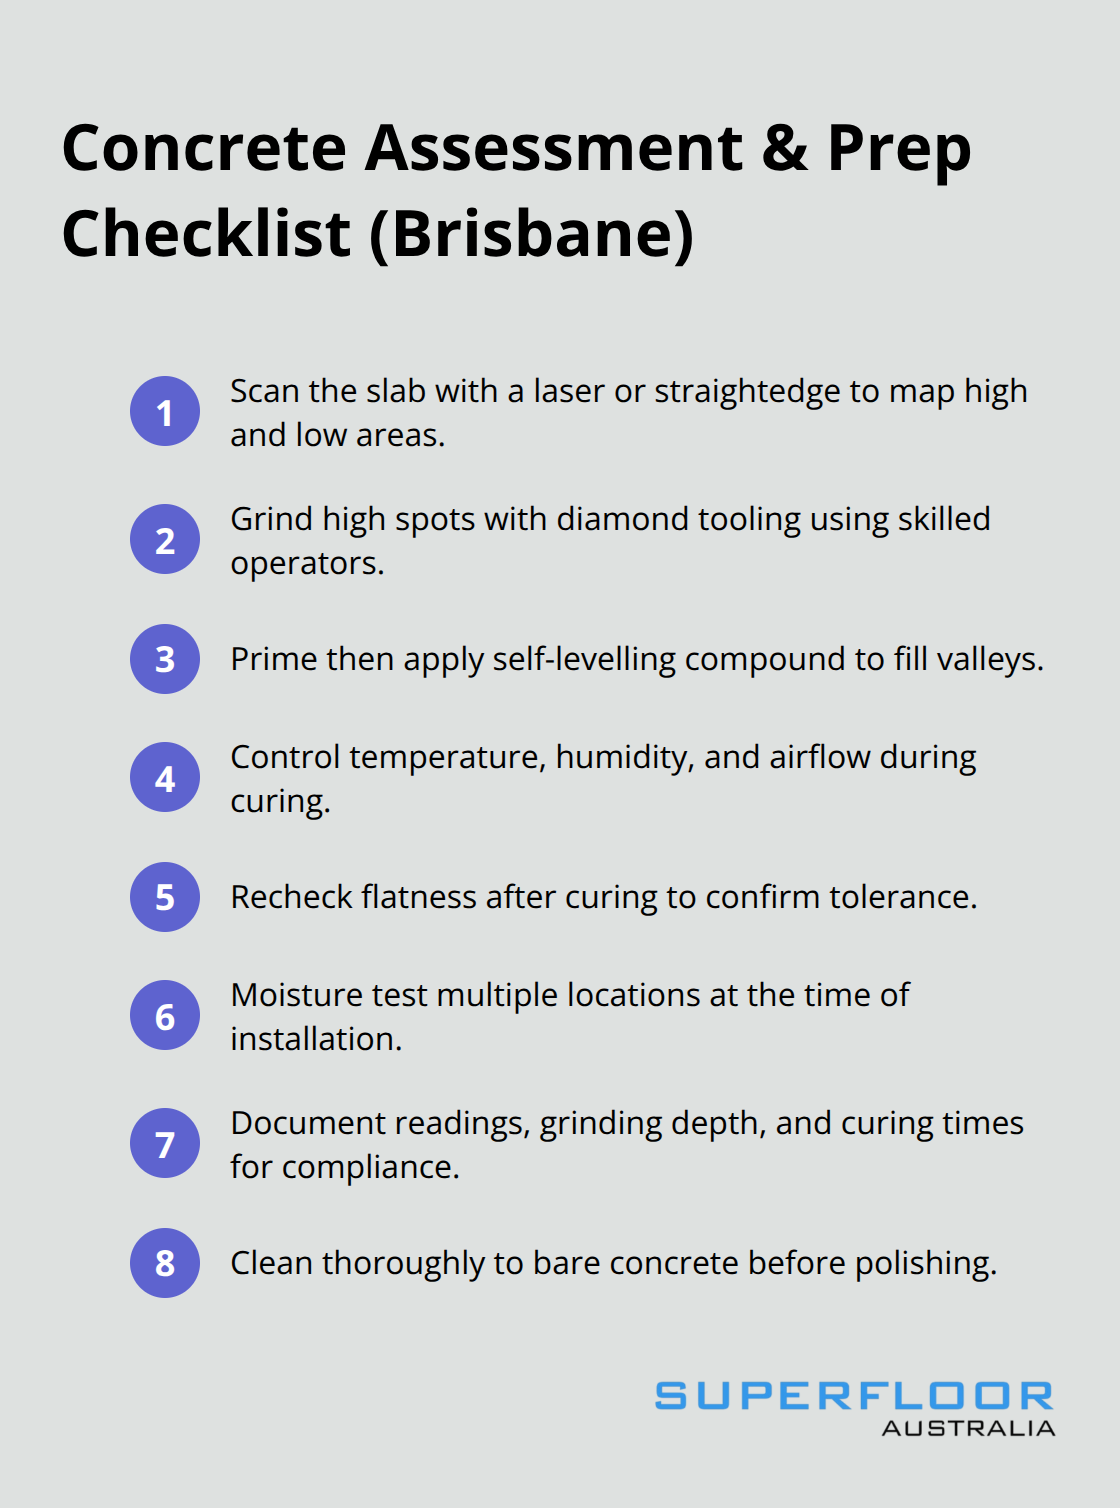
Start with a laser scan or straightedge check across your entire slab to map exactly where your concrete sits. A laser reveals deviations to millimetre precision, showing you every high spot and valley that will telegraph through your final polished surface. The Portland Cement Association recommends a maximum deviation of 1/4 inch in 10 feet for precision flooring applications, which translates to roughly 3 millimetres over 3 metres. If your slab exceeds this tolerance, you must perform grinding. Many Brisbane contractors skip the scanning step and rely on eye assessment, which misses critical imperfections that only appear under controlled measurement. Hire someone with laser equipment to map your concrete topology before any other work begins. This assessment costs a few hundred dollars but prevents thousands in rework later.
Mapping Your Concrete Topology
Once you have the scan data, you know exactly how much material needs removal and where levelling compounds should go. High spots demand diamond grinding with skilled operators who understand how deep to cut without compromising the concrete’s integrity. Valleys and low spots require self-levelling compounds applied over a primed substrate. The primer ensures the compound bonds properly rather than sitting on top like a failed patch.
Diamond Grinding Removes Imperfections
Diamond grinding removes sealers, paint, adhesive residues in a single aggressive pass. Modern diamond grinders produce minimal vibration and dust compared to older jackhammer methods, protecting both the concrete structure and worker health. Ride-on power trowels and laser screeds during initial placement prevent these problems entirely, but existing slabs need skilled operators who adjust their technique based on the concrete’s age, strength, and composition. For slabs with severe damage or multiple layers of old coatings, you may need multiple grinding passes. Self-levelling compounds fill the valleys you’ve identified through scanning, but they only work on a clean, primed surface. Apply a bonding primer first, then pour the compound to the height needed to match your high points. These compounds cure fully within 24 to 48 hours depending on thickness and environmental conditions.
Environmental Control During Curing
Temperature and humidity matter significantly during curing. In Brisbane’s humid climate, you may need evaporation retarders in hot conditions or temporary barriers to control air movement. Once levelling compounds cure, recheck the entire floor with your straightedge or laser to confirm you’ve achieved flatness within tolerance.
Moisture Testing Reveals Installation Readiness
Moisture testing concrete reveals whether your concrete is ready for polishing. Moisture levels must stay below 3 pounds per 1,000 square feet per 24 hours for polished finishes to bond properly. If your slab exceeds this threshold, you must install a vapour barrier or use a breathable system designed for high-moisture environments. Brisbane’s subtropical climate means moisture can climb rapidly through concrete during humid months, so test at the time of year when you plan to install your flooring. Test multiple locations across the slab, not just one spot. A single test result won’t tell you whether moisture is uniform or concentrated in problem areas. Document all moisture readings, grinding depth, levelling compound thickness, and curing times. This documentation protects your warranty and proves compliance with Australian standards. Clean the concrete thoroughly after all grinding and levelling work finishes. Remove all dust, debris, and primer residue with industrial vacuum equipment followed by a damp wipe. A clean substrate accepts polishing compounds and sealers uniformly, preventing streaking or adhesion failure. With your concrete properly assessed, levelled, and moisture-tested, you’re ready to move forward with the polishing process that transforms your prepared slab into a durable, high-gloss surface.
Three Mistakes That Wreck Your Concrete Foundation
Moisture Testing Gets Skipped and Costs You Everything
Moisture testing gets skipped more often than you’d think, and it’s the fastest way to guarantee failure. You can spend thousands on perfect grinding and levelling, but if moisture vapour escapes through the slab after polishing, the finish separates from the substrate within months. Calcium chloride testing or relative humidity probes measure whether your concrete releases moisture at safe levels-below 3 pounds per 1,000 square feet per 24 hours according to the Portland Cement Association. Brisbane’s subtropical climate makes this worse because humidity climbs rapidly through concrete during wet months, so test at the exact time of year you plan to install your flooring, not six months earlier when conditions differ completely.
Test multiple locations across the slab, not just one corner. A single reading won’t tell you whether moisture concentrates in problem areas or spreads uniformly. Document every result because this data proves your floor meets Australian standards and protects your warranty if adhesion issues emerge later.
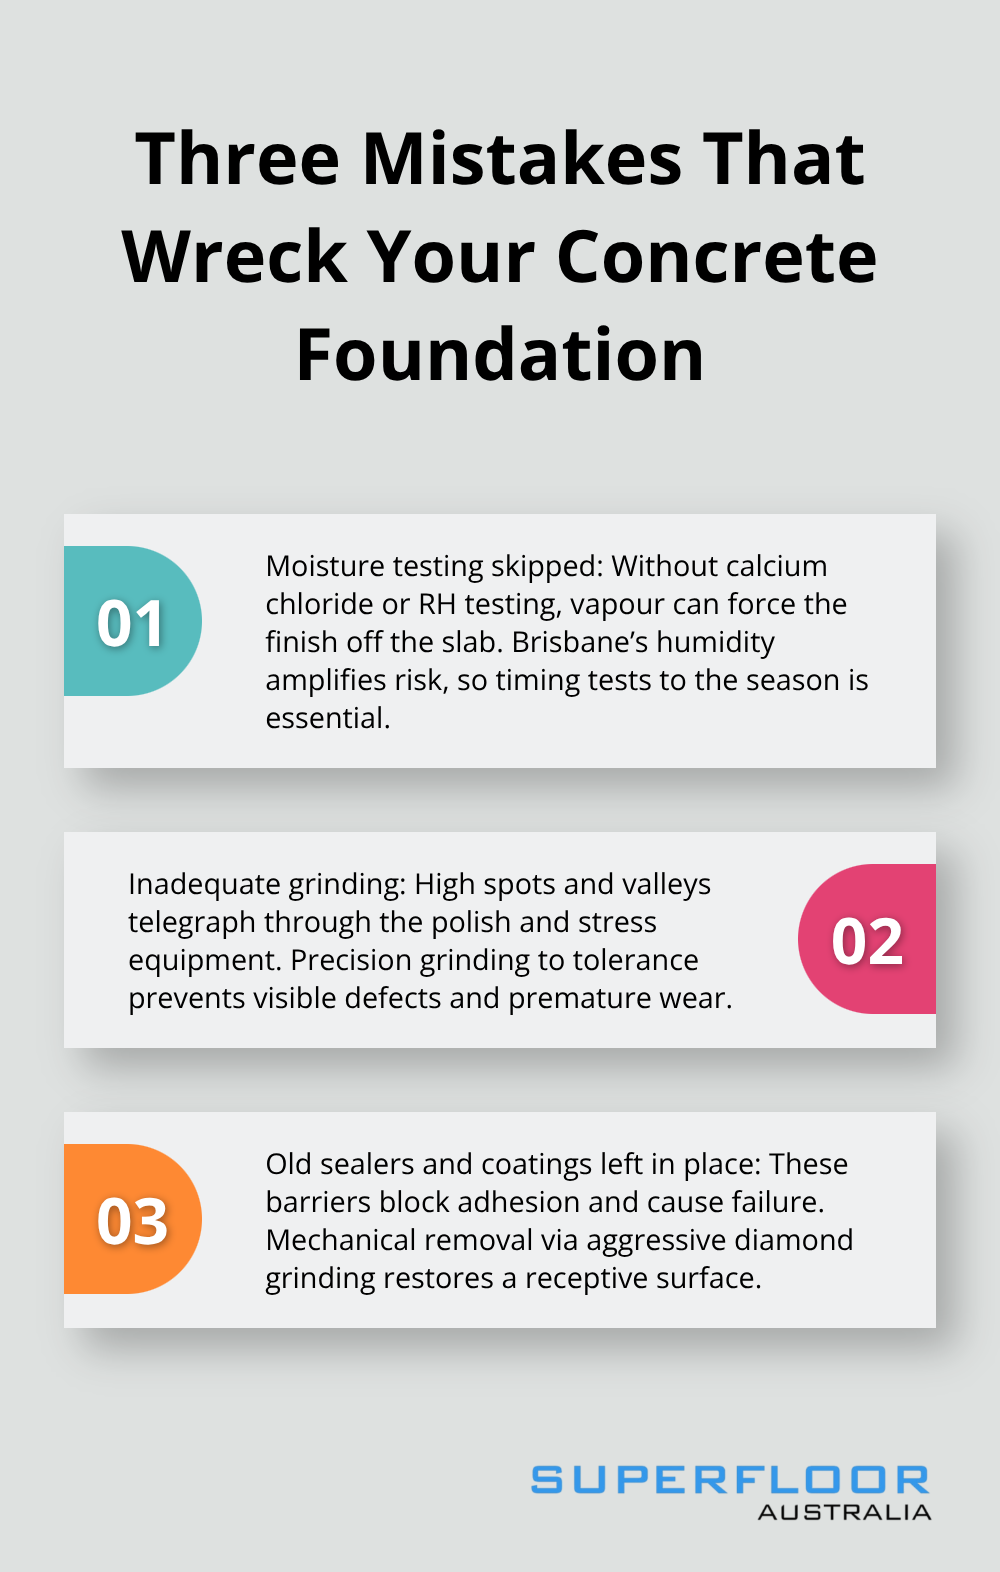
Inadequate Grinding Leaves Imperfections That Show Through Polish
Inadequate grinding leaves high spots and valleys that telegraph straight through your polished finish, and there’s no hiding them once the floor is complete. A straightedge or laser scan reveals deviations that visual inspection misses entirely-your eyes cannot detect millimetre-level imperfections that compound across a large floor. The standards recommend maximum deviation of 1/4 inch in 10 feet for precision flooring, roughly 3 millimetres over 3 metres. Slabs exceeding this tolerance need diamond grinding with skilled operators who understand concrete age, strength, and composition before adjusting cut depth.
Modern diamond grinders eliminate the vibration and dust of older jackhammer methods, protecting both the concrete and worker health. If your slab has multiple layers of old epoxy, paint, or tile adhesive, you’ll need multiple grinding passes to strip everything back to bare concrete. Each pass removes a specific layer, and operators must assess the concrete’s condition between passes to avoid over-grinding.
Old Sealers and Coatings Block Adhesion Completely
The third mistake-failing to remove sealers and coatings-blocks adhesion completely because these barriers prevent bonding agents and polishing compounds from reaching the concrete itself. Epoxy, polyurethane, and old sealers sit on top like a waterproof jacket, and no amount of primer fixes that. Mechanical removal through aggressive diamond grinding is the only method that works, stripping away every layer in a single operation.
State-of-the-art equipment reduces reliance on harsh chemicals during this process, protecting worker health while delivering the clean substrate your flooring demands. When you remove these barriers, the concrete surface becomes receptive to new finishes and accepts polish uniformly across the entire slab.
Final Thoughts
Precision concrete prep Brisbane determines whether your polished floor performs for decades or fails within months. Every step we’ve covered-laser scanning, diamond grinding, moisture testing, and adhesion preparation-directly impacts the durability and appearance of your finished surface. Skipping any of these steps costs thousands in repairs, warranty disputes, and premature replacement.
A few hundred dollars spent on laser scanning and thorough moisture testing saves tens of thousands in failed installations and structural damage. Your concrete foundation determines everything that comes after, so treating it as an afterthought guarantees disappointment. The three mistakes we highlighted aren’t theoretical problems; they’re the exact failures we see repeatedly across Brisbane projects when contractors rush or cut corners.
We at superfloor australia understand that precision preparation separates successful flooring projects from costly disasters. Contact superfloor australia for a professional assessment of your Brisbane concrete, and we’ll deliver the precision preparation your floor demands.