
Most flooring installations fail before they even start. Poor floor prep before install is the silent killer of otherwise quality projects, leading to peeling, cracking, and premature failure within months.
At superfloor australia, we’ve seen firsthand how skipping or rushing preparation costs thousands in repairs. The difference between a floor that lasts decades and one that fails in years comes down to what happens before the first plank or tile goes down.
Why Floor Prep Actually Determines Success
The reality is stark: epoxy floors fail not because the coating is poor, but because the concrete wasn’t ready. Achieving a Concrete Surface Profile of 2–3 is non-negotiable for proper adhesion. Without it, coatings peel within months. Contractors who skip profiling watch their work bubble and flake off within a year. The cost to strip and redo that floor runs into thousands. A planetary grinder with metal-bond diamonds and HEPA extraction takes time upfront, but it delivers the mechanical adhesion that lasts.
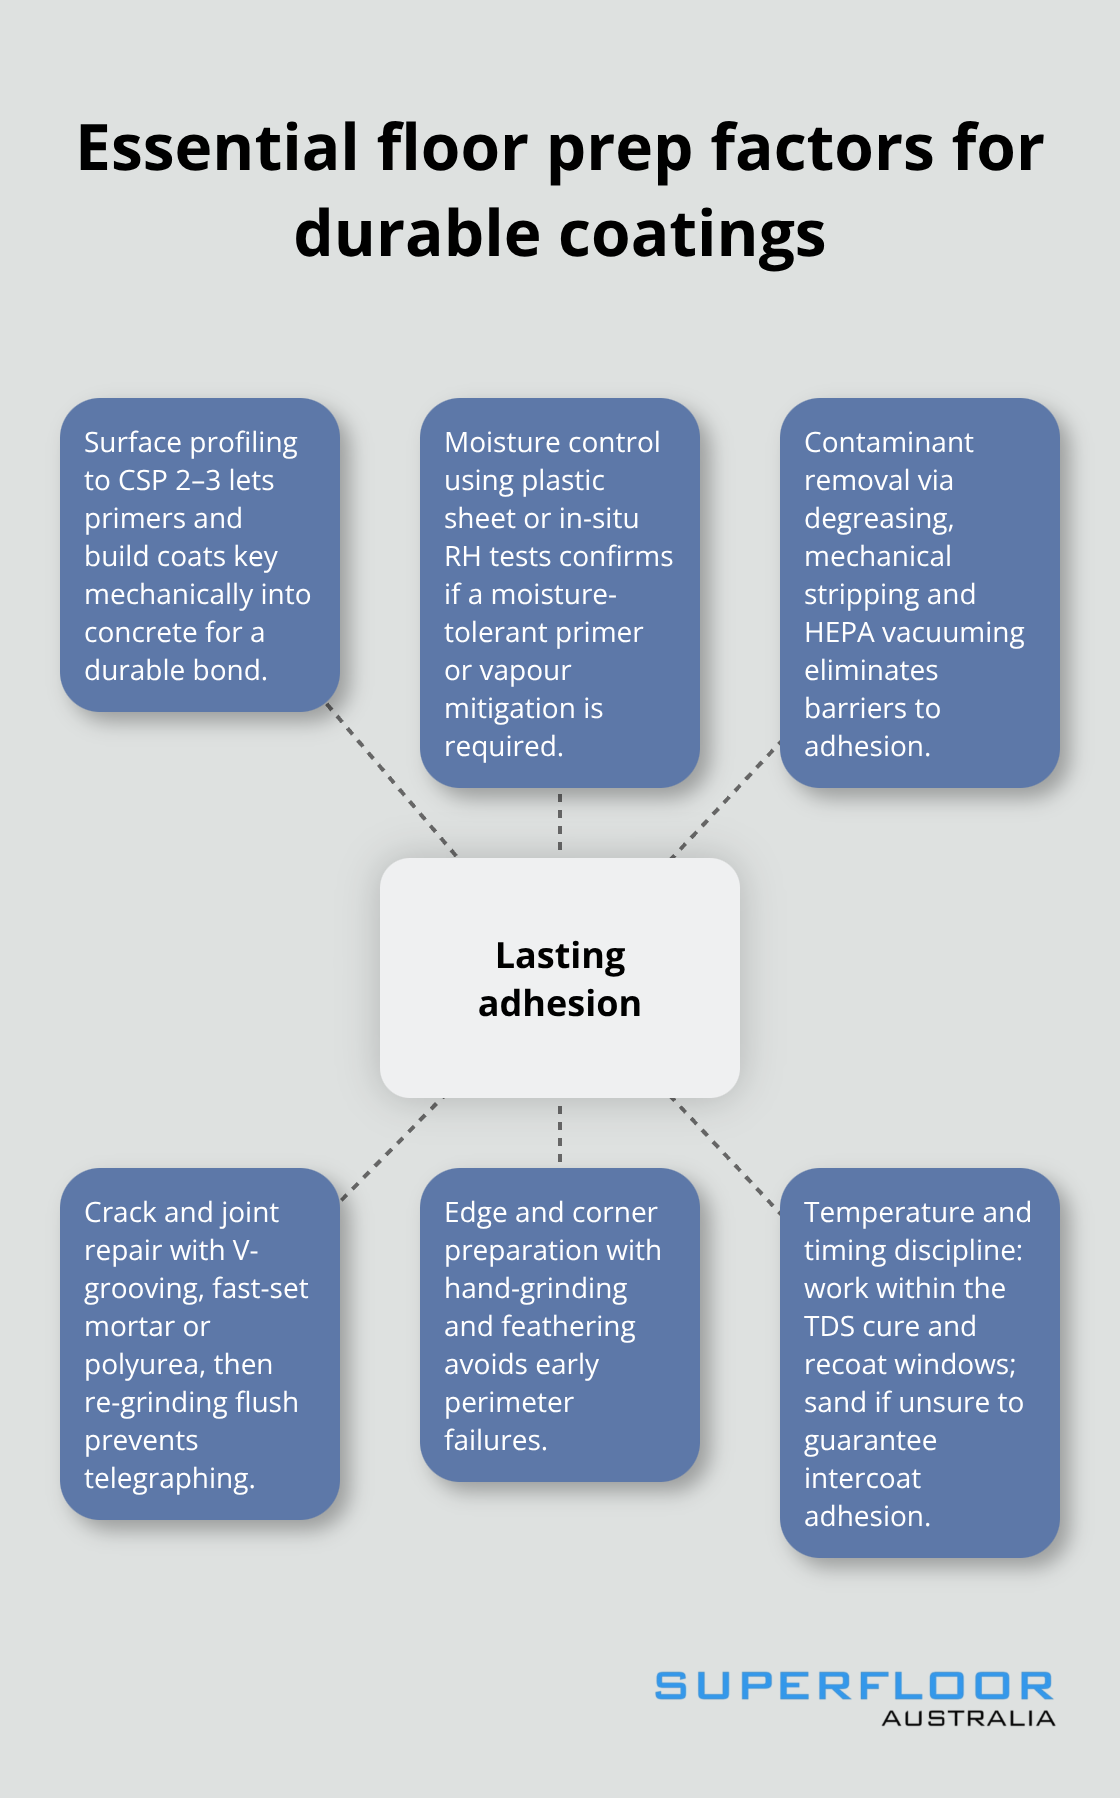
Moisture testing matters equally. High moisture content causes delamination faster than almost anything else. A plastic sheet test or in-situ relative humidity test measures actual conditions. If moisture exceeds manufacturer limits, apply a moisture-tolerant epoxy primer or a dedicated moisture-vapour transmission mitigation system. Skip this step and you’re gambling with your installation.
Contaminants Block Adhesion Completely
Grease, old adhesive, paint residue, and dust sit between your substrate and new coating like a barrier. They prevent bonding entirely. Degrease the slab thoroughly, mechanically remove old adhesives and paints, then vacuum with HEPA extraction until dust-free. Water washing alone won’t work; aggressive cleaning often traps moisture that causes problems later. Cracks and control joints require proper repair before coating. Epoxies and polyaspartics aren’t structural fillers, so V-groove cracks, vacuum them, fill with fast-set mortar or polyurea joint filler, then re-grind flush. Telegraphing cracks ruins aesthetics and signals structural failure underneath. Edges, corners, and transitions need hand-grinding and feathering. These areas fail first because installers often neglect them during prep.
Temperature and Timing Control Cure Success
Humid climates shift cure times dramatically. Cold concrete slabs below 10°C slow epoxy cure rates significantly. Avoid unapproved accelerators; instead, schedule work during warmer periods or modify your primer selection. Follow the manufacturer’s technical data sheet exactly. Missing the recoat window between primer and build coat causes solvent entrapment and poor adhesion. If unsure about timing, lightly sand the surface to guarantee the next coat bonds properly. Older concrete can be porous or uneven, requiring deeper grinding to achieve reliable bonding. Document moisture results, profile grind to CSP, repair all cracks and joints, remove every contaminant, prime within the recoat window, then apply build and top coats. This checklist prevents the failures that occur repeatedly.
What Comes Next in Your Prep Journey
The foundation is now solid. Your concrete is profiled, moisture-tested, cleaned, and ready. The next phase focuses on identifying and fixing structural damage before any coating touches the surface.
Assessment and Cleaning: The First Critical Steps
Inspect for Hidden Damage Before You Start
Walk onto any site before prep work starts and you’ll see damage that installers miss until it’s too late. Structural cracks running through the slab, soft spots where moisture has weakened the concrete, loose aggregate, spalling at edges-these issues don’t disappear when you apply coating. They get worse. Start by inspecting the entire floor surface with a straightedge or spirit level, checking for high spots and dips exceeding 3 millimetres over a 3-metre span. Mark problem areas with chalk.
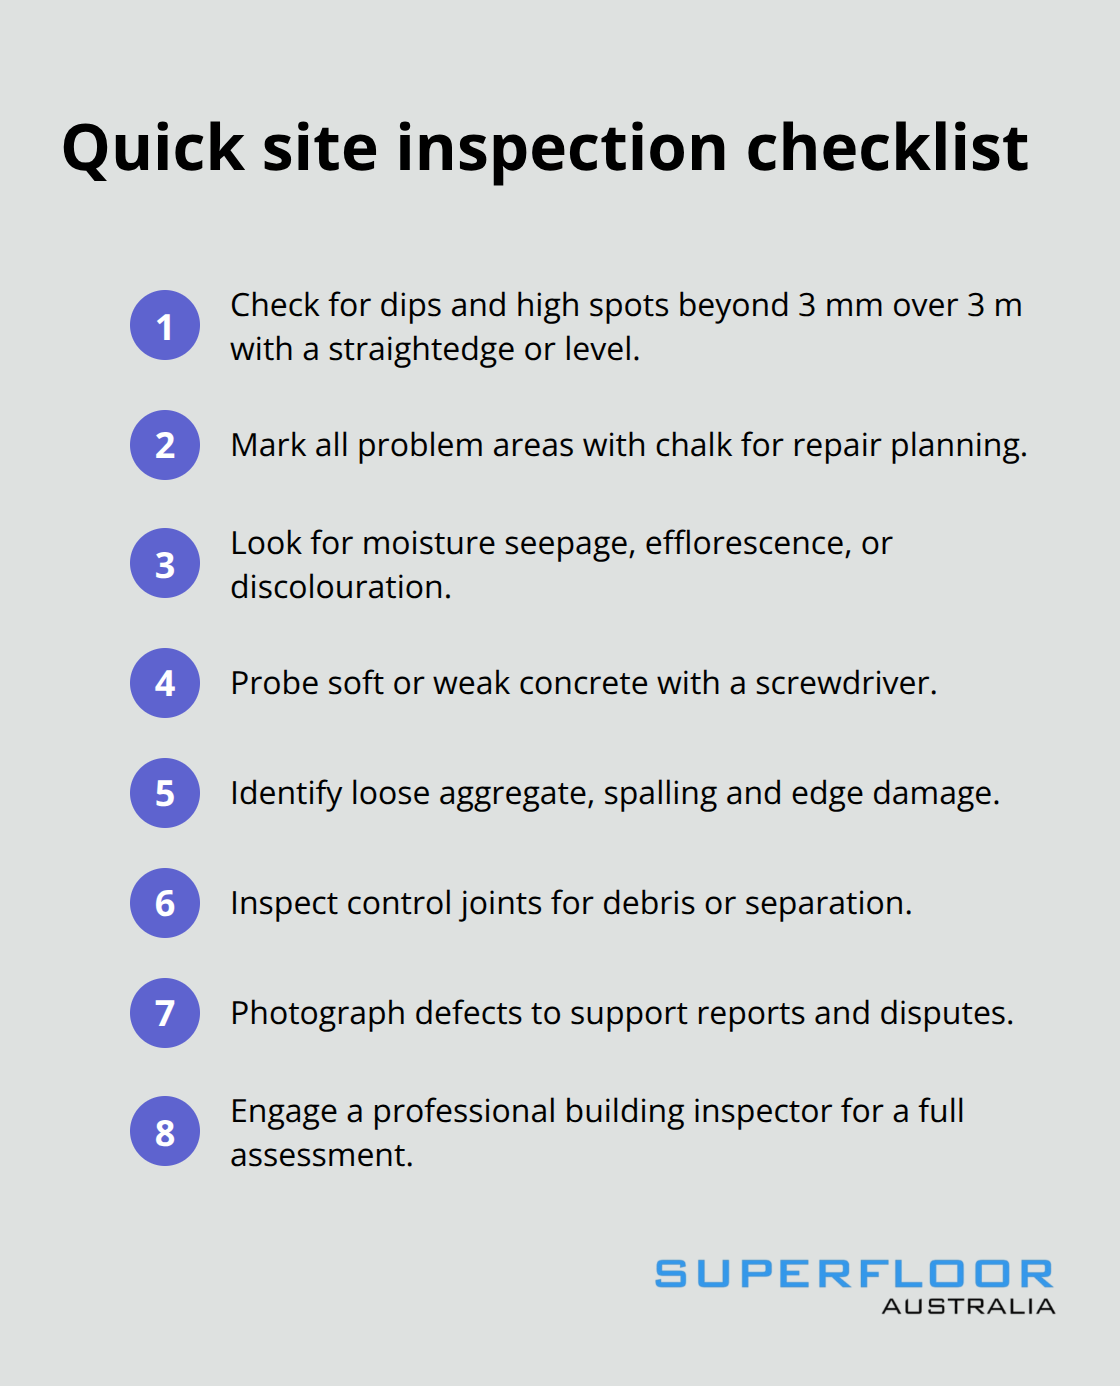
Look for active moisture seepage, efflorescence (white salt deposits), or discolouration indicating water damage. Press a screwdriver into suspicious areas; soft concrete signals deterioration that requires removal and repair before any prep work proceeds. Check control joints for debris or separation. Get an inspection completed by a professional building inspector to identify minor and major structural defects-photograph everything to protect you if disputes arise later.
Remove Contaminants That Block Adhesion
Grease stains, old adhesive residue, paint drips, and dust contamination prevent bonding completely. These aren’t cosmetic issues; they’re adhesion killers. Degrease the slab with a concrete cleaner, then mechanically remove stubborn adhesive and paint using a floor scraper or grinding equipment. Avoid water washing as the primary cleaning method because trapped moisture causes later problems. Vacuum the entire surface with HEPA extraction until no visible dust remains. Run your hand across the floor-if it feels gritty, you haven’t finished cleaning.
Test Moisture Levels to Prevent Failure
Moisture content determines whether your installation survives or fails. Use a concrete moisture meter to measure both surface and in-depth readings, comparing results against your flooring manufacturer’s specifications. A new concrete slab can be considered ‘dry enough’ when moisture content is measured at between 3.5 and 4.5%. If readings exceed acceptable limits, apply a moisture-tolerant epoxy primer or a dedicated moisture-vapour transmission mitigation system before proceeding. High humidity on the ground floor or in coastal areas requires moisture barriers even when initial tests appear acceptable. Document all moisture readings; they become critical if problems develop later and warranty disputes occur. Once you’ve identified damage, removed contaminants, and confirmed moisture levels, you’re ready to move into the grinding and levelling phase-where you transform an uneven, damaged surface into the flat, stable base your flooring demands.
Levelling and Grinding: Transform Uneven Concrete Into a Stable Base
Your concrete now has damage identified, contaminants removed, and moisture measured. The next phase demands precision: you must grind away high spots, fill voids, and achieve the surface profile that determines whether your flooring bonds permanently or fails within months.
Select the Right Equipment for Consistent Results
A planetary grinder with metal-bond diamonds and HEPA extraction delivers the uniformity that smaller handheld grinders cannot match. Handheld grinders miss consistency across large areas, leaving surfaces that cause adhesion problems. Set your grinder to remove material progressively through multiple passes rather than attempting aggressive single-pass removal, which creates heat damage and uneven results. High spots exceeding the 3-millimetre tolerance over a 3-metre span must disappear completely. Use a straightedge across the floor constantly during work to verify you reach consistent depth. Dust control during this phase is not optional-HEPA extraction captures particles that would otherwise settle back onto the surface and block adhesion. Edge grinders reach walls and corners where floor grinders cannot, preventing the adhesion failures that occur first at perimeters.
Repair Cracks and Voids Before Final Grinding
Cracks and control joints require V-grooving before filling. Cut a V-shaped channel along the crack, vacuum completely to remove all dust and debris, then fill with fast-set mortar or polyurea joint filler. Once the filler cures, re-grind the joint flush with surrounding concrete. Skipping the re-grind leaves raised lines that telegraph through coatings and signal underlying structural movement to anyone inspecting the finished floor. Voids and spalling at edges demand the same treatment: grind away damaged concrete, clean thoroughly, fill with appropriate repair mortar, cure fully, then grind smooth. This prevents edge failures that compromise the entire installation’s appearance and durability.
Achieve the Correct Surface Profile for Permanent Adhesion
Surface profile determines adhesion strength more than any other factor. Concrete Surface Profile 2–3 creates mechanical bonding that holds coatings permanently. CSP 1 leaves the surface too smooth; coatings sit on top like paint and peel away. CSP 4 or higher creates excessive porosity that consumes excess coating material and produces weak, chalky surfaces. Achieving the correct profile requires understanding your substrate. New concrete needs lighter work than old, weathered slabs that have oxidised and weakened. Porous concrete requires deeper profiling than dense concrete.
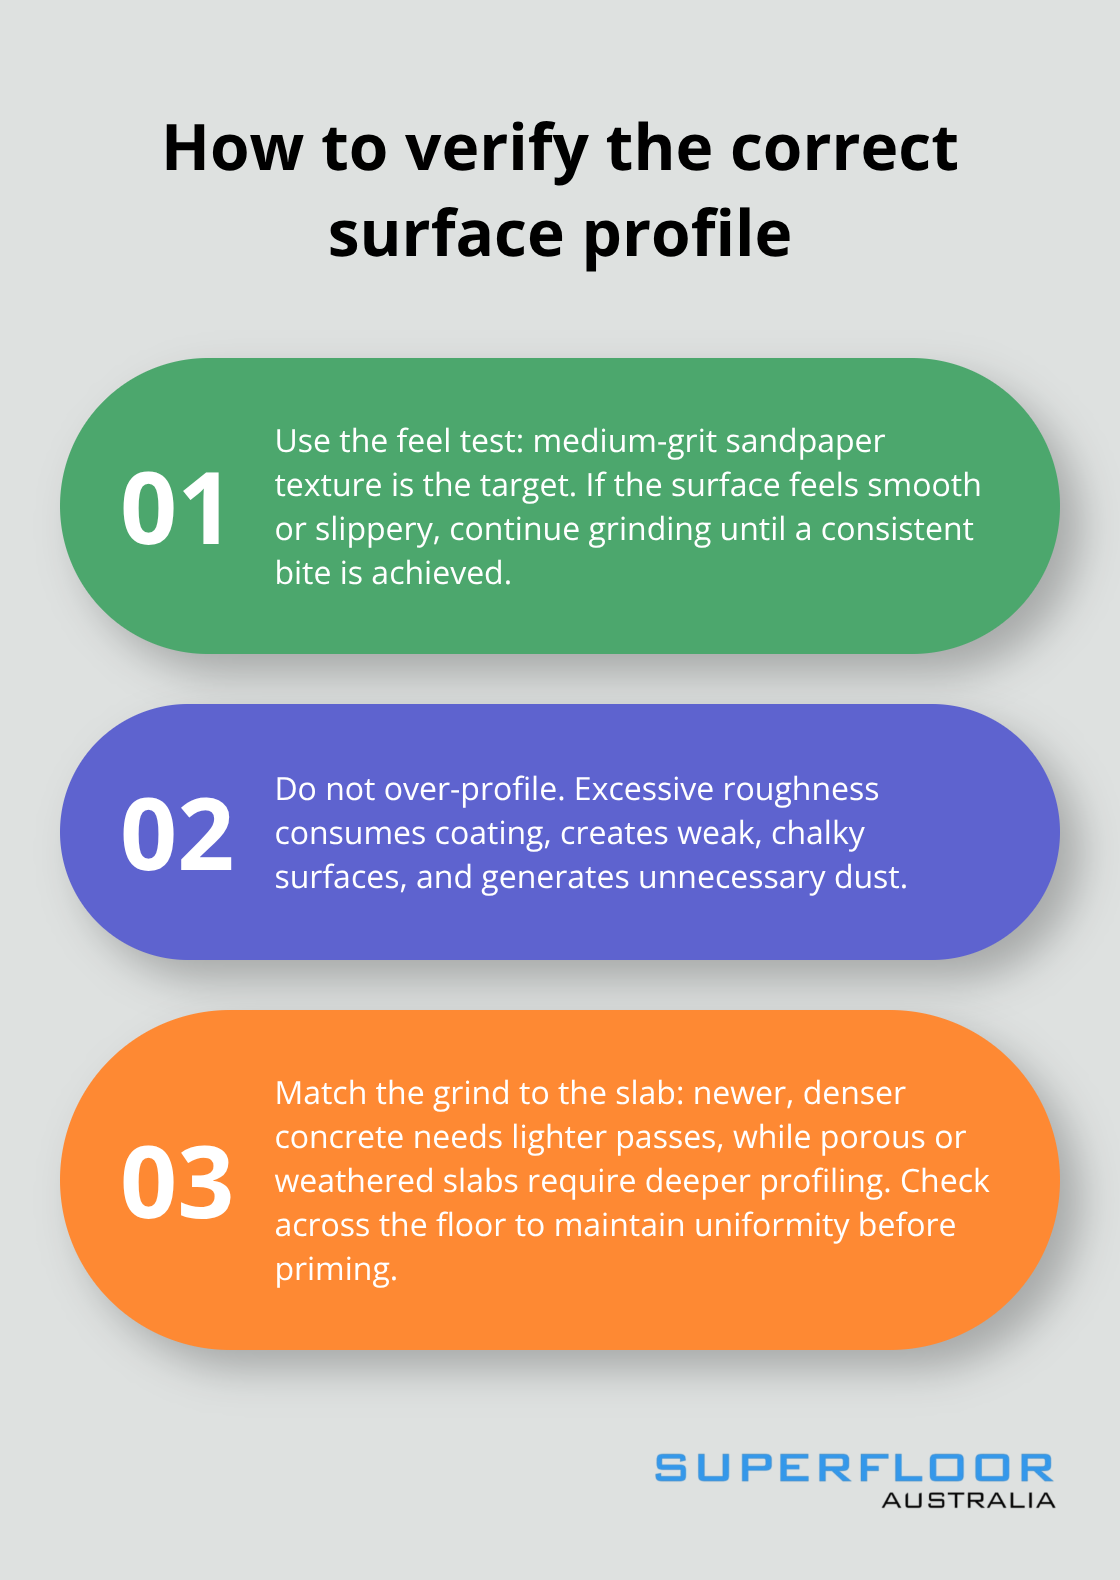
After work completes, the surface should feel like medium-grit sandpaper-rough enough to grip but not so aggressive it creates dust clouds. Run your hand across the floor; if it feels smooth or slippery, grind more. If it feels like grinding compound or creates excessive dust, you have gone too deep.
Complete Final Cleanup and Moisture Control
Final cleanup involves vacuuming with HEPA extraction multiple times until no visible dust remains, then wiping with a damp cloth to catch airborne particles. Allow the concrete to dry completely before applying primer-moisture trapped during coating application causes bubbling and delamination. This preparation phase separates contractors who produce floors lasting decades from those watching their work fail within years.
Final Thoughts
Floor prep before install separates installations that last decades from those that fail within months. The work you invest upfront-grinding to the correct surface profile, testing moisture, removing contaminants, repairing cracks-directly determines whether your flooring performs or deteriorates. Contractors who rush preparation watch their work peel, bubble, and crack, while those who commit to proper prep deliver floors that remain flawless for years.
Redoing a failed floor costs thousands in labour, materials, and downtime. Proper preparation costs far less than the repair bill that follows poor work. A professional assessment catches structural damage, moisture problems, and surface issues before they become expensive failures, and early detection prevents disasters that drain your budget and timeline.
We at superfloor australia understand that precision preparation determines the quality of every installation. Contact superfloor australia to discuss your project and discover how proper floor prep before install delivers superior results that protect your investment for years to come.