
A poorly prepared commercial floor costs money. It fails faster, requires expensive repairs, and creates safety risks for your team.
At superfloor australia, we’ve seen countless businesses lose thousands because they skipped proper preparation steps. The good news is that commercial floor preparation tips are straightforward to implement, and the payoff is substantial.
Why Floor Preparation Directly Impacts Your Bottom Line
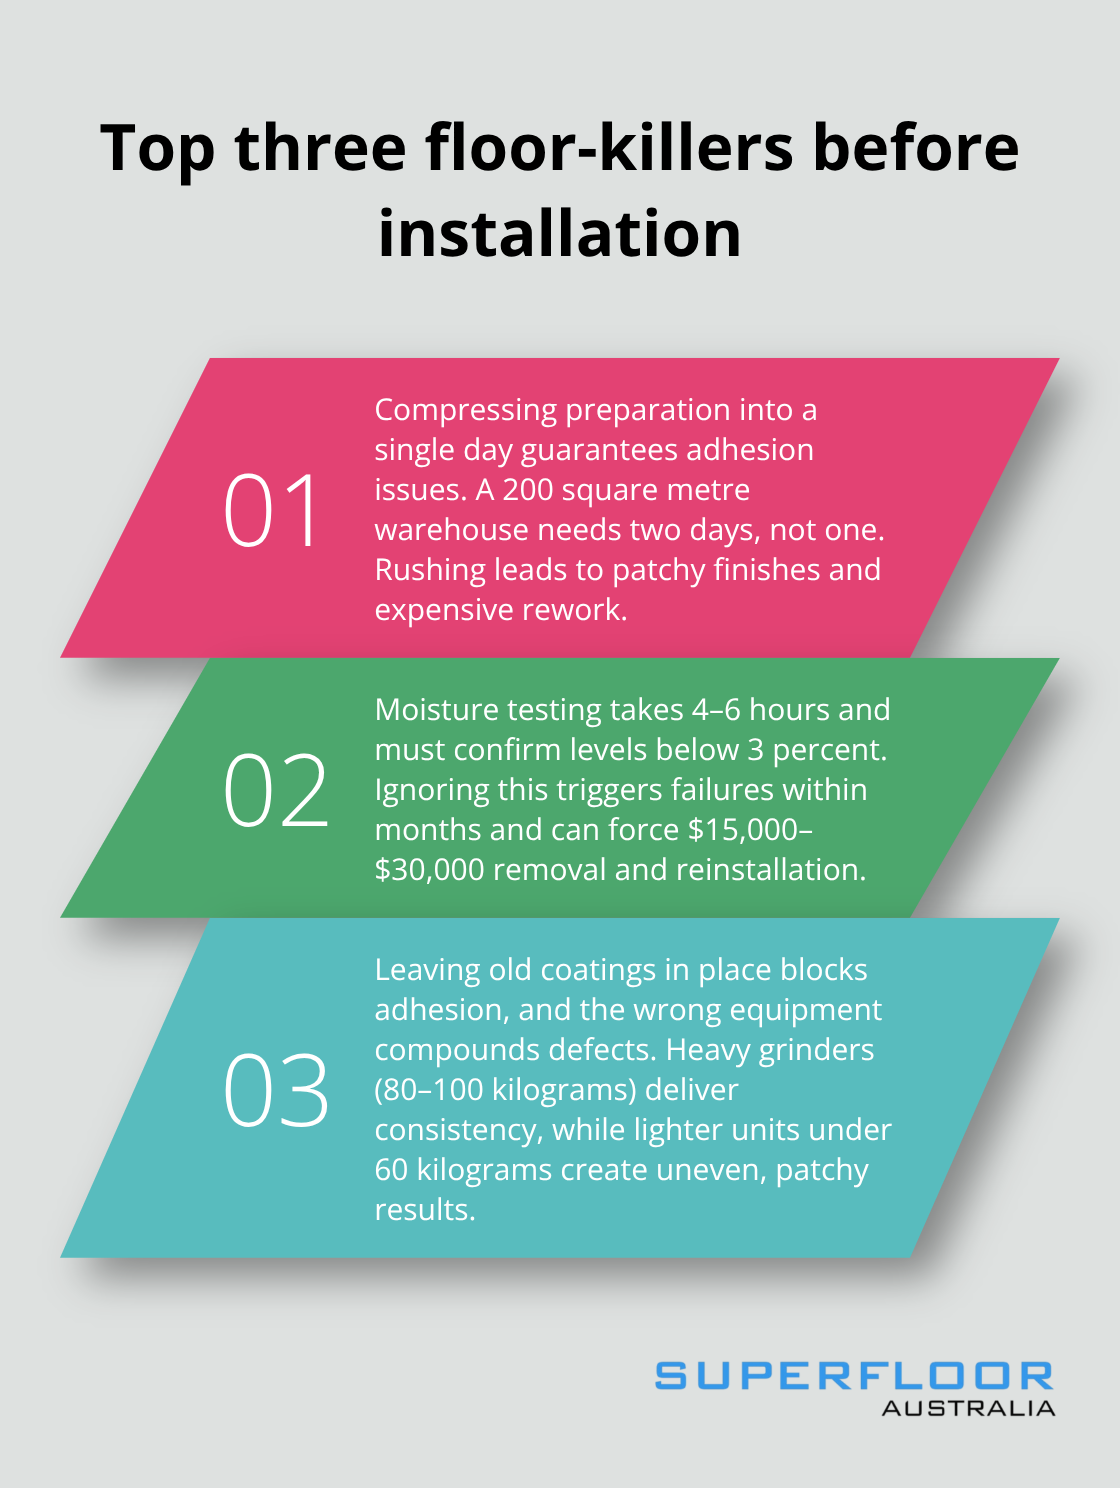
Moisture causes floor failure in commercial spaces, and it strikes without warning. A concrete slab with moisture content above 3% triggers adhesive failure, buckling, and lifting within months of installation. Businesses in humid climates like South Florida have learned this lesson through tens of thousands of dollars in emergency repairs that proper moisture testing would have prevented. Calcium chloride kits and relative humidity probes cost under $500 and take hours to run, yet most commercial property owners skip this step entirely. Adhesion failure alone requires complete removal and reinstallation, adding 3 to 5 days of downtime to a 200 square metre project and costing between $15,000 and $30,000 in labour and materials. Proper preparation eliminates this risk entirely.
Concrete Condition Sets Everything Else in Motion
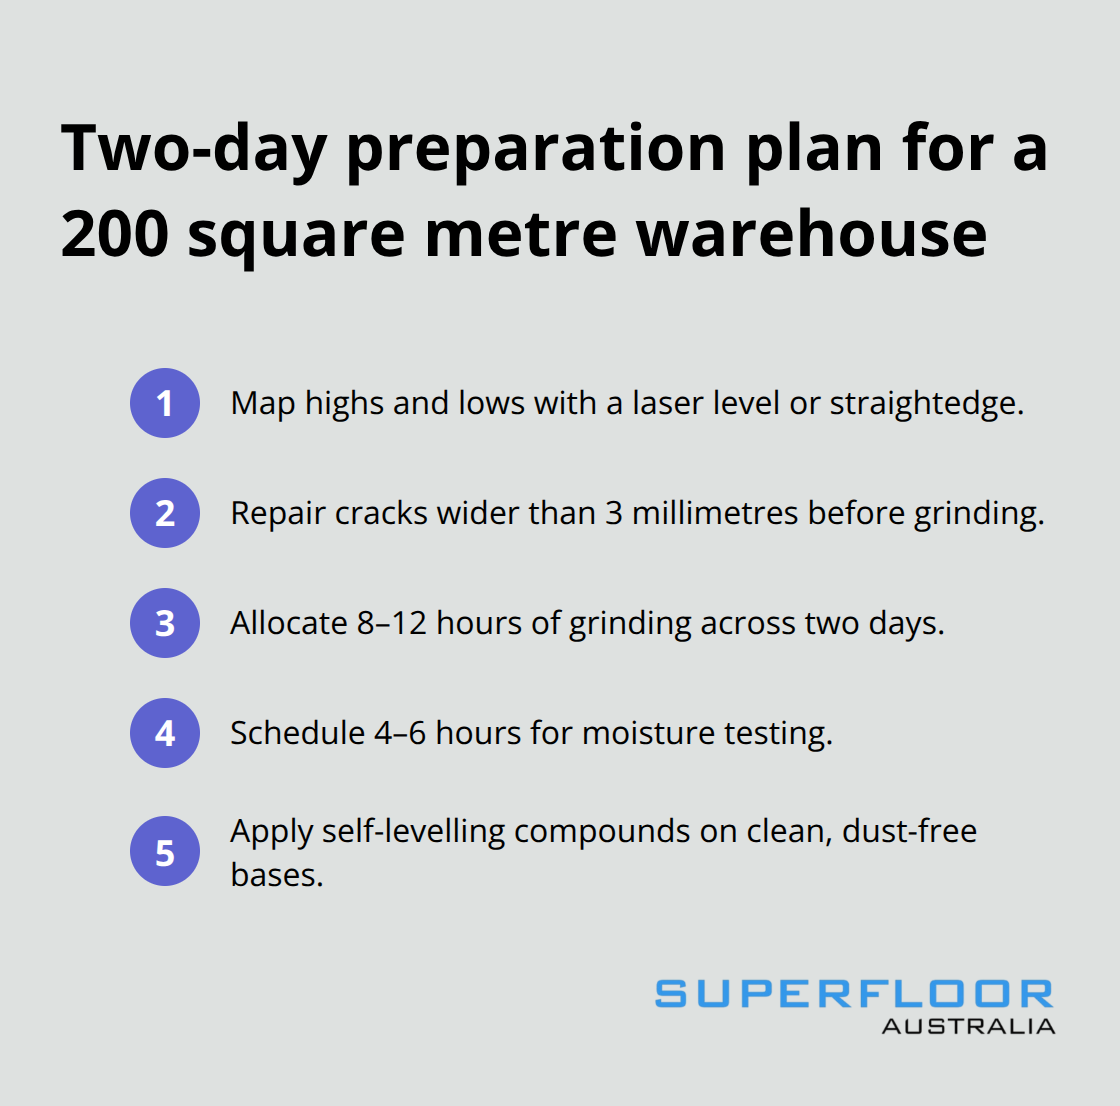
A thorough surface inspection identifies cracks wider than 3 millimetres, spalling, delamination, and old coatings that must be removed before any new flooring goes down. Your new floor bonds to contaminated concrete when you skip this step, not to solid substrate. Old epoxy or paint coatings require stripping with a coarse 16 to 30 grit resin-bonded diamond to expose fresh concrete, and this demands dust extraction systems rated M-Class or H-Class per AS/NZS 60335.2.69 to protect workers and maintain adhesion quality. Heavy grinding equipment (typically 80 to 100 kilograms) applies even pressure without operator strain and produces superior results compared to lighter machines. A typical 200 square metre warehouse requires 8 to 12 hours across two days to prepare properly; rushing this into a single day creates patchy finishes and coating adhesion failures that compound costs later.
Dust Control and Safety Compliance Are Non-Negotiable
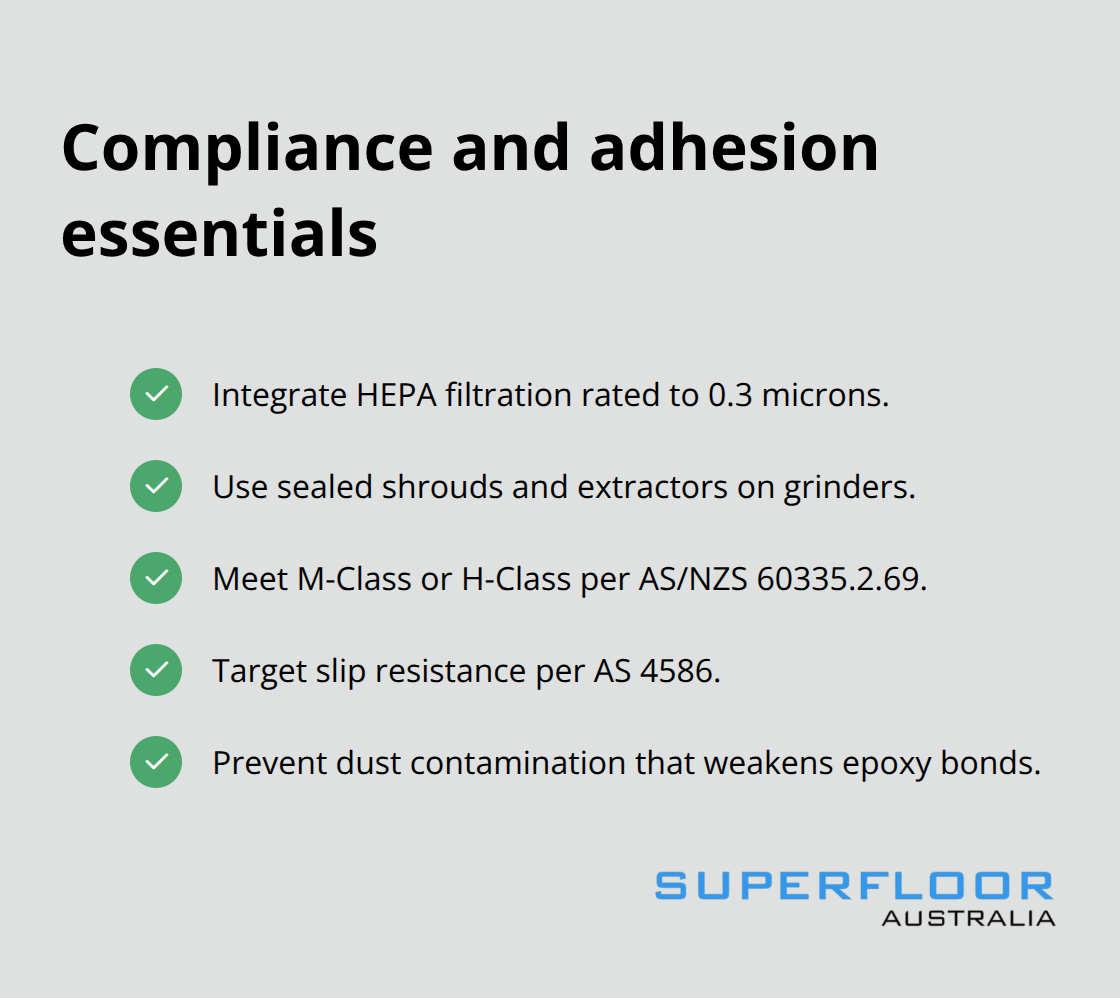
Inadequate dust control during preparation violates the Managing Respirable Crystalline Silica Code of Practice 2022 and exposes your team to serious health risks. HEPA filtration systems rated to 0.3 microns must integrate into grinding equipment, with sealed shrouds and extractors installed before work begins. Dust contamination also sabotages epoxy adhesion directly, trapping particles between the coating and substrate that weaken the bond. Australian Standard AS 4586 sets the benchmark for slip resistance in commercial flooring, and proper preparation ensures your selected system meets these safety requirements.
Businesses that invest in correct preparation avoid costly rework, reduce accident liability, and extend floor life to 12 to 24 months longer than inadequately prepared installations.
Self-Levelling Compounds Fix Uneven Substrates
Self-levelling compounds address uneven substrates and create consistently flat surfaces that improve adhesion and long-term performance. These compounds only work effectively when applied to a properly cleaned and dust-free base. The investment in levelling compounds prevents the adhesion failures and coating breakdowns that plague rushed projects. Your floor’s foundation determines everything that follows, which is why the next section covers the specific techniques that transform a damaged concrete slab into a surface ready for professional flooring installation.
Transforming Damaged Concrete Into Installation-Ready Surfaces
Start with a laser level or straightedge to map high and low areas across your floor, marking problem spots for targeted repairs. This step takes 30 to 45 minutes on a 200 square metre space and prevents surprises during grinding. Cracks wider than 3 millimetres require filling with concrete patching compound and smoothing flush with an 80-grit diamond to prevent gouging during the grinding process.
Spalling and delamination demand epoxy mortars or specialised fillers that restore surface integrity before any coating work begins.
Strip Old Coatings to Expose Fresh Concrete
Old paint or epoxy coatings must be completely removed with a coarse 16 to 30 grit resin-bonded diamond, exposing fresh concrete underneath so your new flooring bonds to solid substrate, not contaminated residue. Skip this removal step and adhesion failure becomes inevitable within months. Heavy grinding equipment weighing 80 to 100 kilograms applies consistent pressure without operator strain, delivering uniform results across the entire floor. Lighter machines under 60 kilograms force operators to push harder, creating uneven surfaces and patchy finishes that compromise coating performance. Planetary grinders reduce swirl marks on large commercial projects, making them worth the rental cost for floors exceeding 300 square metres.
Plan Your Timeline Around Proper Execution
A typical 200 square metre warehouse requires 8 to 12 hours across two days when using proper equipment; attempting single-day completion guarantees adhesion failures and rework costs that dwarf the time savings. Rushing this phase creates patchy finishes that persist through subsequent work stages and compound costs later.
Dust Extraction Determines Both Safety and Adhesion Quality
HEPA filtration systems rated to 0.3 microns must integrate into your grinding setup before work begins, with sealed shrouds and extractors protecting both your team and the floor surface. Dust extraction systems must meet M-Class or H-Class standards per AS/NZS 60335.2.69 to comply with the Managing Respirable Crystalline Silica Code of Practice 2022. Inadequate dust control violates workplace safety regulations and directly sabotages epoxy adhesion (trapping particles between the coating and substrate weakens the bond and creates failure points). Moisture testing follows surface preparation and must use calcium chloride kits or relative humidity probes to verify moisture content remains below 3 percent.
Address Moisture and Substrate Flatness
If moisture exceeds 3 percent, install a vapour barrier and select moisture-resistant adhesives before proceeding. High moisture content in humid climates requires dehumidification systems during installation to stabilise the substrate before, during, and after coating application. Self-levelling compounds address uneven substrates and create consistently flat surfaces that dramatically improve adhesion and long-term performance, but only when applied to properly cleaned and dust-free bases. These compounds cost $1,000 to $3,000 for a 200 square metre area yet prevent the adhesion failures and coating breakdowns that plague rushed or inadequately prepared projects (making them a cost-effective investment compared to complete floor removal and reinstallation). Once your concrete surface reaches installation-ready condition, the specific grinding and polishing sequence determines your final finish quality and long-term durability.
What Kills Commercial Floors Before They’re Even Installed
Rushing floor preparation destroys a six-figure flooring investment faster than any other mistake. Commercial property owners compress 8 to 12 hours of essential work into a single day, only to face adhesion failures within weeks. A 200 square metre warehouse requires two days minimum for proper preparation; attempting single-day completion guarantees patchy finishes that persist through coating application and compound repair costs exponentially. The pressure to minimise downtime is real, but skipping steps costs far more than the extra day of preparation time.
Moisture Testing Cannot Be Rushed
Moisture testing alone requires 4 to 6 hours for calcium chloride kits or relative humidity probes to deliver accurate readings. Rushing this phase creates false confidence that leads to coating failure within months. Ignoring moisture content above 3 percent is the most expensive mistake in commercial spaces. High moisture triggers adhesive failure and buckling within months, forcing complete floor removal and reinstallation at $15,000 to $30,000 for a 200 square metre project. Businesses in humid climates must install vapour barriers and dehumidification systems before coating application, yet many skip this entirely because the problem isn’t immediately visible.
Old Coatings Create Invisible Contamination
Old paint or epoxy coatings left on concrete surfaces prevent proper adhesion, regardless of how well the new flooring is applied. Stripping these old coatings with coarse 16 to 30 grit diamonds exposes fresh concrete, but this step demands proper dust extraction rated M-Class or H-Class per AS/NZS 60335.2.69. Heavy grinders weighing 80 to 100 kilograms deliver consistent results without operator strain, while lighter equipment under 60 kilograms forces operators to apply excessive pressure, creating uneven surfaces and patchy finishes that sabotage the entire project. Planetary grinders eliminate swirl marks on large commercial floors exceeding 300 square metres, making them worth the rental cost.
Grit Sequence and Equipment Selection Determine Quality
Selecting the wrong grit sequence destroys adhesion quality; heavily coated floors require starting at 16 to 30 grit, while fresh concrete with minor blemishes start at 80 grit. Skipping intermediate grits leaves scratch marks that persist through final polishing and compromise the durability of any coating applied afterward. Dust contamination during grinding directly sabotages epoxy adhesion by trapping particles between the coating and substrate, creating failure points that weaken the bond. HEPA filtration removes particles down to 0.3 microns and must integrate before work begins, with sealed shrouds and extractors protecting both worker safety and floor quality.
Substrate Flatness Requires Investment
Self-levelling compounds address uneven substrates and cost $1,000 to $3,000 for a 200 square metre area. Many contractors skip this investment only to face coating breakdowns that require complete removal. These compounds only function effectively when applied to properly cleaned and dust-free bases, making surface preparation the foundation for everything that follows.
Final Thoughts
Commercial floor preparation tips work because they address the root causes of failure before installation begins. Moisture testing, old coating removal, proper dust extraction, and substrate levelling prevent adhesion failures that plague rushed projects and cost $15,000 to $30,000 in emergency repairs. The $1,000 to $3,000 investment in self-levelling compounds and the extra day of preparation time deliver measurable returns that extend your floor’s lifespan by 12 to 24 months.
Quality preparation eliminates patchy finishes and coating breakdowns across your entire commercial space. Your flooring bonds properly to clean, dry, flat concrete, and compliance with Australian Standard AS 4586 and the Managing Respirable Crystalline Silica Code of Practice 2022 protects your team while reducing liability. Lower maintenance costs follow when your floor resists dust, stains, and allergens from day one, with fewer emergency repairs and less operational disruption.
Start by scheduling a thorough site inspection with moisture testing using calcium chloride kits or relative humidity probes, then map high and low areas with a laser level and assess old coatings that require removal. Plan for two days minimum on a 200 square metre project-never compress this timeline into a single day-and source heavy grinding equipment weighing 80 to 100 kilograms plus HEPA filtration systems rated M-Class or H-Class before work begins. We at Superfloor Australia deliver precision preparation and expert craftsmanship tailored to your commercial space, transforming your concrete into a durable, high-performance floor that performs consistently for years.