
Concrete floor preparation is the foundation of any successful refurbishment project. Skip this step, and you’ll face peeling coatings, uneven surfaces, and premature failure.
At superfloor australia, we’ve seen too many projects fail because the prep work was rushed. The good news is that proper preparation doesn’t have to be complicated-it just requires knowing what to look for and how to fix it.
Assess Your Concrete Before You Start
Before you remove anything or plan your refurbishment approach, you need to understand what you’re working with. The condition of your existing concrete determines everything that follows-the prep method you’ll use, the timeline you’ll need, and the budget you should set aside. Skipping this assessment stage creates surprises later, and surprises cost money.
Visual Inspection for Cracks and Surface Damage
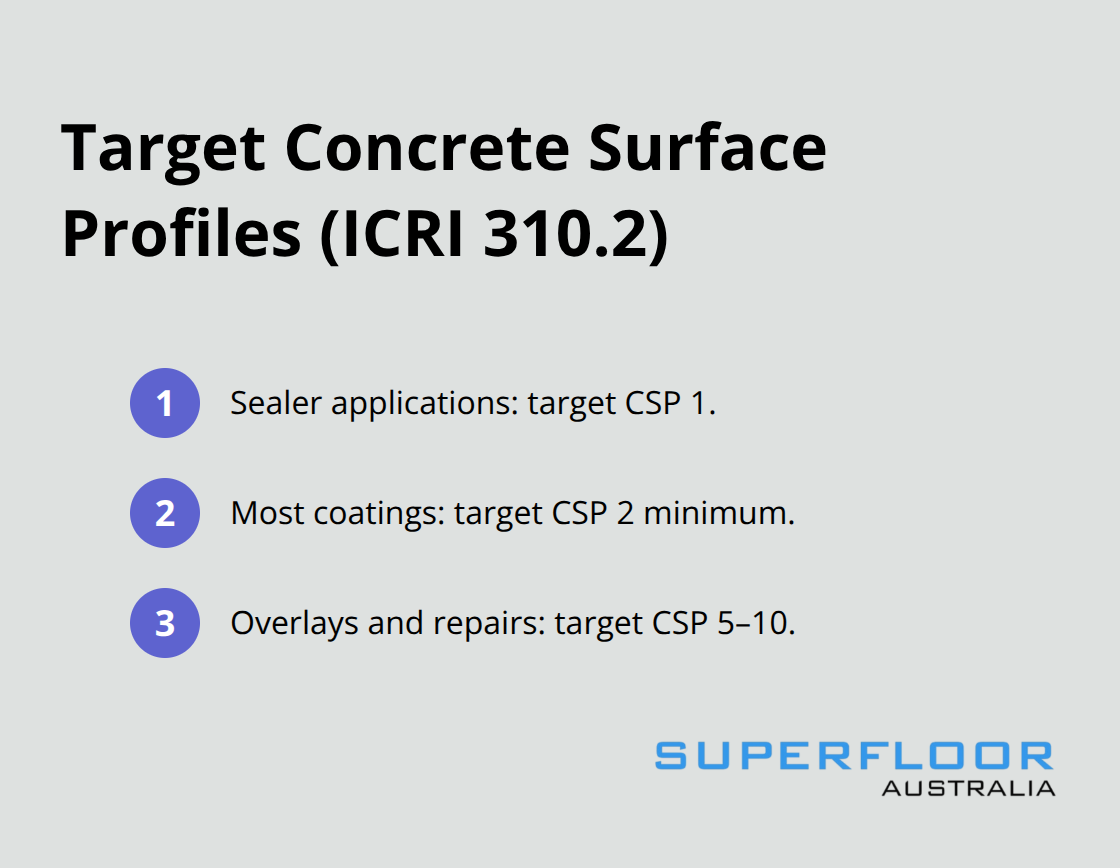
Start with a thorough visual inspection of the entire floor. Look for cracks of all sizes, not just the obvious ones. Hairline cracks under 1mm require assessment before applying any coating. The ICRI Standard No 310.2 provides a Concrete Surface Profile rating system that runs from CSP 1 to CSP 10, which helps you understand what texture your concrete needs. For example, if you plan to apply a sealer, you’ll need CSP 1, but if you’re doing an overlay or repair, you’ll need CSP 5 to CSP 10. This means larger cracks must be opened with a V-groove, cleaned, and filled with shrinkage-compensated grout before you proceed.
Look also for chips, spalling, and areas where the surface breaks away-these directly affect how much prep work you’ll need and how much patching compound you’ll use. The more damage you identify now, the more realistic your timeline and budget become.
Moisture Testing Is Non-Negotiable
Moisture in your concrete is the silent killer of coatings. Epoxy coatings are particularly vulnerable, and if moisture isn’t addressed, bubbles form and coatings peel within months. Test for moisture using the in-situ relative humidity method per ASTM F2170, and your concrete subfloor must not exceed 75% relative humidity. Many contractors skip this step, which is why failed projects appear so often.
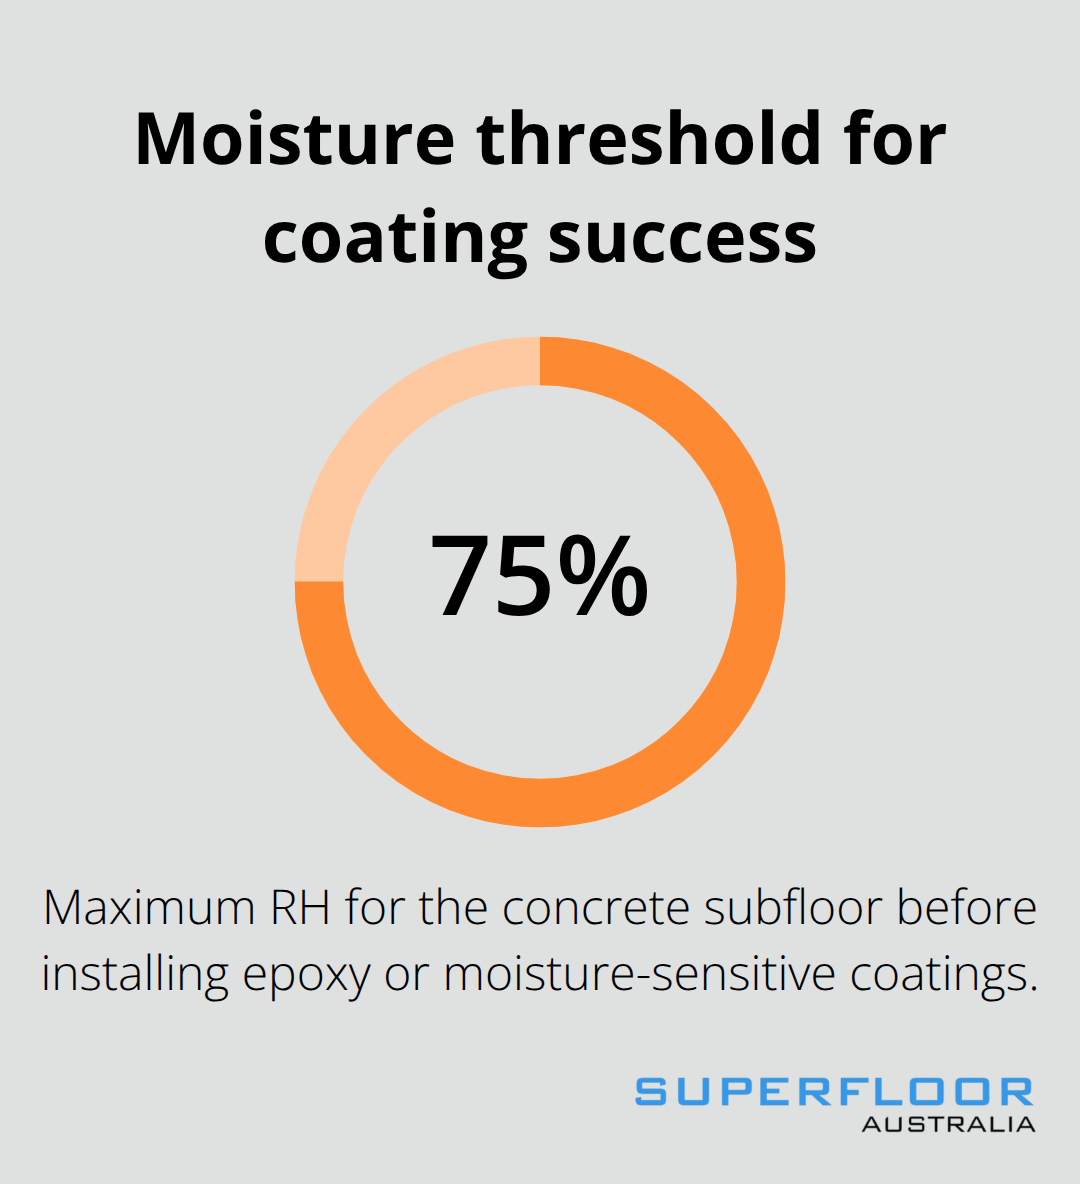
Test at least one small area after you’ve removed the old coating, and for larger projects, test multiple spots. If your results come back high, you’ll need to apply a moisture vapour barrier before installation. This adds time and cost, but it prevents far more expensive failures down the road.
Identifying Contamination and Concrete Condition
Oil, grease, wax, dirt, curing compounds, and old adhesive residues all act as bond breakers-they stop new coatings from sticking properly. Mechanical preparation removes these, but chemical cleaners often push contaminants deeper into the concrete rather than removing them. Look for discolouration, staining, and any slick or waxy patches on the surface.
If your concrete was previously burnished or densified, the low porosity acts as a barrier and must be removed mechanically. Check whether any existing coatings, paints, or sealers remain on the surface-all of these must go. The goal is to reach clean, sound concrete. Once you’ve assessed the damage, contaminants, and moisture levels, you’ll know whether you need grinding, shot blasting, or both, and you’ll have a realistic picture of the time and cost involved. This assessment directly shapes your next steps in the preparation process.
Remove Old Coatings and Contamination First
Mechanical Removal Is the Only Reliable Method
The moment you expose your concrete subfloor is when real assessment begins. Old sealers, paints, and coatings hide what lies underneath, and you cannot move forward with any refurbishment until they completely disappear. Mechanical removal-through grinding, shot blasting, or scarifying-strips coatings while creating the surface profile your new finish requires. Chemical strippers fail because they push contaminants deeper into the concrete rather than removing them, leaving bond breakers that cause adhesion failure. Start with a 16-30 grit diamond pad if you grind, which aggressively removes old finishes and damaged surface layers. This step demands attention; poor coating removal directly causes the failures that appear in refurbishment projects.
Dust Control Prevents Adhesion Failure
Once coatings are stripped, dust becomes your next enemy. Industrial vacuums with M-class or H-class filtration systems remove dust that would otherwise embed in the concrete pores and prevent adhesion. A standard shop vac will not work-the dust particles are too fine and will circulate back into the air. After vacuuming, wipe the surface with a dry cloth to capture residual dust. This dual approach (vacuum plus cloth wipe) eliminates the fine particles that compromise coating performance.
Addressing Bond Breakers and Surface Stains
Oil, grease, and wax residues require mechanical preparation as well; they act as bond breakers and cannot be chemically cleaned away effectively. Stains from old spills or discolouration may persist even after thorough cleaning, but they do not affect coating adhesion if the surface itself reaches the correct profile. The ICRI Standard No 310.2 specifies that your concrete must reach CSP 2 minimum for most coatings, which means a rough, open porous texture that mechanical methods create. This preparation stage represents your last chance to address substrate issues before new coatings go down, making it worth the time and investment.
With your old coatings removed and your surface mechanically prepared to the correct profile, you now move into the repair phase-addressing the cracks, chips, and damaged areas that your initial inspection revealed.
Repair and Rebuild the Concrete Surface
Address Cracks Before Coating Application
Open larger cracks with a V-groove the moment your old coatings are removed and your concrete is exposed. Non-live hairline cracks under 1mm may be covered during the polishing process, but cracks larger than this demand immediate attention. Clean out all debris from the groove, wet it thoroughly, and fill it with shrinkage-compensated grout. This approach prevents the crack from spreading underneath your new coating and causing adhesion failure months later. Live cracks require structural repair before any refurbishment work proceeds-if you skip this, your new finish will crack in the same pattern. After grout sets, sand the patched area smooth with the same 16-30 grit pad you used for coating removal, ensuring the repair sits flush with the surrounding concrete.
Patch Chips and Spalling Areas
Chips and spalling areas need patching compound applied to the same depth and profile as the surrounding surface. The goal is a uniform surface where repairs blend seamlessly, not a patchwork of raised or recessed spots that will telegraph through your final finish. Uneven patches create visible defects in your polished or sealed floor, so take time to level each repair properly during the grinding phase.
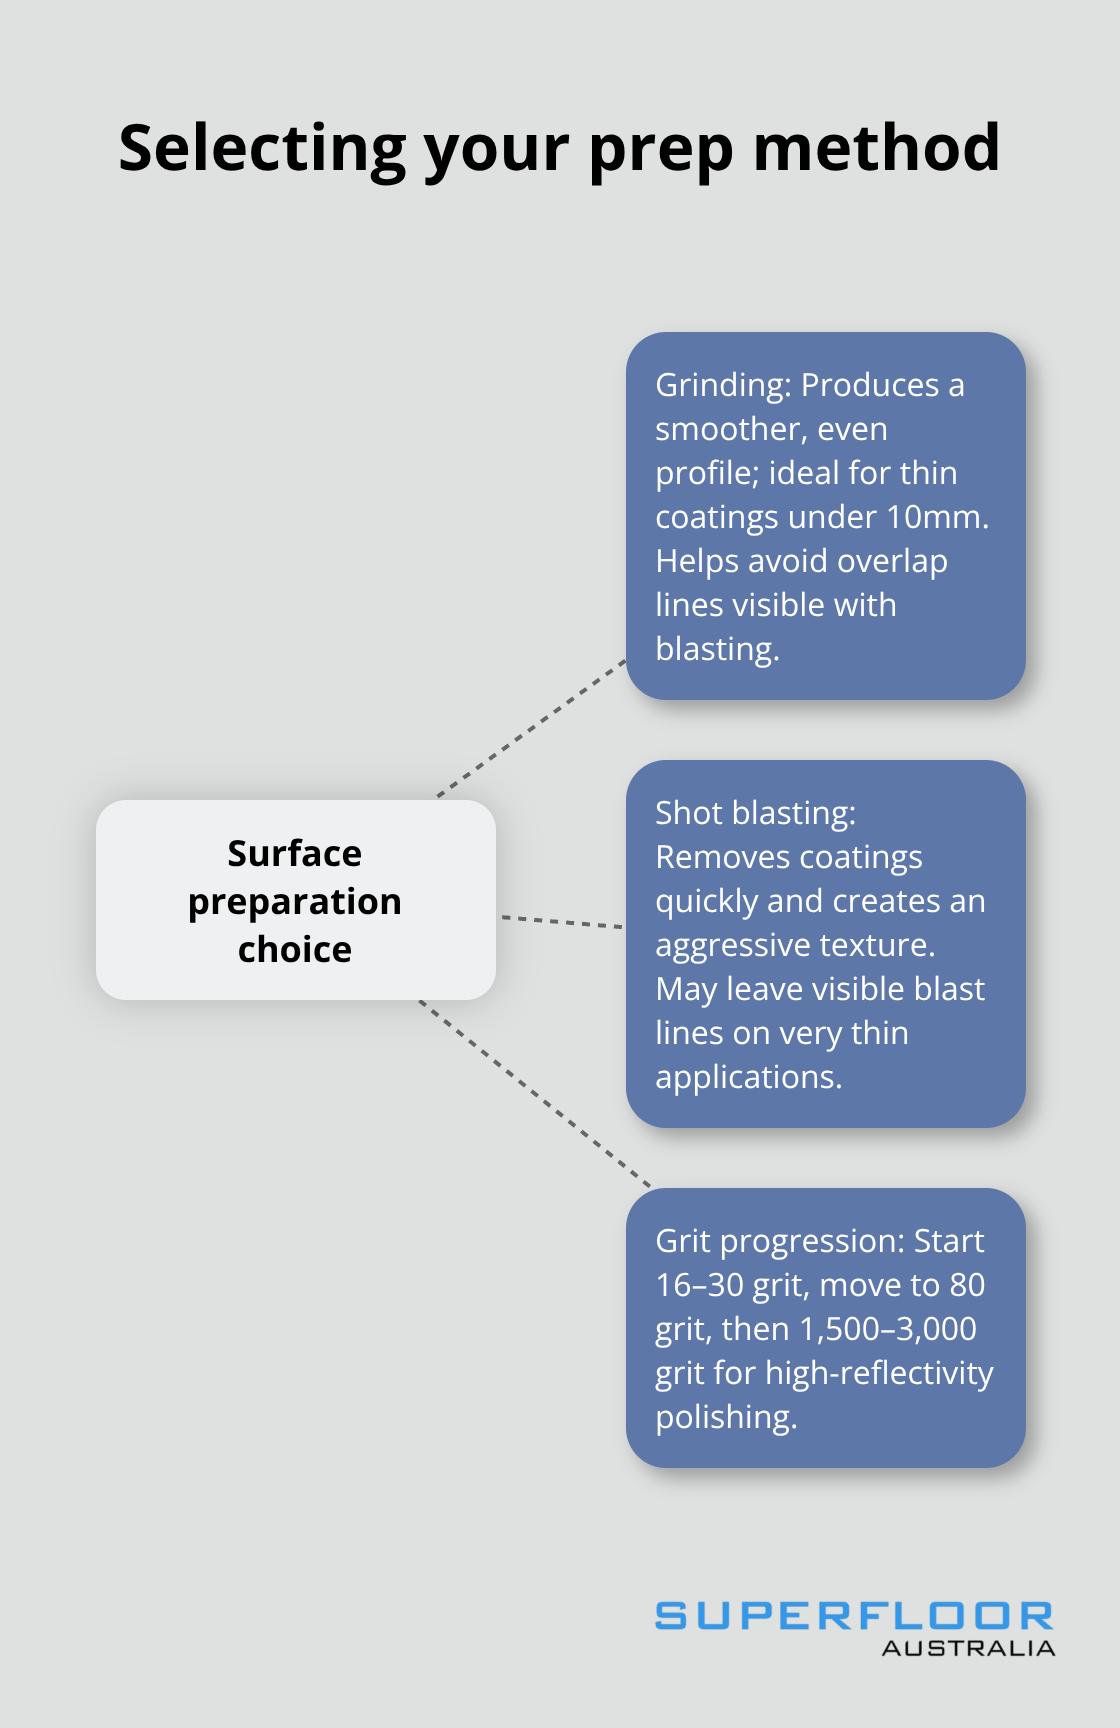
Choose Between Grinding and Shot Blasting
Grinding produces a smoother, more even surface profile and works best for thin coatings under 10mm because it avoids the overlap lines that shot blasting can leave. Shot blasting removes coatings faster and creates aggressive surface texture by firing abrasive particles at the concrete, but the speed comes at the cost of visible blast lines on very thin applications. Whatever method you choose, follow the grit progression: start at 16-30 grit to remove finishes and repair compound, move to 80 grit to refine texture, then progress to 1,500-3,000 grit if you’re polishing for a high-reflectivity mirror finish.
Execute Proper Grinding Technique
Each pass should overlap smoothly in one direction, then rotate 90 degrees for the next pass to ensure full coverage with no missed spots. The ICRI Standard No 310.2 specifies your target Concrete Surface Profile-CSP 2 minimum for most coatings, CSP 5-10 for overlays and repairs. Match your grinding progression to reach this target before moving to the next stage. After grinding stops, vacuum immediately with an industrial M-class or H-class system, then wipe the surface with a dry cloth. This two-step dust removal is non-negotiable; fine particles embedded in concrete pores will sabotage adhesion and cause the coating to fail within months.
Final Thoughts
Concrete floor preparation determines whether your refurbishment succeeds or fails. You’ve now seen the full process: assess your floor honestly, remove old coatings mechanically, test for moisture, patch damage properly, and grind to the correct profile. Each step builds on the last, and skipping any one of them creates expensive problems later.
A well-prepared surface accepts coatings evenly, preventing bubbles, peeling, and premature failure. Your new finish lasts longer, maintains its appearance, and requires less maintenance over time. Polished concrete floors resist dust, stains, and allergens, making them ideal for homes, commercial spaces, and industrial environments where durability matters. At superfloor australia, we’ve completed hundreds of refurbishment projects across Brisbane, and the ones that deliver the best results always receive proper preparation before any coating goes down.
If you’re confident in your ability to handle grinding, dust control, and moisture testing yourself, proceed with the methods outlined here. If you’d rather have professionals handle the work, superfloor australia delivers high-quality polished concrete flooring with precision preparation and expert craftsmanship tailored to your specific needs. Either way, commit to proper preparation, and your concrete floor will reward you with years of durability and low maintenance.