
Concrete grinding and polishing transforms dull, damaged floors into sleek, professional surfaces. At superfloor australia, we’ve seen firsthand how the right technique and equipment make all the difference between amateur results and truly polished finishes.
This guide walks you through the exact process we use, from selecting the right grinder to avoiding costly mistakes that waste time and money.
Essential Equipment and Tools for Concrete Grinding
Selecting the Right Concrete Grinder
Choosing the right grinder matters more than most people think. Walk-behind concrete grinders come in two main configurations: single-phase machines rated for 10 amps, which work on standard household power, and three-phase units that deliver more consistent power on larger jobs. For garage floors and residential work, a single-phase grinder handles the job fine, but if you’re tackling commercial spaces or multiple projects, three-phase equipment reduces downtime and delivers faster results. Floorex machines, manufactured locally in Australia, are built to last-their Satellite grinder typically delivers over 1,000 hours of service before major maintenance, and many original transmissions in the field are still running strong after 15 years. The key difference between grinder types lies in their planetary head configurations and speeds; the Satellite, Meteor, and Galaxy ranges each handle different concrete hardness levels and finish requirements.
Diamond Pads and Grit Progression
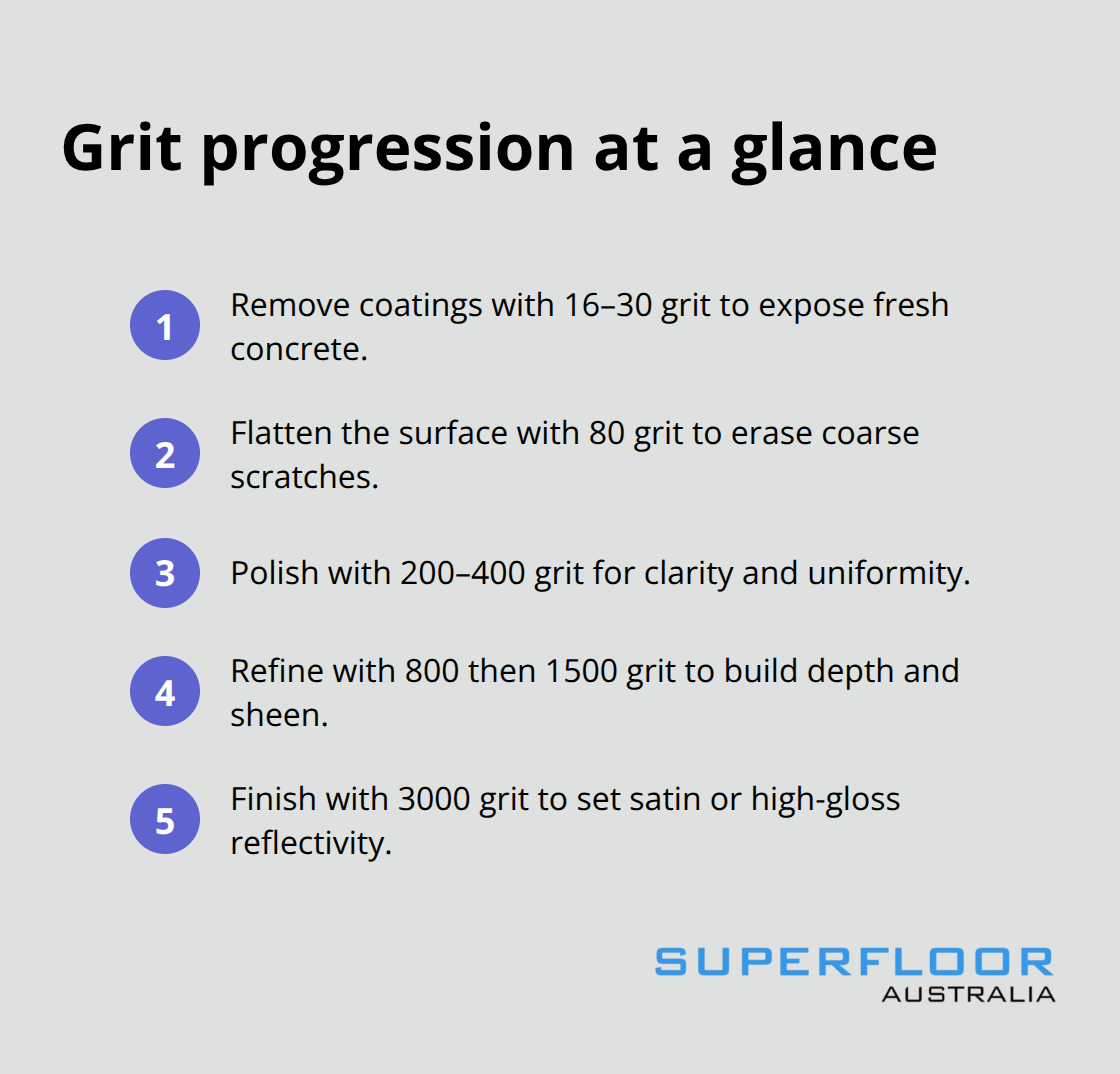
Quality equipment saves you time, reduces surface inconsistencies, and cuts your labour costs significantly. Diamond pads are non-negotiable because diamonds, being one of the hardest materials on Earth, have superior abrasive properties for grinding and polishing hard surfaces. Start with 16–30 grit resin-bonded diamonds to strip old coatings and reveal fresh concrete, then progress to 80 grit for surface flattening before moving into polishing stages. Don’t compromise on the grinder itself-a reliable machine with solid power transmission makes the entire process faster and more predictable.
Dust Control and Respiratory Protection
Airborne concrete dust contains silica particles that can lead to lung cancer, silicosis, and kidney disease, so dry grinding without proper extraction is genuinely dangerous. Connect your grinder to a dust collection system-whether that’s a dedicated industrial vacuum or the machine’s built-in extractor-because it cuts dust exposure dramatically and keeps your work area visible. Wet grinding is another option that cools the pads and eliminates airborne dust, but it requires proper drainage and takes longer overall. Protective gear isn’t just safety theatre: wear a fitted P2 dust mask rated for concrete work, safety goggles that seal around your eyes, ear protection because grinders run at 80+ decibels, and long sleeves plus closed-toe shoes. A full-face respirator is worth the investment if you grind regularly.
Pre-Grinding Assessment and Preparation
The moisture meter becomes your best friend-check concrete moisture content before you start, because high moisture can cause efflorescence or delamination after polishing, ruining months of work. Surface preparation determines everything that follows; spend time cleaning dirt and debris, treating oil stains with a concrete degreaser, and filling cracks with polyurea joint filler or epoxy resin before any grinding touches the floor. Once you’ve assembled your equipment and prepared the surface, you’re ready to move into the actual grinding and polishing process, where technique and patience separate professional results from disappointing finishes.
Step-by-Step Grinding and Polishing Process
Initial Grinding with Coarse Diamond Pads
You start your grind with overlapping passes using a 16–30 grit pad, working in one direction across the floor, then repeat at 90 degrees to catch any missed spots and achieve full coverage. This initial pass tears away existing coatings, paint, and surface damage, exposing fresh concrete underneath. As you work, inspect the surface carefully-if you spot chips or pitting, stop and fill them with patching compound, then smooth the excess with the same coarse pad before you continue. The foundation you build here determines everything that follows, so resist the urge to rush through this stage.
Flattening and Densifying the Surface
Once the first stage is complete, you move to an 80 grit pad and make a second pass using the same overlapping technique. This stage flattens the surface further and removes scratches left by the coarse pad. Most DIY mistakes happen here because people rush into polishing without spending adequate time on these foundational grinding stages; skipping steps or moving too quickly to finer grits results in an uneven, patchy finish that no amount of polishing can fix.
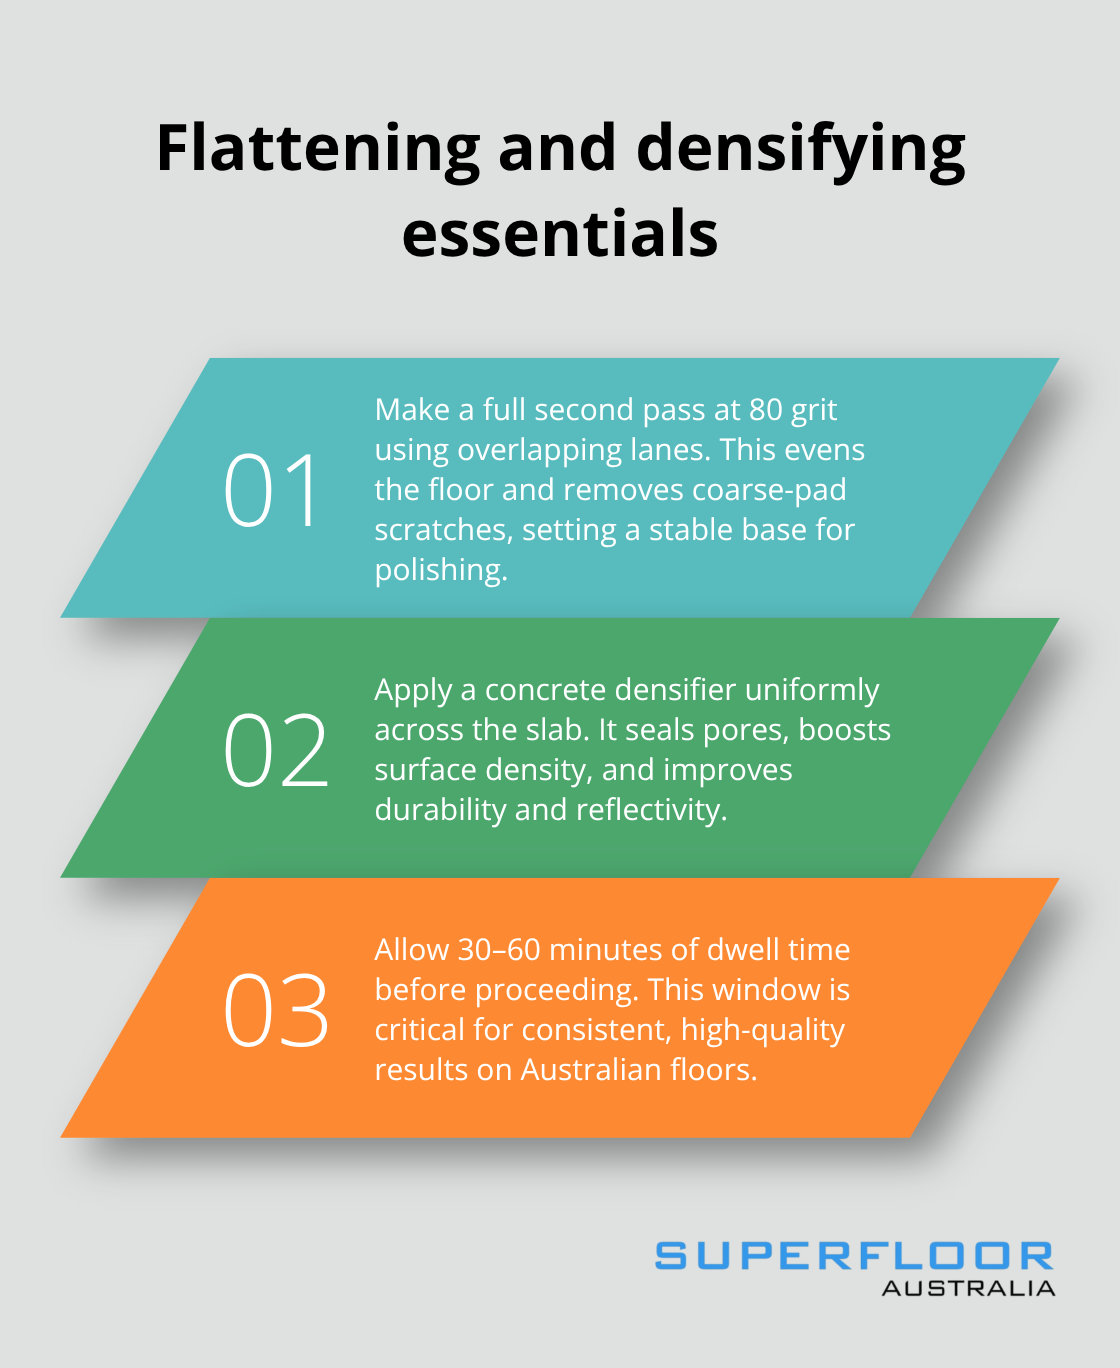
After the 80 grit pass, you apply a concrete densifier across the entire floor. This chemical solution increases surface density by sealing pores, which dramatically improves durability and helps you achieve that mirror-like reflectivity you want. You must let the densifier sit for 30 minutes to one hour before proceeding-this dwell time is non-negotiable if you want consistent results.
Progressive Polishing to High-Gloss Finish
You now move into the polishing stage, which transforms the floor from functional to stunning. You start with 200–400 grit diamond pads and work the same overlapping pattern you used during grinding, then progress through 800 grit, then 1500 grit, spending adequate time on each stage rather than rushing through. Dry polishing produces a more brilliant shine than wet polishing, though wet polishing cools your pads and reduces dust if your site allows for drainage. The final polish uses 3000 grit pads to control reflectivity-this is where you decide whether you want a mirror-like high-gloss finish or a more subdued satin appearance.
Sealing and Protection
Once you complete polishing, you vacuum all dust thoroughly and wipe the surface completely dry. You then apply your sealer in thin, even coats, allowing at least 45 minutes of drying time between coats, followed by a protective top sealant. At this point your floor is durable enough to handle vehicle weight in garages or heavy foot traffic in commercial spaces without cracking. The entire process from initial grinding to final sealing typically takes 3–5 days depending on floor size and whether you work with wet or dry methods. With your floor now sealed and protected, the next critical step is understanding what mistakes can undo all this careful work-and how to avoid them entirely.
Common Mistakes to Avoid When Grinding Concrete
Rushing the Grit Progression Destroys Your Foundation
The moment you skip the 80-grit stage is the moment you sabotage your entire project. We at superfloor australia watch DIY jobs fail constantly because people spend only 15 minutes on this critical pass before jumping straight to polishing. This creates an uneven surface with inconsistent shine, visible scratches, and a patchy appearance that no amount of finer grits can fix. The 80-grit pass flattens the concrete properly and removes all scratches from your initial 16–30 grit work; inadequate time here means your 200-grit polish pads spend hours trying to compensate for a foundation that was never properly prepared. Try spending a minimum of 2–3 hours on the 80-grit stage for a residential garage floor, longer for commercial spaces. Your foundation determines everything that follows, so resist the urge to move forward too quickly.
Neglecting Grinder Maintenance Costs You Time and Money
Your grinder’s condition directly impacts your timeline and final results. A machine with a worn transmission or damaged diamond pads works harder, generates excessive heat, and produces inferior results that force you to repeat stages.
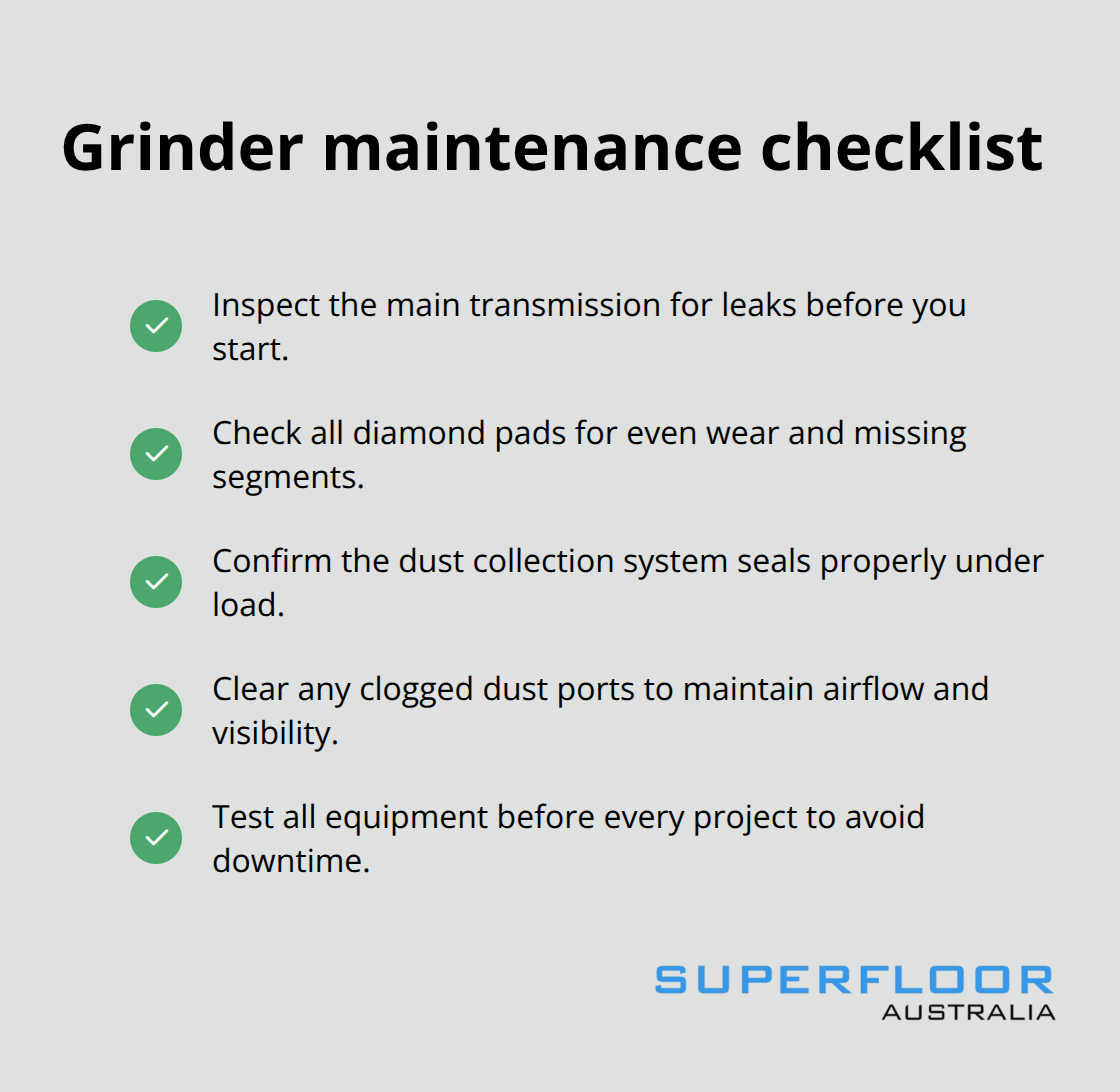
Test all equipment before every project: inspect the main transmission for leaks, verify all diamond pads have even wear and no missing segments, and confirm the dust collection system seals properly. A single clogged dust port forces your grinder to work twice as hard, reduces visibility of your work, and means you’re breathing silica particles that can cause permanent lung damage. Many contractors skip maintenance because they think it saves time, but a neglected grinder costs you 30–40% longer on every project and produces surfaces that need refinishing within 18 months instead of lasting 10+ years.
Concrete Dust Exposure Causes Permanent Health Damage
Concrete dust contains crystalline silica in concrete dust and lung scarring health risks; Australia’s workplace safety standards classify it as a carcinogen. A P2 respirator rated for concrete dust is non-negotiable-cheap masks that don’t seal properly offer almost zero protection. Connect your grinder to an industrial vacuum with at least 10 litres per second airflow; if you’re wet grinding, ensure your site has proper drainage so water doesn’t pool and weaken the concrete base. Protective eyewear must seal around your eyes completely; dust particles lodge under standard glasses and cause corneal damage. Long sleeves and closed-toe shoes protect against grinding sparks and concrete chips that travel at high velocity. Hearing protection matters too-concrete grinders run at 80–90 decibels, and prolonged exposure causes permanent hearing loss. Many DIYers ignore safety because they’re working on their own floor and think the risk is low; this is how permanent injuries happen. We’ve seen contractors develop silicosis 10 years after finishing a project, unable to work or exercise without breathlessness. The time you save by skipping safety gear costs you decades of health problems that no floor is worth.
Final Thoughts
Grinding and polishing concrete floors demands precision, patience, and respect for the process-the difference between a floor that lasts 10 years and one that fails within 18 months comes down to whether you follow every step properly or cut corners. Your foundation work with the 80-grit stage determines your entire result, your equipment maintenance prevents costly delays, and your safety practices protect your health for decades to come. If you’ve followed this guide carefully, you now understand why professionals charge what they do and why rushing through any stage sabotages months of work.
Some projects suit DIY work perfectly, while others demand professional expertise that most homeowners don’t possess. A single-car garage floor with minimal damage and good concrete condition is manageable for someone willing to invest 3–5 days and learn proper technique, but a commercial space with multiple problem areas, uneven concrete, or high-traffic demands requires industrial-grade machines and knowledge of concrete variations that professionals bring to every job. Professional contractors diagnose moisture issues or structural problems before they ruin your investment and deliver results that DIY work often cannot match.
We at superfloor australia specialise in delivering high-quality polished concrete floors that enhance both aesthetics and durability across homes, commercial, and industrial spaces. Our sleek, high-gloss finishes resist dust, stains, and allergens, ideal for low-maintenance environments where you want your floor to perform as hard as you do. If your project exceeds your comfort level or you want guaranteed results, contact superfloor australia to discuss your specific needs and get a professional assessment of what your floor requires.