Concrete grinding floors transforms rough, uneven surfaces into smooth, professional-looking finishes. This process removes imperfections, old coatings, and creates the perfect foundation for polishing or sealing.
At Superfloor Australia, we’ve seen countless DIY attempts go wrong due to improper technique and equipment selection. The right approach makes all the difference between amateur results and professional-grade outcomes.
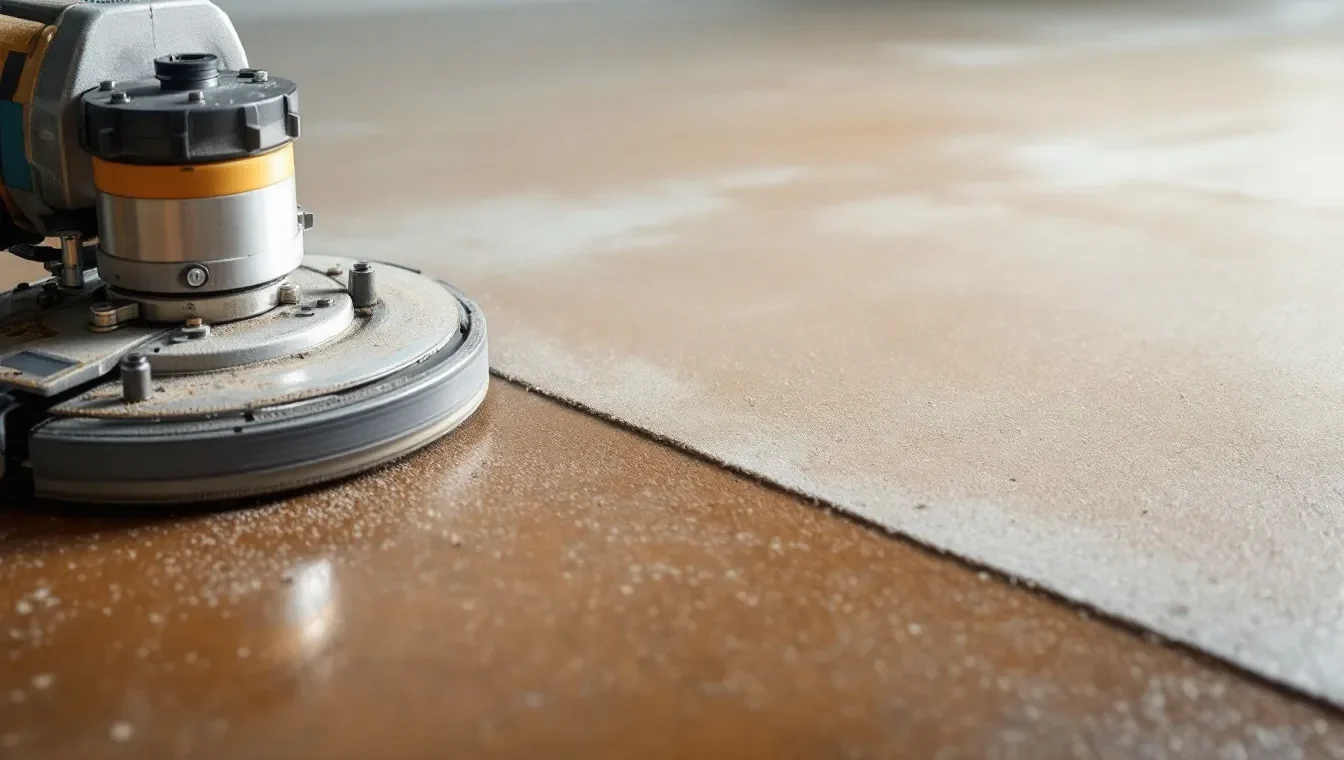
Essential Tools and Equipment for Concrete Grinding
Professional concrete grinding requires three categories of equipment that work together seamlessly. We at Superfloor Australia have tested countless combinations and found that corners cut on any category lead to subpar results and potential safety hazards.
Diamond Grinding Tools That Deliver Results
Metal-bonded diamond discs are often recommended for aggressive grinding, while resin-bonded alternatives are better suited for finish polishing. Start with 16-30 grit diamonds for coating removal, then progress through 80, 120, and 220 grit stages. Each disc costs between $45-85, but genuine diamonds last 4-6 times longer than cheap imitations. Makita and Bosch produce the most consistent diamond segments, while generic brands often lose diamond particles within hours of use.
Grinder Selection Based on Project Size
Walk-behind grinders handle areas over 500 square metres efficiently, operating at 1,750 RPM with 15-20 horsepower motors. Handheld units work perfectly for spaces under 100 square metres but require 40% more time per square metre. Dust extraction systems reduce airborne particles by 95% when properly connected (professional-grade equipment from established suppliers beats consumer models that lack adequate torque and filtration).
Safety Gear That Actually Protects
Crystalline silica exposure poses serious health risks to concrete workers. P2 respirators provide essential protection as particulate filters, while basic dust masks provide minimal protection. Safety glasses must meet AS/NZS 1337 standards with side shields. Steel-toed boots prevent injuries from dropped equipment (weighing 25-45 kilograms). Hearing protection becomes mandatory since grinders operate at 85-95 decibels continuously.
Equipment Setup and Testing
Test all equipment before you begin work to avoid delays and safety issues. Check diamond disc attachment points for proper torque specifications. Verify dust collection systems connect securely to prevent particle escape. Inspect power cords and extension leads for damage that could cause electrical hazards.
With your equipment ready and safety gear in place, the next step involves proper surface preparation and assessment techniques that determine your project’s success.
Step-by-Step Concrete Grinding Process
Surface preparation determines 80% of your success before you start the machine. Inspect every concrete surface for oil stains, paint residue, and structural cracks that affect patterns. Remove all furniture, sweep thoroughly, and mop with degreasing solution. Check for loose concrete sections by tapping with a hammer – hollow sounds indicate areas that need repair with epoxy filler.
Mark electrical conduits and plumbing locations to avoid costly damage. Temperature control is critical in diamond grinding to prevent overheating, which can lead to premature wear and damage to both the grinding wheel and the concrete surface. Concrete surfaces between 10-25°C grind most effectively, while hot surfaces above 30°C cause diamond segments to glaze over within minutes.
Surface Assessment and Preparation
Test concrete hardness using a scratch test with a steel nail. Soft concrete requires metal-bonded diamonds, while hard surfaces work better with resin-bonded options. Clean all debris and moisture from the surface because wet concrete clogs diamond segments immediately.
Saturating the surface with a densifier after the first grind might help harden the surface to enhance the grinding process. Apply concrete hardener to dusty surfaces 24 hours before work begins. This step prevents excessive dust creation and extends diamond life. Check for existing sealers using the water drop test – water that beads indicates sealed surfaces that need aggressive removal.
Coarse Grit Applications
Begin with 16-30 grit metal-bonded diamonds and move at walking speed across the surface. Overlap each pass by 50% to prevent streak marks that become permanent once you progress to finer grits. Apply consistent downward pressure – approximately 15-20 kilograms for handheld units and 40-50 kilograms for walk-behind machines.
Change direction every third pass to prevent groove formation. Monitor diamond wear constantly because worn segments create heat buildup that damages concrete surfaces permanently. Replace diamonds when cutting efficiency drops (typically after 200-300 square metres of aggressive work).
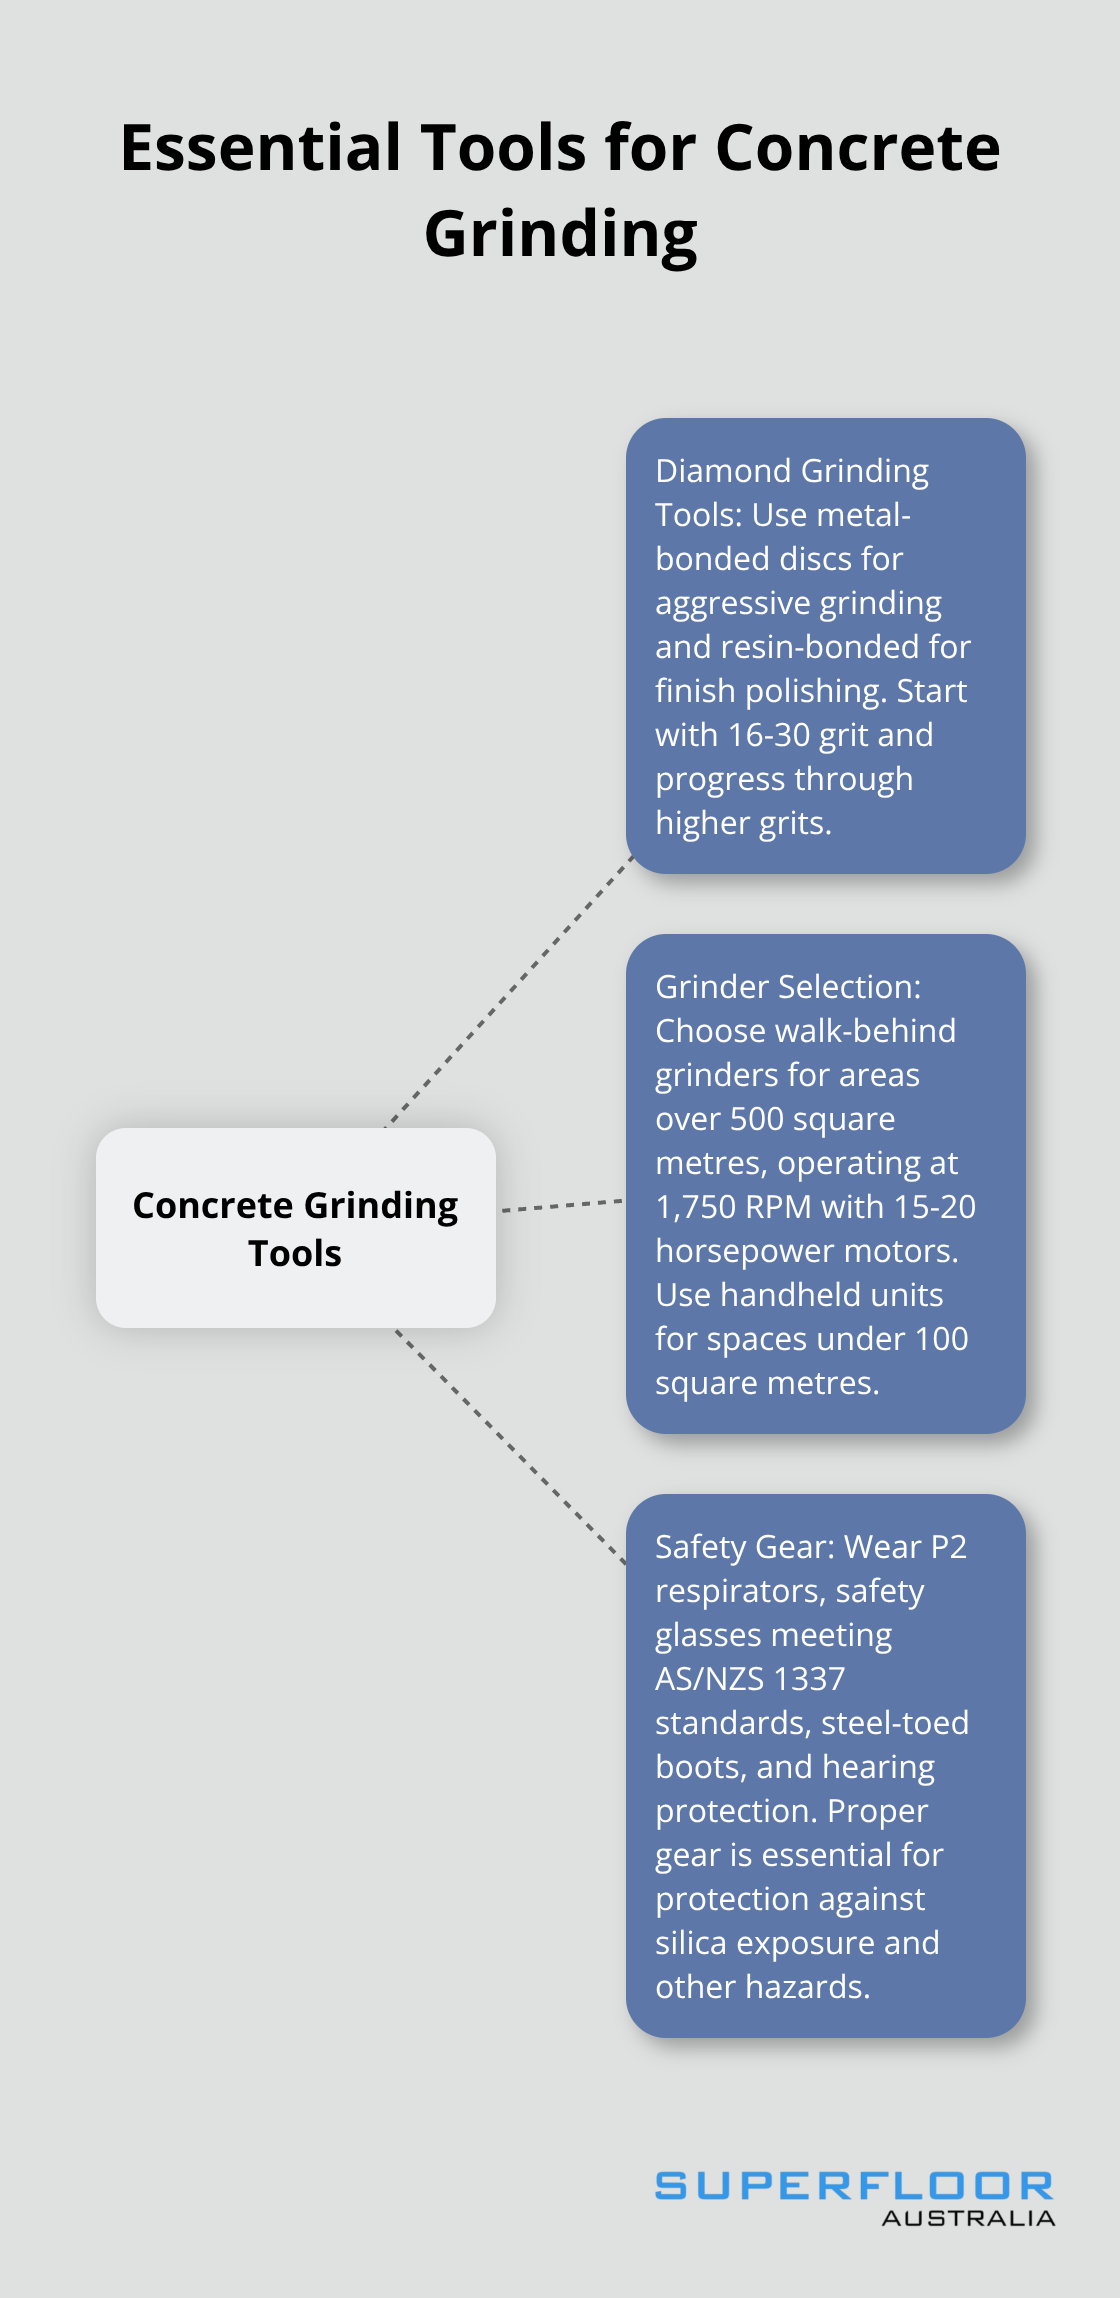
Progressive Grit Refinement
Professional results demand precision in every step of the refinement process. Your tool choices and grinding sequence directly determine whether floors achieve optimal outcomes. Never skip grit stages regardless of time pressure because each stage removes scratches from the previous level. Progress through 80, 120, 220, 400, 800, and 1500 grit stages systematically. Each grit level requires 2-3 complete passes over the entire surface area.
Vacuum thoroughly between stages to prevent coarser particles from contaminating finer diamonds. Apply concrete densifier after 400 grit stage to harden the surface and achieve maximum reflectivity. Final 3000 grit burnishing creates mirror-like finishes but requires specialised equipment.
Quality Control and Pattern Management
Inspect your work under bright lighting after each grit stage. Scratches visible at this point will show through the final finish. Use consistent overlapping patterns to maintain uniform appearance across the entire surface.
Even experienced contractors make critical errors that compromise results and waste expensive materials. Understanding these common pitfalls helps you avoid costly mistakes and achieve professional-grade outcomes.
Common Mistakes and How to Avoid Them
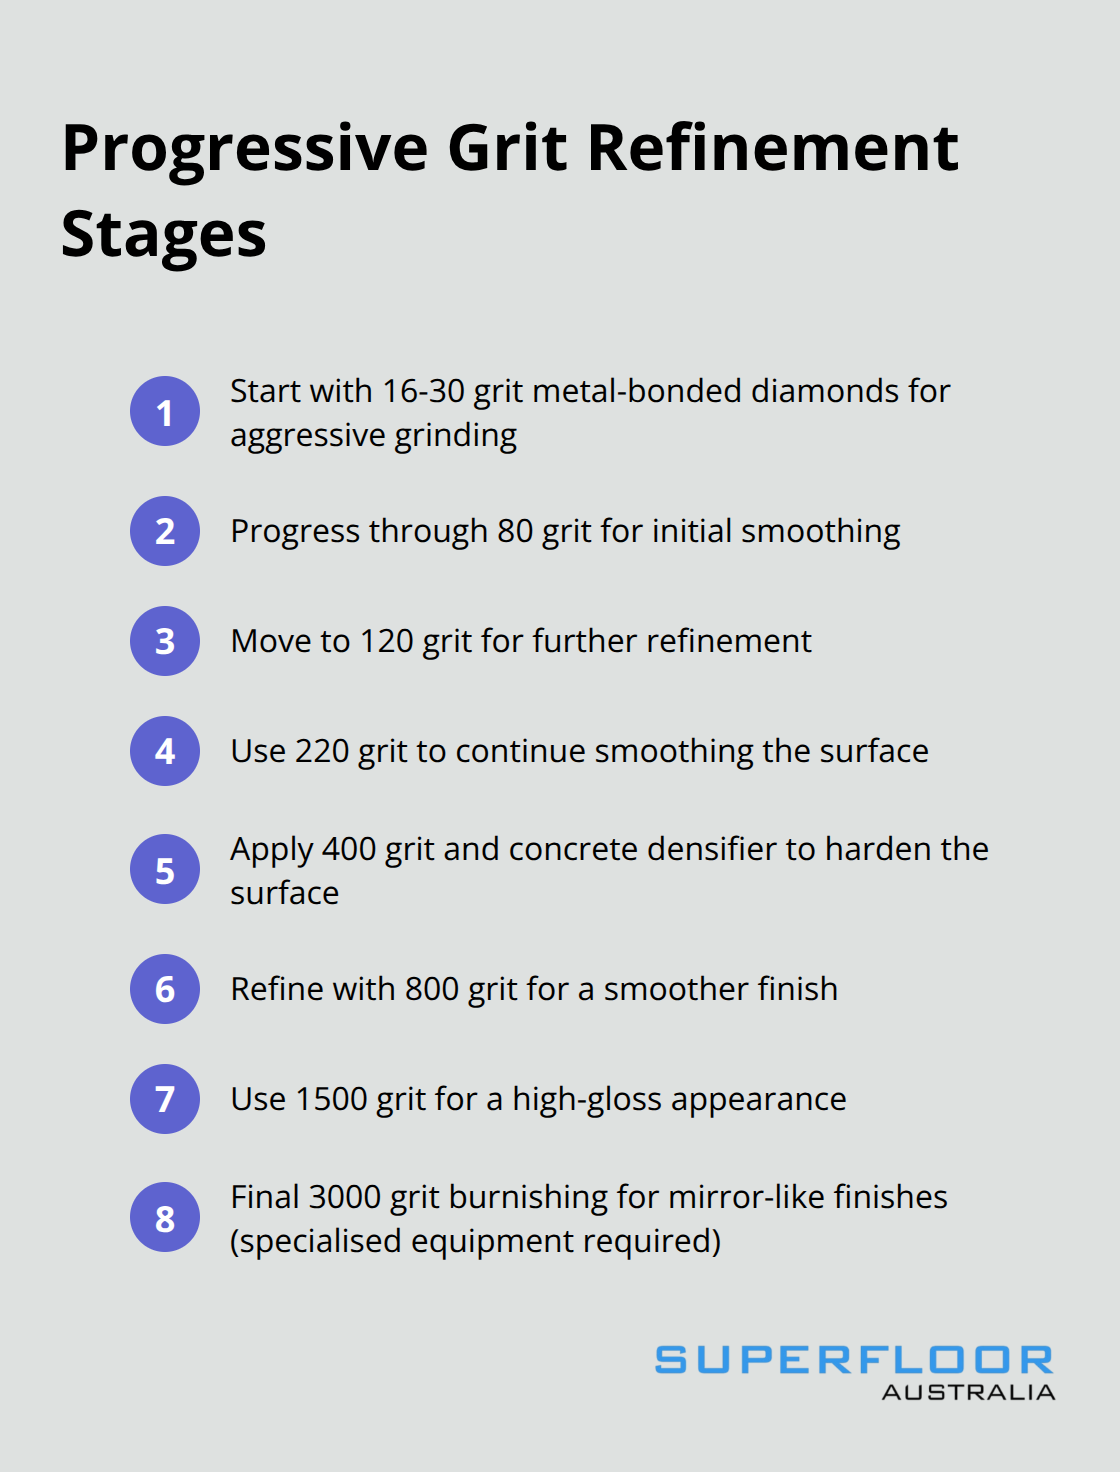
Equipment mismatches create the most expensive failures in concrete floor preparation. Contractors who use small handheld grinders on large commercial floors waste significant time and burn through diamond discs twice as fast. Walk-behind units that weigh under 100 kilograms lack the mass needed for effective cuts on hard aggregate concrete.
Dust extraction systems rated below 2,000 cubic feet per minute fail to capture silica particles. This creates health hazards and equipment damage from dust buildup that clogs diamond segments within hours.
Speed Control and Pressure Management
Fast movement across concrete surfaces creates uneven scratch patterns that show through every subsequent grit stage. Professional operators maintain 3-4 metres per minute maximum speed during coarse phases. Operators who exceed this speed create permanent defects that require complete rework.
Excessive downward pressure above 25 kilograms on handheld units causes diamond segments to show burn marks from excessive speed or pressure. This destroys cut efficiency and requires immediate disc replacement (at $65-85 per unit). Heat buildup from aggressive pressure also creates micro-cracks in concrete surfaces that become permanent defects.
Temperature and Surface Monitoring
Surface temperatures must stay below 40°C during operation to prevent diamond damage and concrete surface defects. Operators who ignore temperature control face premature equipment failure and poor surface quality. Hot surfaces above this threshold cause diamond segments to lose their cutting edge permanently.
Monitor diamond wear constantly because worn segments create heat buildup that damages concrete surfaces. Replace diamonds when cut efficiency drops, typically after 200-300 square metres of aggressive work.
Grit Stage Sequence Errors
Operators who jump from 30 grit directly to 120 grit leave deep scratches that require complete rework from the start. Each skipped stage doubles the time needed to achieve smooth finishes. This mistake costs contractors thousands in wasted materials and labour hours.
Poor dust management systems allow particles to accumulate on diamond segments, which reduces cut performance by 40% within one hour. Inadequate vacuum systems rated below 15 horsepower cannot handle dust loads from aggressive operations.
Safety and Health Compliance
Workers without proper P2 respirators face silica exposure levels that exceed safe workplace limits of 0.05 mg/m3 over an eight hour working day. This exposure creates long-term health risks including silicosis and respiratory damage that develops over years of exposure.
Experienced contractors can help you avoid these costly mistakes and ensure professional results that meet industry standards.
Final Thoughts
Professional concrete grinding floors delivers results that DIY attempts rarely match. Experienced contractors achieve consistent finishes across large areas while they avoid costly equipment damage and health hazards from silica exposure. The precision required for proper grit progression and temperature control demands specialised knowledge that takes years to develop.
Consider professional services when you work with areas over 200 square metres, deal with hard aggregate concrete, or require mirror-like finishes. Complex projects that involve multiple rooms or commercial spaces benefit from industrial-grade equipment that costs $15,000-40,000 to purchase. Professional operators complete work 60% faster than inexperienced users while they maintain consistent quality standards.
We at Superfloor Australia have refined these techniques through thousands of successful projects. Our polished concrete flooring services combine precision preparation with expert craftsmanship to deliver dust-resistant surfaces that maintain their appearance for decades. Professional installation protects your investment and guarantees results that meet industry standards (with proper maintenance schedules followed).