
Brushed concrete floors offer a practical, durable finish that works in almost any home. At superfloor australia, we’ve helped countless homeowners transform their spaces with this straightforward technique.
This guide walks you through every step, from preparing your concrete surface to maintaining your new floors long-term. You’ll learn exactly what tools you need and how to achieve professional results yourself.
Getting Your Concrete Ready for Brushing
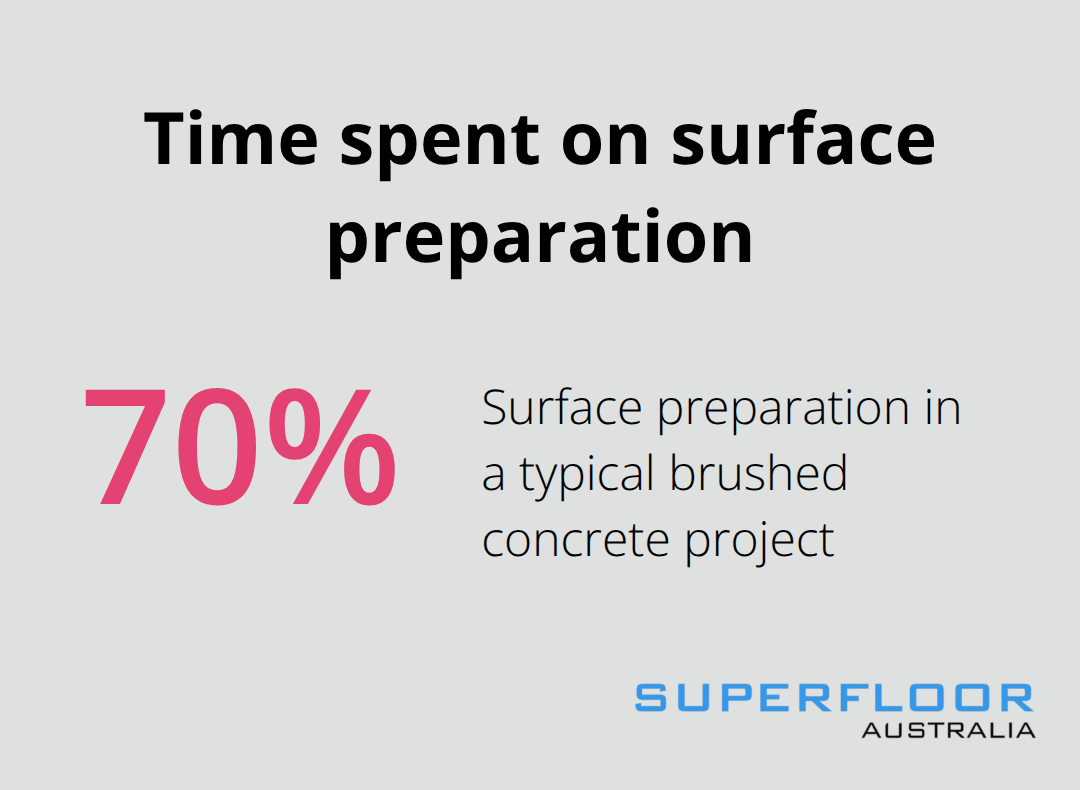
Surface preparation accounts for up to 70% of your total project time, and this investment pays off-it forms the foundation for a brushed finish that lasts decades. Start by removing any existing flooring.
If you have tile, use a floor scraper or chisel to break it away; for hardwood, the same tools work effectively. Carpet should be cut into strips to make removal easier. Once the old material is gone, tackle adhesive residue with a grinder fitted with a diamond cup wheel, working systematically across the entire floor. This step matters far more than most homeowners realise because leftover adhesive will show through your final finish and create uneven spots that catch light poorly.
Test Your Concrete’s Suitability
Before you start any grinding work, assess whether your concrete can actually take a brushed finish. Perform a Mohs hardness test-your concrete needs a proper hardness rating to hold a brushed texture without crumbling. Run a simple water drop test on your surface: if water beads up instead of soaking in, your concrete is too dense or sealed, and you will need additional preparation. Test moisture levels using a calcium chloride test; if moisture vapour emission rates exceed pounds per 1,000 square feet in 24 hours, you must apply an epoxy-based moisture barrier before proceeding. This prevents your brushed finish from failing months down the line.
Remove Debris and Degrease the Surface
Sweep and vacuum thoroughly to remove all loose debris, then degrease the surface to eliminate oil and grease stains. A pressure washer handles stubborn stains effectively. This cleaning stage prepares the concrete to accept repairs and grinding work without interference from contaminants that could compromise adhesion or create weak spots in your final finish.
Fill Cracks and Repair Damage
Address cracks and holes before you grind: fill anything smaller than 1/4 inch with concrete patching compound, which dries quickly and bonds well. Larger cracks require epoxy injection to prevent them from reappearing after you finish brushing. Spalling and holes should be repaired with a concrete resurfacer, applied flush with the surrounding surface so your grinder can work evenly across the entire floor. Skipping these repairs means your brushed finish will highlight every imperfection rather than hide it, and you will face costly touch-ups later.
Move Forward to the Grinding Stage
With your concrete tested, cleaned, and repaired, you now have a stable base ready for the grinding process that transforms your surface into a brushed finish.
Grinding and Brushing Your Concrete Floor
Start with Coarse Grinding to Expose Aggregate
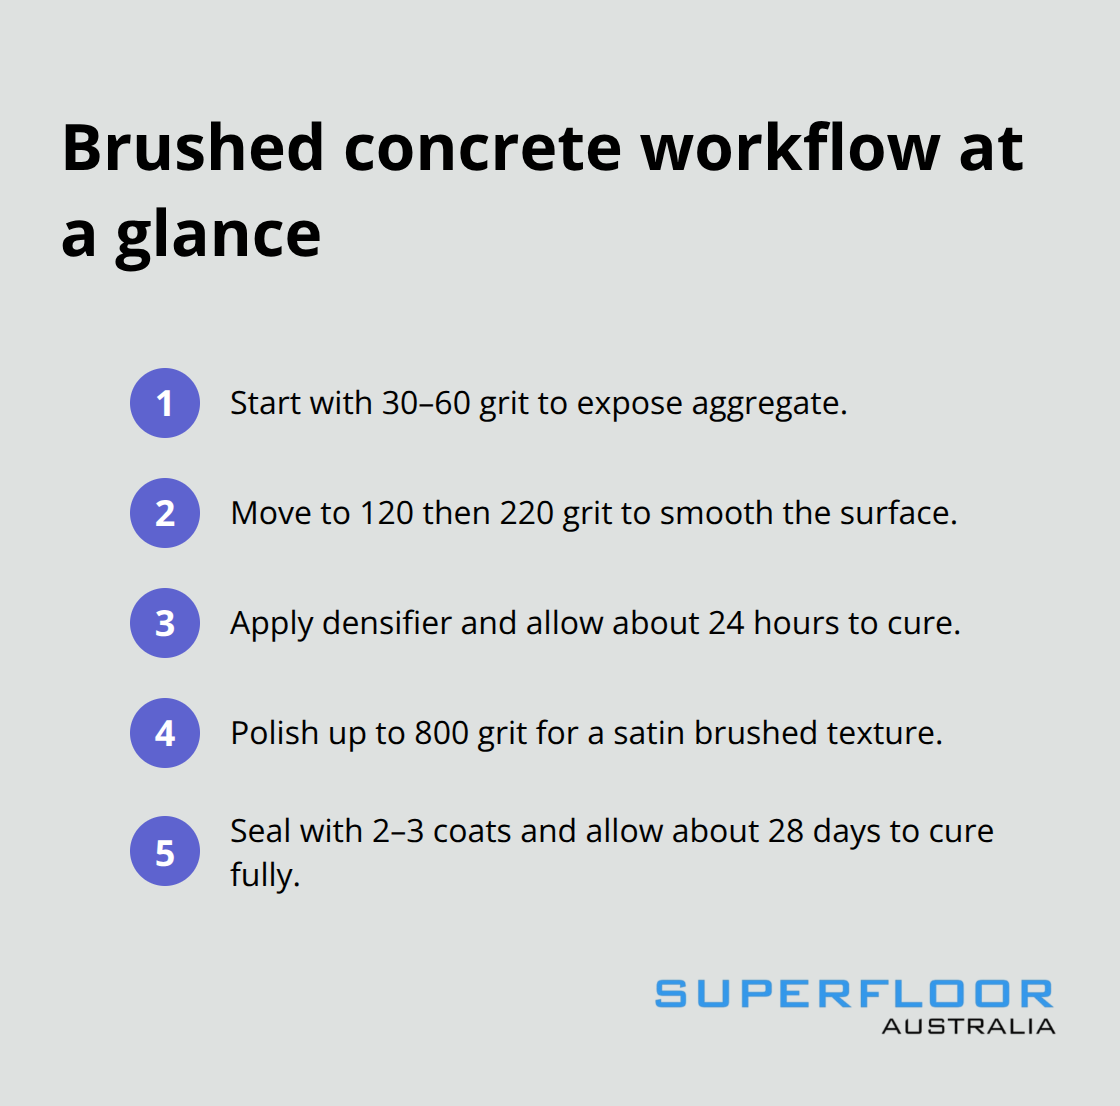
Now that your concrete is prepared, you grind and brush the surface to reveal the aggregate and achieve your desired texture. Start with coarse diamonds rated 30–60 grit to remove any remaining adhesives and expose the concrete’s aggregate structure. This initial grinding stage is aggressive but necessary; it strips away the top layer and creates a uniform base. A planetary grinder maintains even coverage and eliminates directional marks that would otherwise compromise your final look. Work methodically across the entire floor to ensure consistent results.
Progress Through Medium Grits to Smooth the Surface
Once you’ve covered the entire floor with coarse diamonds, progress to 120 grit, then 220 grit. These medium grits smooth the surface and reduce the visible scratches left by the coarser diamonds.
Work systematically to avoid missing sections or creating uneven patches. The transition between grit levels matters-rushing this stage leaves visible lines in your finished floor that catch light poorly and undermine the professional appearance you’re after.
Apply Densifier and Allow Proper Curing
After initial grinding, apply a concrete densifier and allow it to cure for approximately 24 hours. This densifier increases surface density, boosts polishability, and strengthens resistance to stains and abrasions, making your brushed finish far more durable long-term. The curing period is non-negotiable; skipping it or shortening it compromises the bond between the densifier and concrete, resulting in premature failure and costly repairs.
Polish to 800 Grit for Your Brushed Texture
Once your densifier has fully cured, you’re ready for the final polishing stage using finer grits to achieve the brushed texture you want. Continue working with your planetary grinder, moving through progressively finer diamond pads to refine the surface. For a brushed finish specifically, stop your polishing around 800 grit rather than pushing to 3000 grit (which produces a high-gloss mirror finish). The 800-grit stopping point gives you that satin, textured appearance that defines a brushed concrete floor. Discipline matters here-resist the temptation to polish higher, as overshooting compromises your intended finish.
Seal and Cure Before Heavy Use
After polishing is complete, seal your floor with a breathable sealer applied in two coats, or three coats if your space experiences high traffic. These sealers repel water and chemicals while maintaining the concrete’s natural texture for safe footing. Allow approximately 28 days for newly polished and sealed floors to fully cure before subjecting them to heavy foot traffic or moving furniture across the surface. During these 28 days, keep the space clear and avoid water contact where possible. Once fully cured, your brushed concrete floor delivers a durable, low-maintenance surface ready for years of everyday use-and proper maintenance routines will keep it looking fresh for decades to come.
Maintaining Your Brushed Concrete Floor
Establish a Daily and Weekly Cleaning Routine
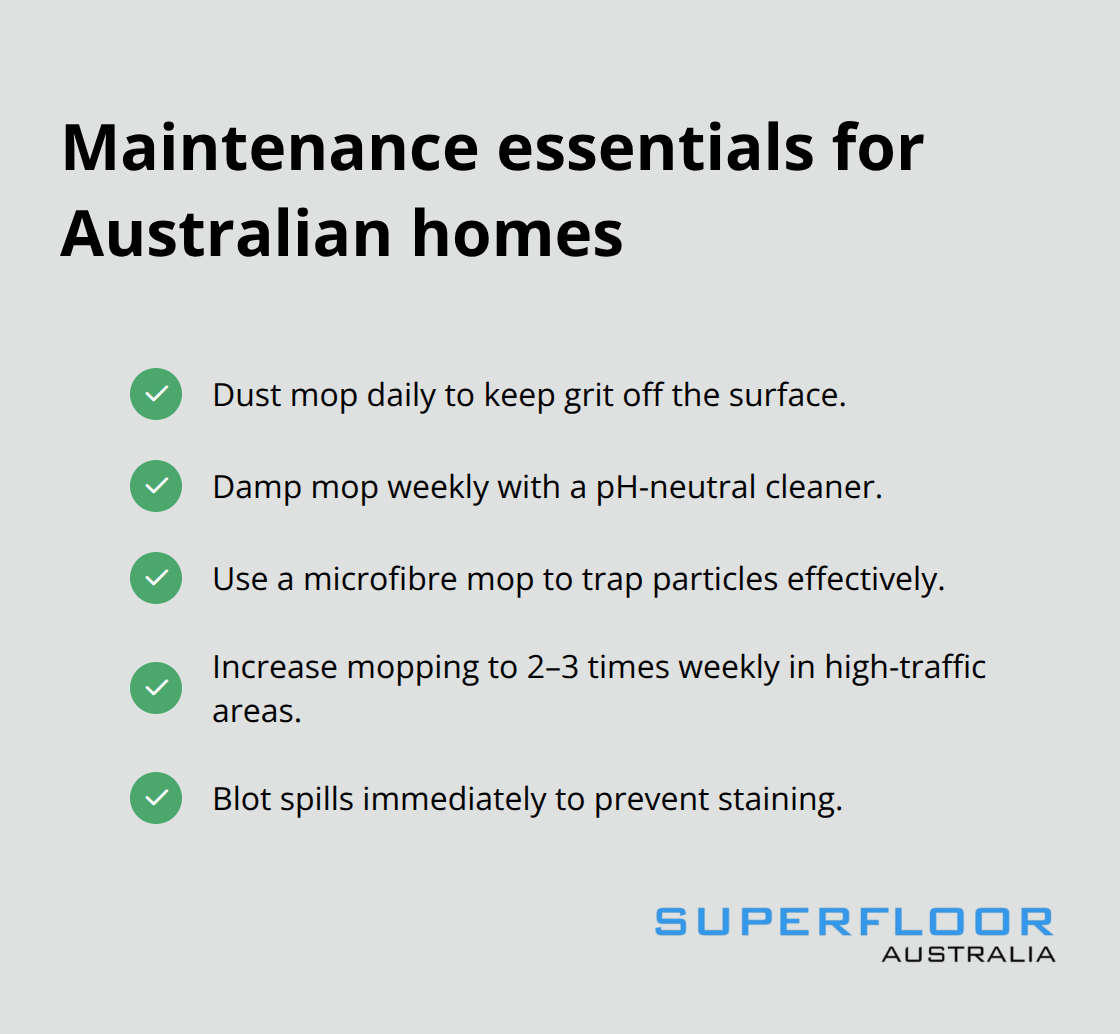
Daily dust mopping and weekly damp mopping with a pH-neutral cleaner form the backbone of brushed concrete maintenance. Your brushed floor’s longevity depends entirely on preventing dust and grit accumulation, which acts like sandpaper underfoot and gradually dulls the satin texture you worked hard to achieve. Use a microfibre mop rather than cotton or synthetic alternatives-microfibre actually traps particles instead of pushing them around. For stubborn stains that resist damp mopping, apply a mild dish soap and warm water solution, then scrub gently with a soft-bristled brush rather than an abrasive pad that can scratch the surface.
Handle Stains and Spills Effectively
Oil-based stains require a specific approach: make a paste from baking soda and water, leave it overnight to break down the oil, then scrub and rinse thoroughly. High-traffic areas demand more frequent cleaning-increase your mopping frequency to two or three times weekly in kitchens, entryways, and living spaces where foot traffic concentrates. Spill management cannot be overlooked; blot spills immediately rather than rubbing, which spreads the stain deeper into the concrete’s pores and makes removal far more difficult later.
Apply Protective Sealers Regularly
Sealing your brushed concrete floor with a stain guard or breathable sealer creates a protective barrier that prevents moisture and chemicals from penetrating the surface. Apply a fresh sealer coat every two to three years in standard residential spaces, but increase this frequency to annually in kitchens and bathrooms where spills and humidity create constant challenges. This investment protects your floor from the wear that accumulates over time.
Use Preventive Measures to Reduce Damage
Walk-off mats at every entrance reduce the amount of dirt and grit entering your home-this single preventive measure cuts maintenance time substantially. Chair mats under rolling furniture protect against the concentrated pressure and scratching that occurs when office chairs roll repeatedly across your floor. Never drag heavy furniture across the surface; lift and carry items instead, or use furniture sliders designed for concrete. Concrete’s thermal mass means the surface naturally feels cool underfoot, so consider radiant heating if winter comfort concerns you.
Address Scratches and Damage Promptly
Minor scratches happen inevitably, and addressing them promptly prevents them from spreading. For shallow scratches, clean the affected area with a pH-neutral cleaner, then use a fine-grit polishing pad to smooth the area without affecting surrounding sections. Deeper scratches or damaged areas require re-polishing from a coarser grit and working progressively to finer grits to match the rest of your floor, followed immediately by a fresh sealer coat to protect the repaired section. Extensive damage such as deep cracks warrants professional restoration rather than DIY attempts that often worsen the problem.
Final Thoughts
Installing brushed concrete floors in your home transforms your space with a durable, low-maintenance surface that outperforms traditional flooring options. Surface preparation, grinding to 800 grit, densifying, sealing, and allowing proper curing create a floor that performs beautifully for decades. Your investment in upfront preparation prevents costly repairs later and delivers exceptional durability that justifies the effort.
The long-term benefits make brushed concrete floors an intelligent choice for any home. Your floor resists stains, dust, and allergens naturally, making it ideal for families with allergies or pets, while the satin texture provides safe footing without the slippery surface of high-gloss finishes. Installation costs typically range from $4 to $10 per square foot, making brushed concrete significantly cheaper than hardwood or tile in most cases, and because you reuse your existing concrete slab rather than removing and replacing it, the environmental impact stays minimal.
Maintenance requires minimal effort: daily dust mopping and weekly damp mopping with pH-neutral cleaner keep your floor looking fresh indefinitely, while sealing every two to three years in standard spaces and annually in kitchens and bathrooms protects your investment. Superfloor Australia delivers high-quality brushed concrete flooring solutions in Brisbane, with precision preparation and expert craftsmanship tailored to your needs.