Installing floating floors on concrete transforms any space into a beautiful, functional area. The process requires proper preparation and the right techniques to achieve professional results.
We at Superfloor Australia have guided countless homeowners through successful installations. This comprehensive guide covers everything from moisture testing to final quality checks.
Tools and Materials Needed for Floating Floor Installation
Professional floating floor installation requires specific tools that separate amateur attempts from expert results. A moisture meter stands as your most important investment, with digital models that provide readings within 0.1% accuracy for concrete substrates. The calcium chloride test method takes 72 hours but delivers laboratory-grade precision for moisture assessment. Your cutting arsenal needs a circular saw with carbide-tipped blades, plus a jigsaw for intricate cuts around door frames and heating vents.
Essential Power and Hand Tools
Your toolkit must include a tapping block and pull bar system for tight joint connections without damage to plank edges. Professional installers recommend rubber mallets over standard hammers to prevent surface dents. Spacers that maintain the critical expansion gap come in various thicknesses, with options that provide extra safety margin. A chalk line creates perfect start references, while a speed square guarantees 90-degree cuts every time. Quality knee pads become invaluable during extended installation sessions on concrete surfaces.
Underlayment Selection That Transforms Performance
The 3mm Acoustic Rubber Underlay delivers commercial-grade density at 850 kg/m3 with 43dB acoustic performance rating. Standard 3mm Silver Foam Underlay covers 20 square metres per roll and includes built-in moisture protection film. Builders plastic sheeting at 200 microns thickness provides additional vapour barrier protection over concrete slabs. Cork underlayment offers natural antimicrobial properties but costs 40% more than foam alternatives.
Safety Equipment and Protective Gear
Professional installations require vapour-tight duct tape for sealing plastic sheet overlaps at 300mm intervals. Safety glasses protect your eyes from concrete dust and wood particles during cutting operations. Work gloves with grip enhancement prevent slips while handling planks and tools. Dust masks become essential when you cut materials or work in poorly ventilated areas (especially important with concrete preparation). These safety measures protect you throughout the installation process and prepare you for the next critical phase: concrete preparation and moisture testing.
Preparing Concrete for Floating Floor Installation
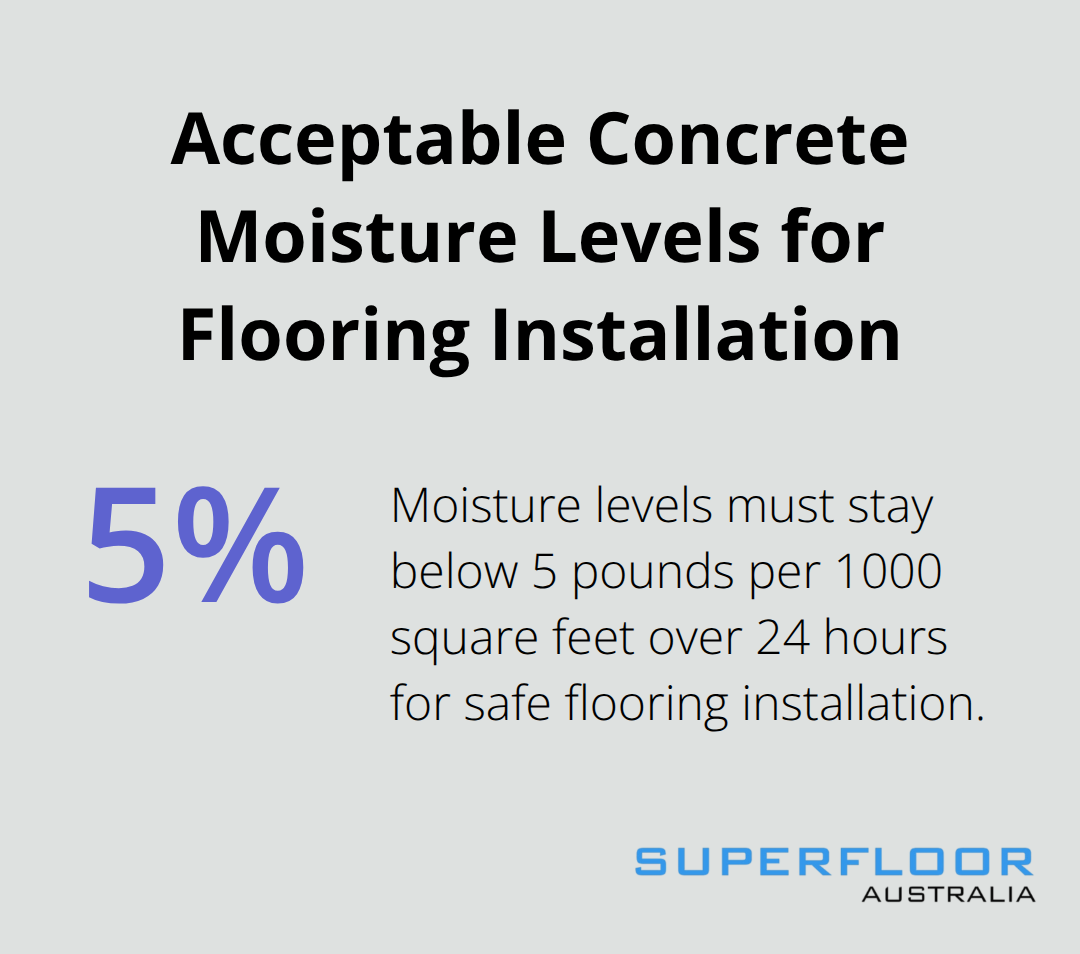
Concrete moisture testing determines installation success or expensive failures within months. Digital moisture meters provide surface readings, but the calcium chloride test remains the gold standard with 72-hour accuracy requirements. Concrete slabs release moisture at varying rates depending on conditions, with evaporation rates reaching over 20mm on hot windy days. Test multiple locations across your concrete surface, focus on areas near exterior walls and plumbing penetrations where moisture accumulates. Acceptable moisture levels must stay below 5 pounds per 1000 square feet over 24 hours using ASTM F1869 standards.
Moisture Detection Methods
Professional installers use both surface meters and penetration tests to verify concrete readiness. The relative humidity test method requires drilling holes 40% into slab depth and measures internal moisture conditions. Surface metres detect immediate moisture but miss deeper substrate problems that cause future failures. Test results above acceptable limits require vapour barriers or installation delays until concrete cures properly.
Surface Preparation and Levelling Requirements
Clean concrete surfaces with degreasing agents to remove construction residues, paint splatters, and adhesive remnants that prevent proper underlayment adhesion. Self-levelling compounds correct surface variations, which causes plank separation and premature wear. Fill concrete gouges with multipurpose filler that cures within 24 hours and requires no additional waterproofing. Professional installers reject substrates with significant variations across room spans because floating floors telegraph every imperfection. Grind high spots rather than apply compound for minor corrections (this saves both time and material costs).
Vapour Barrier Installation
Install 200-micron builders plastic with 300mm overlaps sealed with vapour-tight duct tape before any underlayment placement. Position plastic sheets to cover the entire floor area plus wall edges where moisture penetration occurs most frequently. Seal all penetrations around pipes and floor drains with additional tape applications. This barrier system prevents moisture migration that damages flooring materials over time.
Underlayment Selection and Placement
The 3mm Acoustic Rubber Underlay achieves 43dB sound reduction with 850kg/m3 density that withstands heavy furniture loads. Roll underlayment perpendicular to planned plank direction, butt seams tightly without gaps or overlaps. Standard foam underlay costs less but provides minimal acoustic benefits compared to rubber alternatives. Pre-installed underlay on hybrid planks eliminates separate installation steps but offers less moisture protection than dedicated barrier systems (particularly important over concrete slabs). Position your materials and tools strategically before you begin the actual plank installation process.
Step-by-Step Installation Process
Professional floating floor installation begins with room layout that prevents costly mistakes and material waste. Start from the longest wall in your room, but check wall straightness with a chalk line first – most walls deviate from true straight by 5-10mm over standard room lengths. Position your first plank 10mm from the wall with spacers, then work left to right across the room width. The click-lock method requires tongue-and-groove connections at 45-degree angles before you lower planks flat against the subfloor. Never force connections that resist gentle pressure, as this damages the mechanism and creates gaps within weeks.
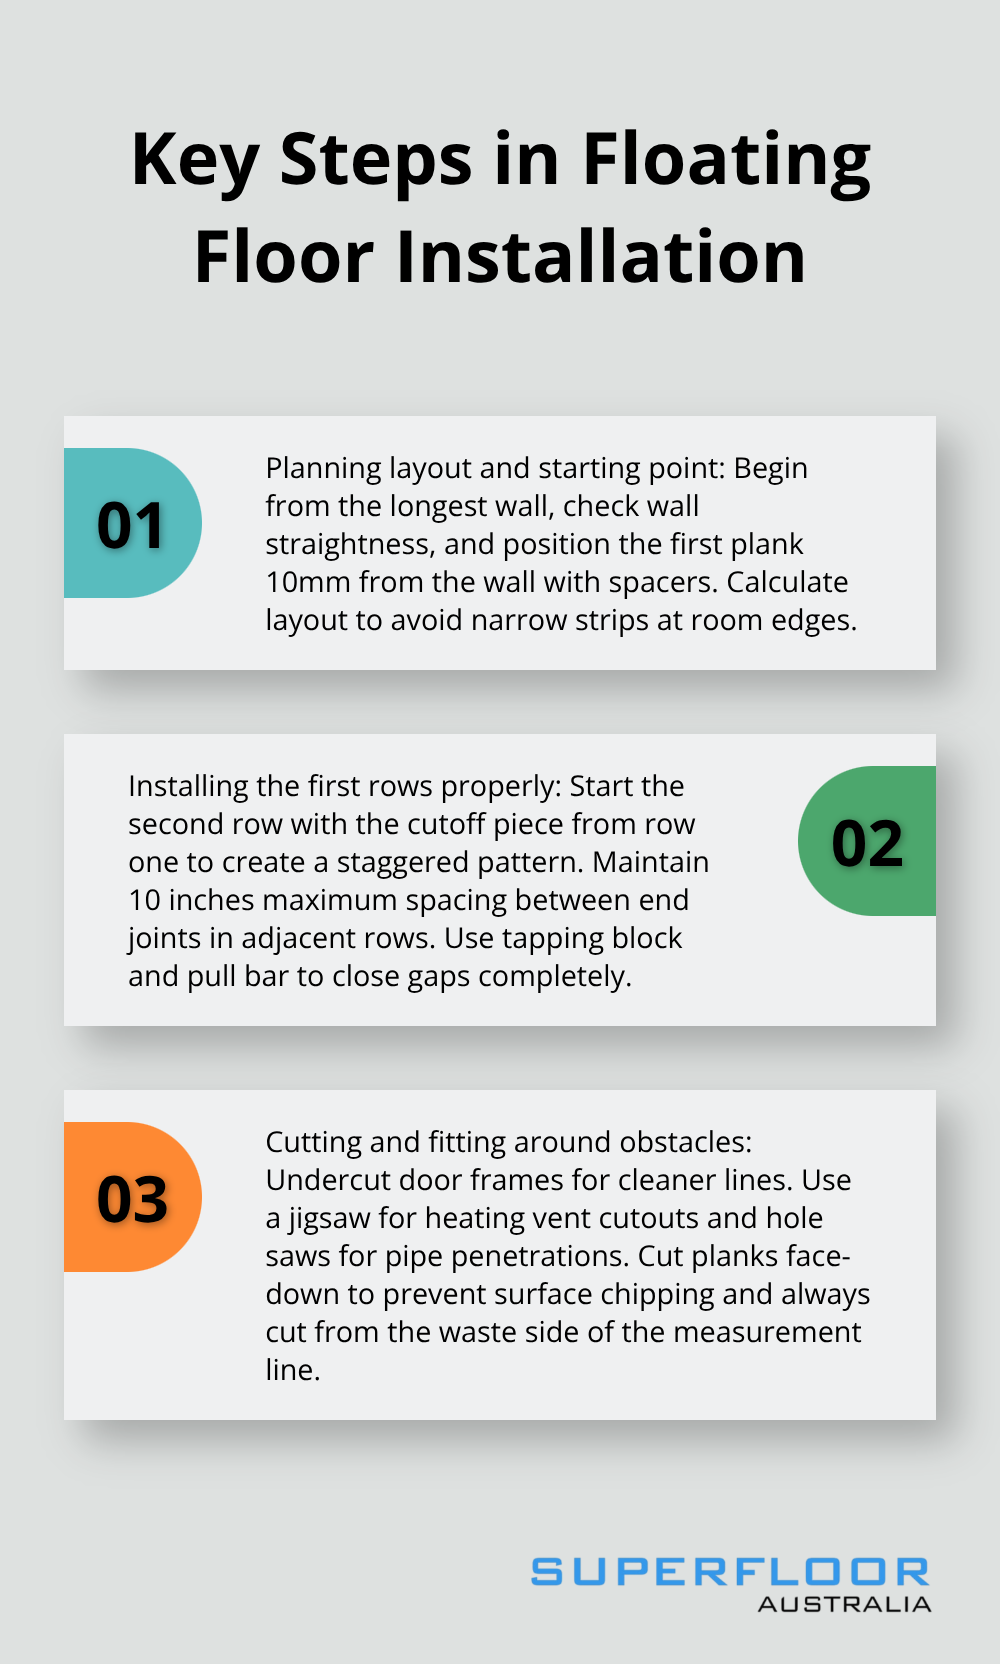
Planning Layout and Starting Point
Your first row determines the entire installation quality, so measure twice and cut once becomes absolutely critical here. Cut end planks so they measure at least half the length of full planks – shorter pieces create weak points that separate under foot traffic. Calculate your layout to avoid narrow strips at room edges (less than 50mm wide strips look unprofessional and perform poorly). Professional installers reject layouts that create these problematic edge conditions.
Installing the First Rows Properly
The second row starts with your cutoff piece from row one, which creates the staggered pattern that distributes load across the entire floor system. Professional installers maintain 10 inches maximum spacing between end joints in adjacent rows. Use your tapping block and pull bar system to close gaps between planks completely – even 1mm gaps telegraph through the floor surface and collect debris over time. Check each row for straightness before you proceed to the next row.
Cutting and Fitting Around Obstacles
Door frame cuts require you to undercut the frame itself rather than notch around it, which creates cleaner lines and stronger installations. Use your jigsaw with fine-tooth blades for heating vent cutouts, measure twice and cut 2mm oversized for thermal expansion clearance. Pipe penetrations need hole saws that cut 6mm larger than pipe diameter, then split the plank lengthwise to fit around obstacles. Template cardboard helps transfer complex shapes accurately to expensive planks before you cut them. Professional tip: cut planks face-down to prevent surface chipping, and always cut from the waste side of your measurement line for perfect fits.
Final Thoughts
Your floating floors on concrete installation succeeds when you complete thorough quality checks after the final plank placement. Walk across the entire surface to identify loose connections or squeaks that indicate improper installation. Remove all spacers and install baseboards to cover expansion gaps while you maintain the 10mm clearance requirement.
Most installation failures stem from inadequate moisture tests or rushed acclimatisation processes. Planks that haven’t adapted to room conditions for 48-72 hours will expand or contract after installation, which creates gaps or buckling. Skip vapour barriers over concrete and moisture damage appears within six months (particularly in ground-level installations).
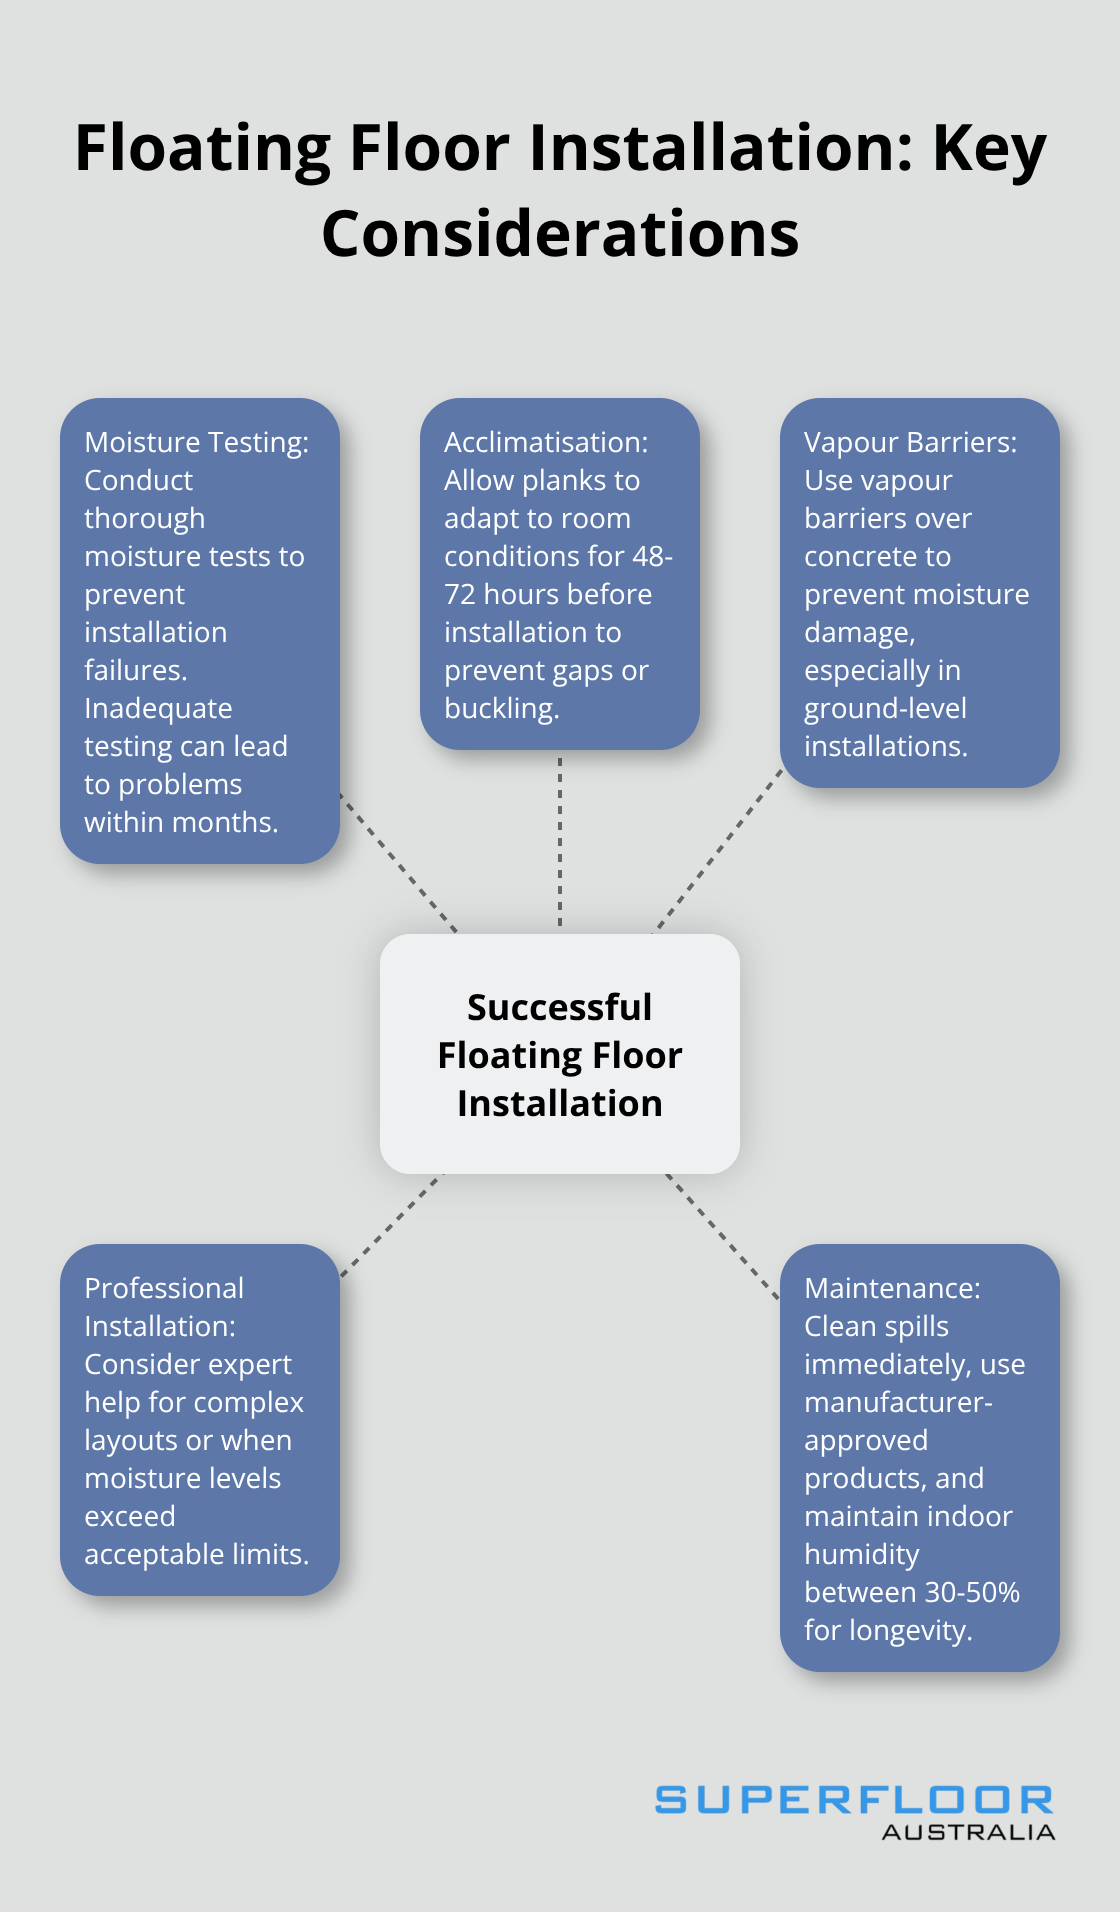
Professional installation becomes necessary when moisture levels exceed acceptable limits or when complex room layouts require specialised cuts. We at Superfloor Australia handle projects that demand expert precision, especially when you integrate with existing polished concrete areas or address structural moisture issues. Clean spills immediately and use manufacturer-approved products to prevent surface damage while you maintain consistent indoor humidity levels between 30-50%.