
Honed concrete around pool areas offers a sleek, modern finish that’s both practical and visually appealing. At superfloor australia, we’ve seen more homeowners choose this surface for its durability and low maintenance compared to traditional pool decking.
The installation process requires careful planning and proper technique to get right. This guide walks you through every step, from preparing your pool area to maintaining your new surface for years to come.
Preparing Your Pool Area for Honed Concrete
Assess Your Current Surface
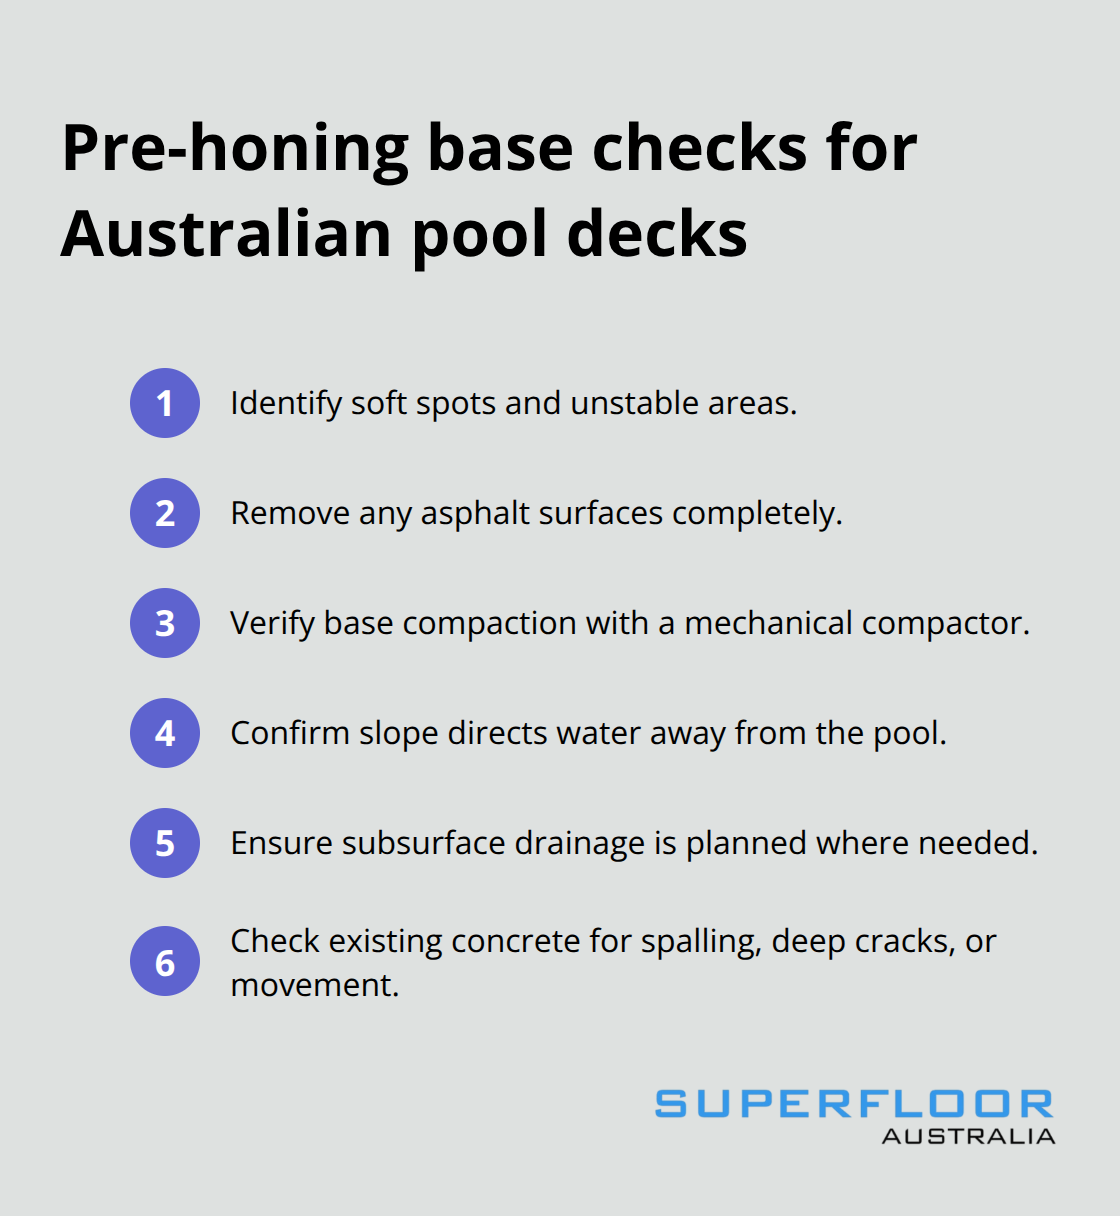
Walk around your pool area and identify any cracks, uneven sections, or water pooling spots. These aren’t minor issues-they compound during installation. If your existing surface slopes toward the pool rather than away, you’ll trap water against the concrete, which accelerates deterioration. The Portland Cement Association recommends a slope of 1/8 to 1/4 inch per foot away from the pool edge. Measure this with a level and straight edge; don’t estimate.
Look for soft spots in the current deck-these indicate poor base preparation underneath. If the existing surface is asphalt, you must remove it completely. Asphalt breaks down under UV exposure and chlorine, leaving debris that compromises your new base. For existing concrete, assess whether it’s stable enough to build on. Concrete with significant spalling, deep cracks, or movement isn’t suitable.
Remove Existing Materials
You’ll need to remove unsuitable surfaces entirely and start fresh with proper base preparation. Strip away all loose material, dirt, and organic growth with a pressure washer at 3000 PSI or higher, then allow 48 hours for complete drying before proceeding. This step prevents contamination that weakens the bond between your new concrete and the base layer.
Build a Strong Foundation
The foundation determines everything. Most pool deck failures stem from inadequate base preparation, not from the concrete itself. Compact 4 to 6 inches of crushed aggregate following guidelines for pedestrian walkways. Use a mechanical compactor-hand tamping won’t achieve the density needed. Your base must support the weight of people, furniture, and water without settling. Poor compaction leads to cracking within 12 to 18 months.
After compacting, check that water drains away from the pool. If water pools anywhere on your base layer, you need subsurface drainage solutions. Consider installing perforated drain pipe around the pool perimeter, directing water away from the structure. This prevents the hydrostatic pressure that cracks concrete from underneath.
Install Drainage Systems
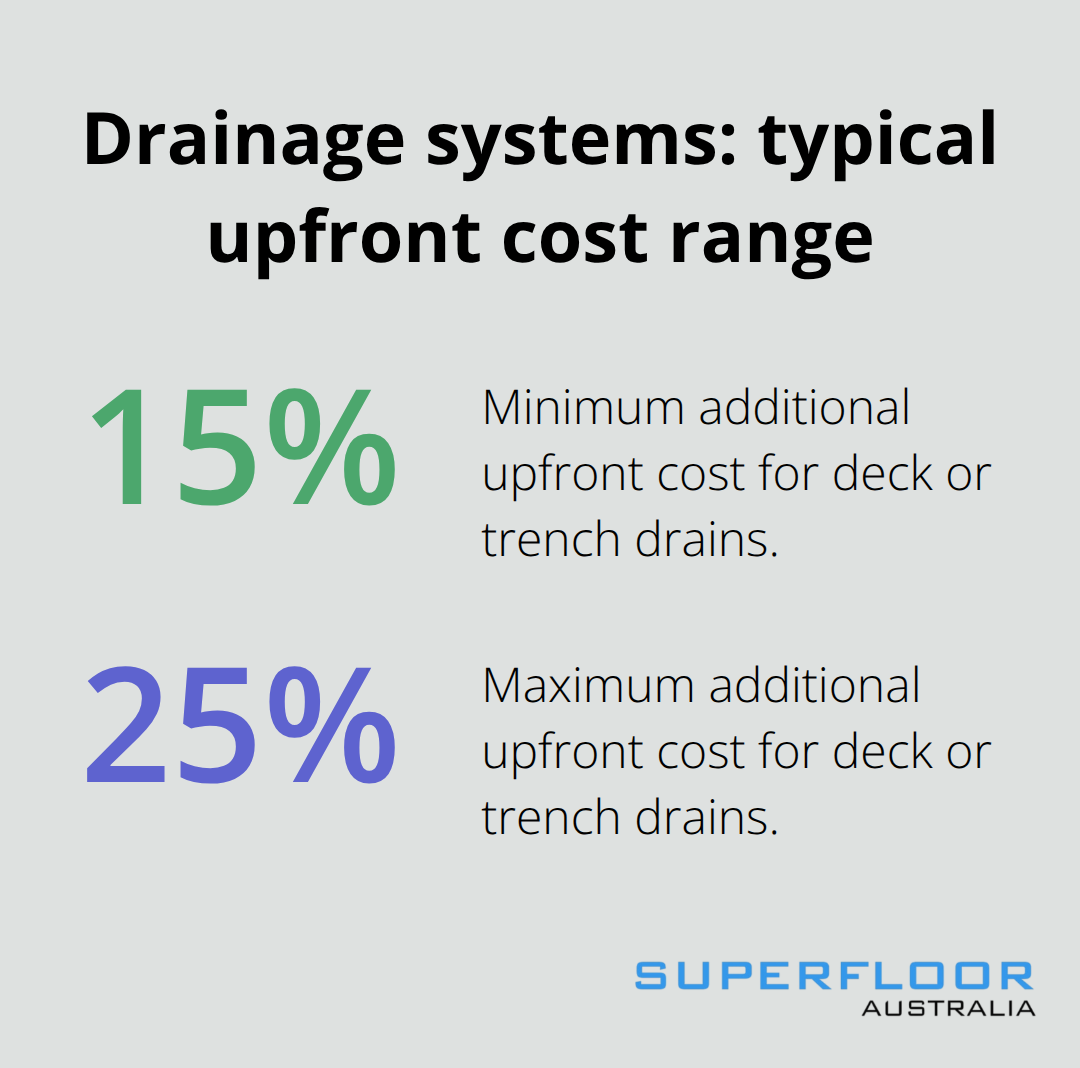
Drainage is where most DIY installations fail. Surface slope alone isn’t enough; you need subsurface management. Install deck or trench drains if your pool area receives heavy rainfall or sits in a low-lying section of your yard. These systems cost between 15 and 25 percent more upfront but save thousands in repairs later. Position drains at the lowest points and slope the base toward them.
If you’re in a climate with freeze-thaw cycles, this becomes non-negotiable. Water trapped under the concrete expands when frozen, creating heaving and cracking. Air-entraining admixtures in exterior mixes help protect against freeze-thaw damage, but that’s only effective if water doesn’t accumulate underneath. Get drainage right first, then the concrete mix becomes your secondary defence. With your pool area properly assessed and prepared, you’re ready to move forward with the concrete pouring and base layer preparation that transforms your pool deck.
Pouring and Finishing Your Pool Deck Concrete
Selecting and Pouring the Right Concrete Mix
With your base properly compacted and drainage sorted, you’re ready to pour. Mix an exterior-grade, polymer-modified concrete with appropriate air content-this differs significantly from the mix used for interior floors. Air-entrained concrete protects against freeze-thaw damage, and the polymer improves bonding to your base layer. Pour in small sections rather than trying to cover the entire deck at once; this approach lets you reach all areas and avoid voids that weaken the finished surface. Spread the concrete evenly using a screed or straight edge in a sawing motion to create a flat, uniform finish. Work quickly because exterior concrete sets faster than you’d expect, especially on hot days.
Timing the Honing Process
You’ll immediately begin the honing process after spreading-don’t wait for full curing. The initial grinding happens while the concrete is still green, meaning partially set but not fully hardened. This timing matters because grinding fully cured concrete requires far more aggressive equipment and costs significantly more. Use a grinding sequence that starts with coarser grits and progresses to finer ones, typically moving from 60-grit through to 120-grit or higher depending on the look you want. This controlled grinding creates a matte texture that maintains slip resistance-a critical safety feature around water.
Many installers over-polish, which creates a slick surface that becomes dangerous when wet. Try aggregate exposure that’s visible but not so exposed that you’ve removed the binding matrix. After honing, add a light broomed pattern or additional texture to the finish for extra grip, especially near the pool edge where people transition from deck to water.
Managing the Curing Phase
Curing happens over 7 to 14 days, and this period determines whether your deck cracks or stays intact. Keep the surface moist during this time-either through misting or a curing compound-because concrete that dries too quickly develops surface cracks. The American Concrete Institute recommends moisture curing for exterior decks because it delivers superior strength and durability compared to air drying. Once fully cured, apply a penetrating breathable sealer that soaks into the pores of the concrete while maintaining slip resistance. Penetrating sealers are preferred over film-forming types around pools because they protect the concrete without creating a slippery surface.
Sealing and Joint Protection
You’ll need to reapply sealer every 2 to 5 years depending on your climate and foot traffic-more frequently in harsh conditions or high-use areas. For chlorinated or saltwater pools, verify that both your concrete mix and sealer are rated for chlorine or salt exposure; standard products deteriorate faster in these environments. If your pool uses a saltwater system, this becomes non-negotiable because salt accelerates concrete degradation.
Control joints placed at regular intervals-roughly every 8 to 12 feet-minimise random cracking by giving concrete a planned path to move. Saw-cut these joints into the slab as it cures, then fill them with flexible polyurethane sealant that absorbs movement without hardening. Rounded or eased edges along the pool border reduce chipping hazards and make the deck safer for bare feet. These details separate professional installations from rushed jobs that fail within a few seasons. With your concrete poured, honed, and properly sealed, your pool deck is ready for regular maintenance routines that keep it looking fresh and performing well for years ahead.
Maintenance and Care for Poolside Honed Concrete
Your honed concrete deck requires consistent maintenance to stay safe and visually appealing, but the routine is straightforward if you follow the right approach. Clean your pool area weekly with a pH-neutral cleaner and soft-bristled brush, then rinse thoroughly with fresh water. Never use acidic cleaners, vinegar, or pressure washers above 2000 PSI because these etch the honed surface and create a rough, uncomfortable finish.
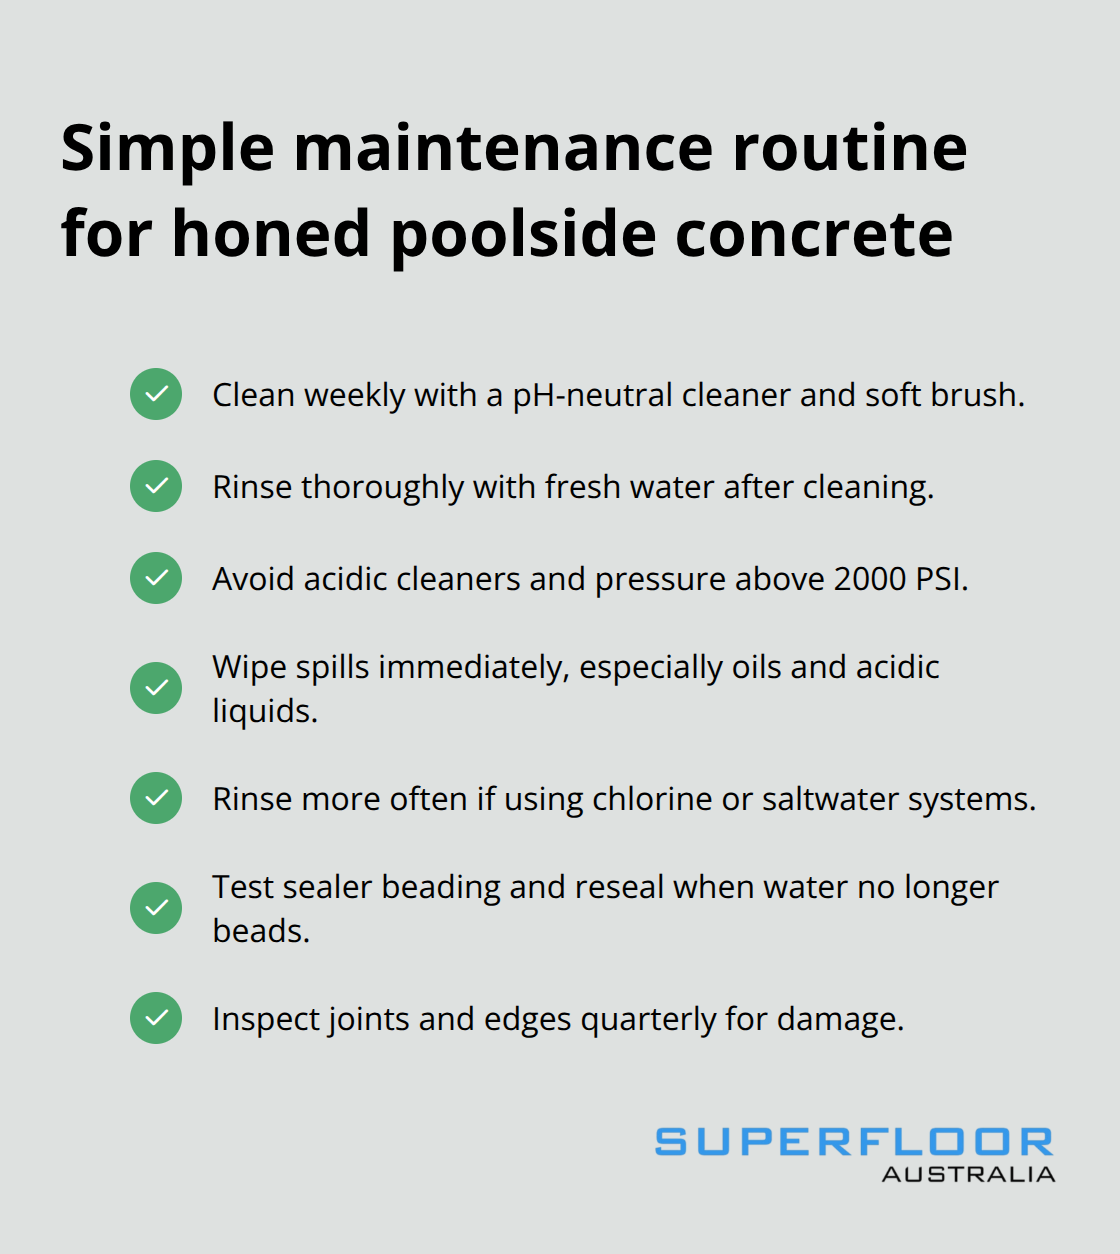
Spills demand immediate attention, especially oil, grease, or acidic liquids from pool chemicals or beverages. The longer these sit, the deeper they penetrate and the harder they become to remove.
Addressing Stains and Chemical Exposure
For stubborn stains, use a concrete-specific stain remover rather than generic household products. If your pool uses chlorine or a saltwater system, rinse the deck more frequently because salt and chlorine residue accumulates faster than you’d expect and degrades both the concrete and sealer over time. Standard cleaners won’t address chemical buildup effectively-you need products formulated for pool environments to prevent accelerated deterioration.
Resealing Your Deck Surface
Your sealer protects against water absorption and staining, but it degrades faster around pools than on standard patios. Reapply sealer every 2 to 3 years in warm climates or every 4 to 5 years in drier regions. Test whether resealing is needed by pouring water onto the deck-if it beads up and rolls off, your sealer is still effective. If water soaks in and darkens the concrete, reseal immediately.
Use a penetrating sealer rated for chlorine and saltwater exposure if your pool uses either system; standard sealers deteriorate rapidly in these environments. Apply thin, even coats rather than one thick coat, which can trap moisture underneath and cause problems. Most penetrating sealers require two coats for maximum protection (with 24 hours between applications) to deliver the durability your pool deck demands.
Managing Slip Hazards and Water Runoff
Honed concrete is naturally slip-resistant when dry, but any wet surface becomes slippery-this isn’t a flaw in the material, it’s physics. The key is managing water runoff around your pool so standing water doesn’t accumulate. Position furniture and equipment away from high-traffic areas, and use protective pads under heavy items to prevent localised wear patterns.
Areas near the pool edge experience the most foot traffic and water exposure, so these wear faster than other sections. If you notice the surface becoming polished or slick in specific zones, apply an additional broomed texture or anti-slip coating to those spots rather than recoating the entire deck. Textured concrete without sealer provides superior grip compared to sealed surfaces, so if slip resistance matters more than stain protection in your climate, consider leaving high-traffic zones near the pool edge unsealed or using a matte sealer instead of glossy formulations.
Preventing Wear and Maintaining Durability
Protect your deck from heavy impact by moving furniture regularly to prevent wear patterns from forming in the same spots. Water pooling near the pool edge accelerates erosion and creates sediment buildup that makes the surface rough and uncomfortable. Clear water runoff promptly after rain or heavy pool use to maintain both safety and appearance. Inspect control joints and edges quarterly for signs of damage or separation, and address any cracks or spalling immediately before they expand. This proactive approach prevents minor issues from becoming expensive repairs that compromise your entire pool deck.
Final Thoughts
Honed concrete around pool areas delivers a modern, durable surface that outperforms traditional decking options. The process demands attention to detail at every stage, from base preparation through sealing, but the payoff is a deck that stays safe, looks polished, and requires minimal upkeep. Your foundation work determines longevity, proper drainage prevents costly failures, and consistent maintenance keeps the surface performing well for years.
Honed concrete offers genuine advantages over alternatives-it costs significantly less than natural stone or premium pavers while delivering a comparable aesthetic. The installation timeline is faster than interlocked systems, meaning your pool area becomes usable sooner. The finish is naturally slip-resistant when properly installed, and the low-maintenance routine of regular cleaning and periodic resealing fits easily into most homeowners’ schedules.
If you’re ready to move forward, start by assessing your current pool area conditions and planning your drainage solutions. Get quotes from experienced installers who understand pool-specific requirements and can verify their work with references. We at Superfloor Australia specialise in concrete honing and outdoor solutions that deliver slip-resistant elegance for poolside areas, backed by precision preparation and expert craftsmanship.