At Superfloor Australia, we’ve seen a growing trend in transforming existing concrete slabs into stunning polished concrete floors. This cost-effective and eco-friendly option breathes new life into old spaces.
Installing polished concrete floors on existing slabs is a process that combines artistry with technical expertise. Our guide will walk you through the steps, from preparation to customisation, ensuring you achieve the perfect finish for your space.
How to Prepare Your Existing Concrete Slab
Assessing Slab Condition
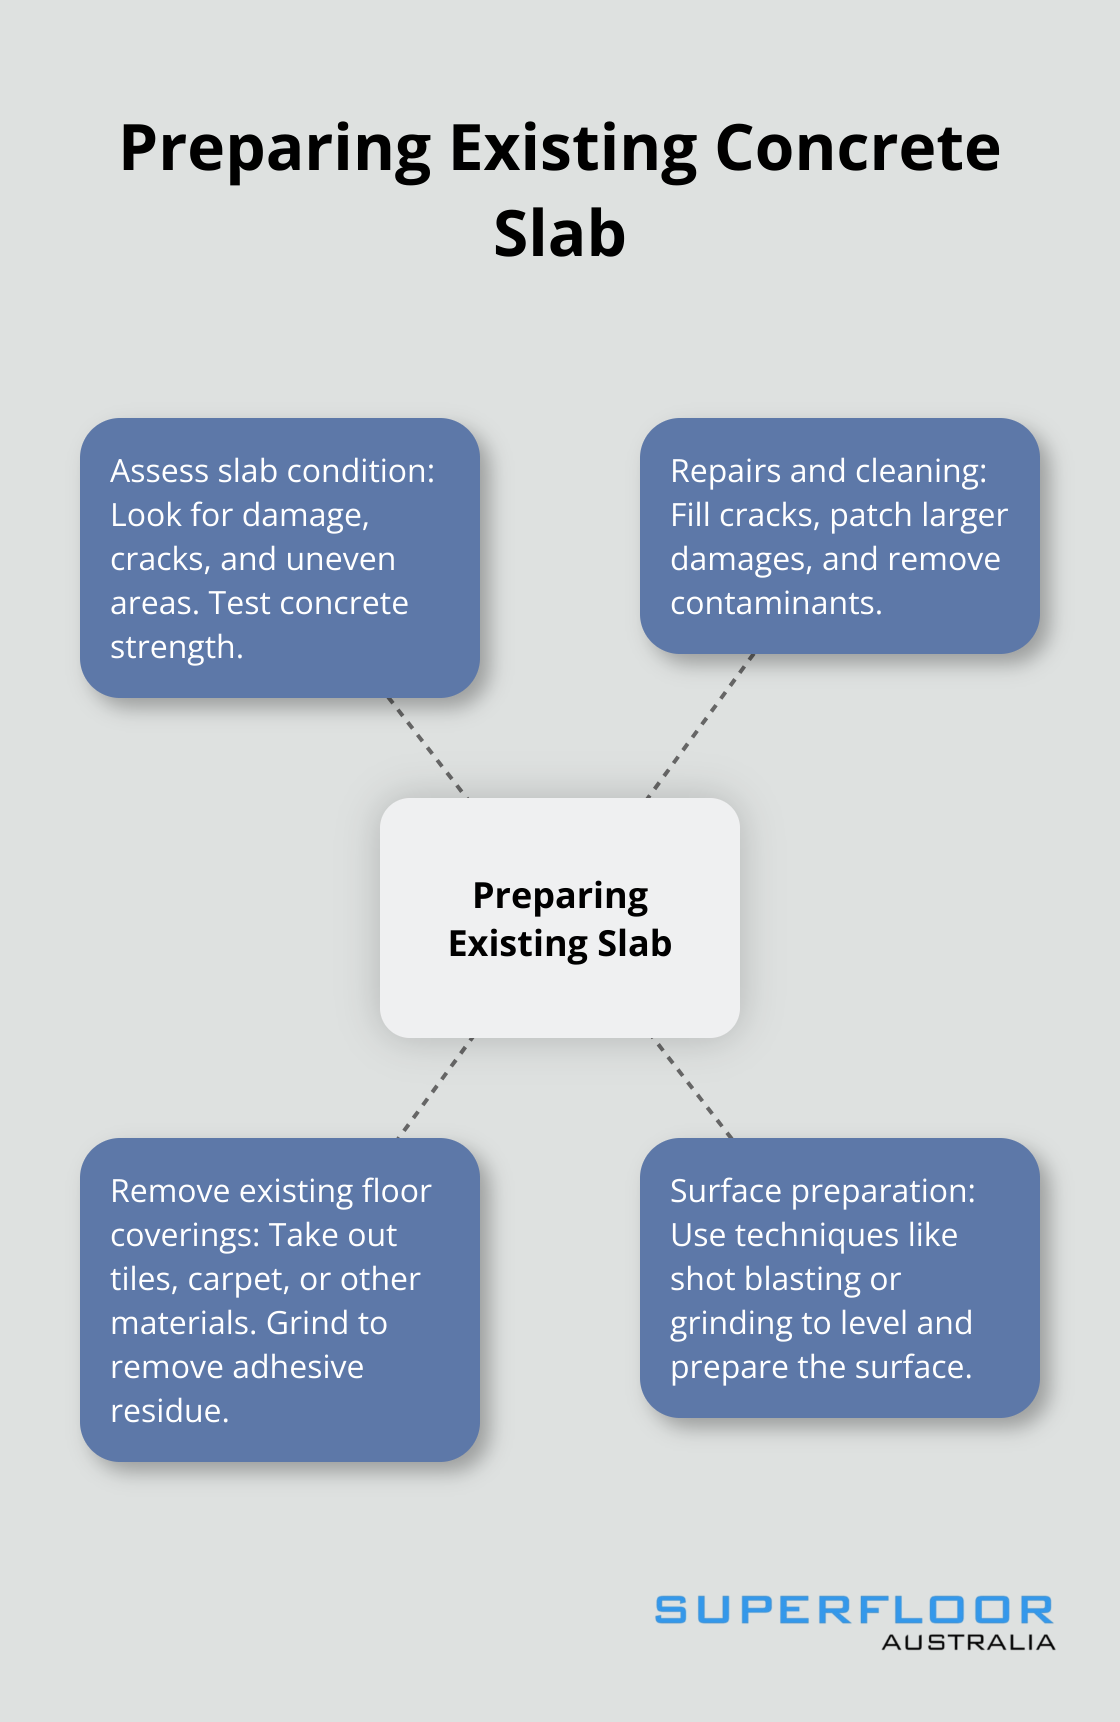
The preparation of your existing concrete slab forms the bedrock of a successful polished concrete floor installation. This step (which many overlook) determines the quality and longevity of your final result. A thorough assessment of your existing slab is the first order of business. We look for signs of damage, such as cracks, chips, and uneven areas. Using a specialised hammer is another common way to test concrete strength. This assessment helps determine the scope of work needed and allows for an accurate timeline and cost estimate.
Repairs and Cleaning
After identifying issues, repairs take centre stage. Small cracks are typically filled with epoxy or similar compounds, while larger damages may require more extensive patching. The objective is to identify the key physical characteristics of a concrete substrate needed to ensure successful, long-term repairs and overlays.
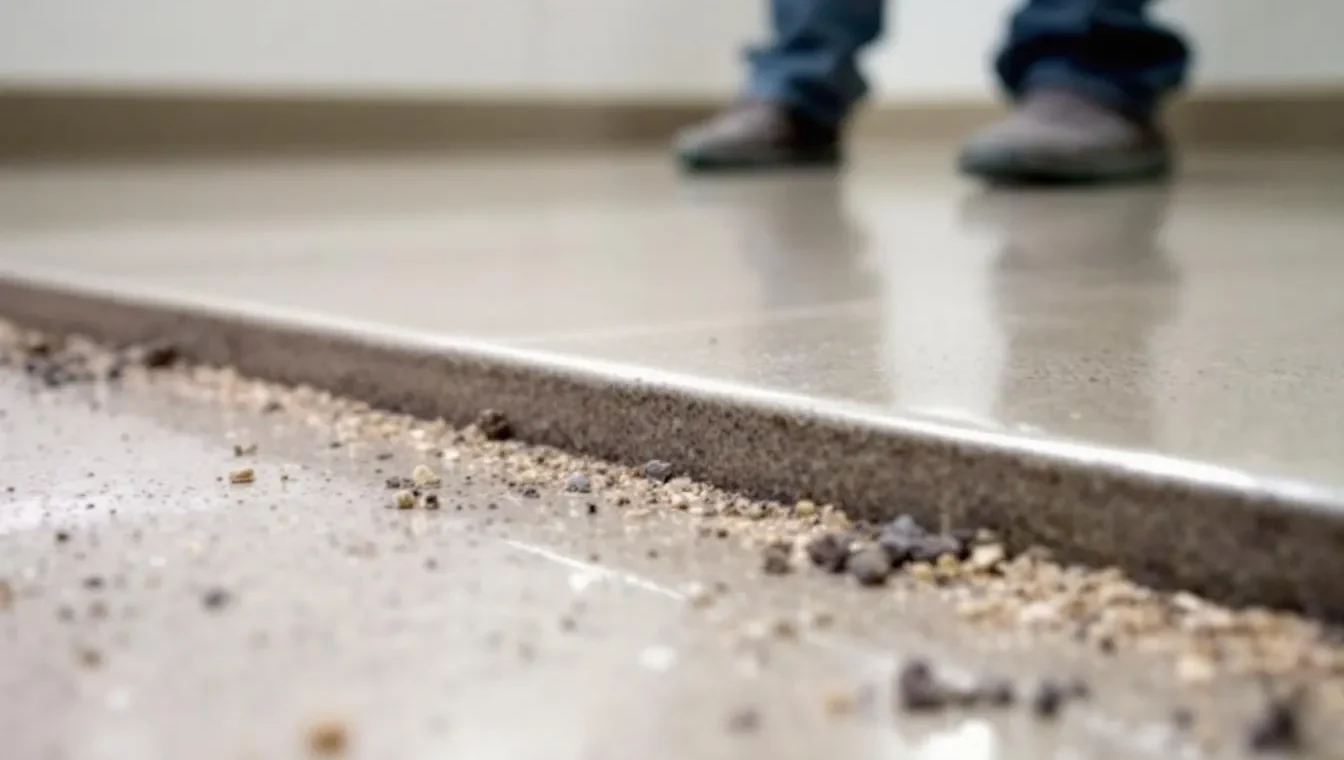
Cleaning is equally important. Industrial-grade cleansers and sometimes shot blasting remove all contaminants, including old adhesives, paint, or sealers. This step is critical – even small amounts of residue can interfere with the polishing process and compromise the final finish.
Removing Existing Floor Coverings
If your slab is covered with tiles, carpet, or other flooring materials, these need removal. This process can be labour-intensive and may reveal additional issues with the slab that weren’t visible before.
After removal, grinding the surface eliminates any remaining adhesive residue. This step also helps to level out any minor imperfections in the slab, creating an ideal surface for polishing.
Surface Preparation Techniques
Different techniques come into play depending on the condition of your slab. Shot blasting, for instance, is effective for removing thin coatings and opening up the pores of the concrete. One of the most popular surface preparation techniques on the market, it involves using a wheel to sling metal shot into the concrete. Grinding, on the other hand, is better suited for levelling uneven surfaces and removing thicker coatings.
The choice of technique (and the intensity of its application) depends on factors such as the hardness of the concrete, the type of coating to be removed, and the desired level of aggregate exposure in the final polished surface.
With the slab properly prepared, we’re now ready to move on to the exciting process of polishing. This next step will transform your ordinary concrete slab into a gleaming, durable surface that will be the envy of all who see it.
Transforming Concrete Through Polishing
The Grinding Journey
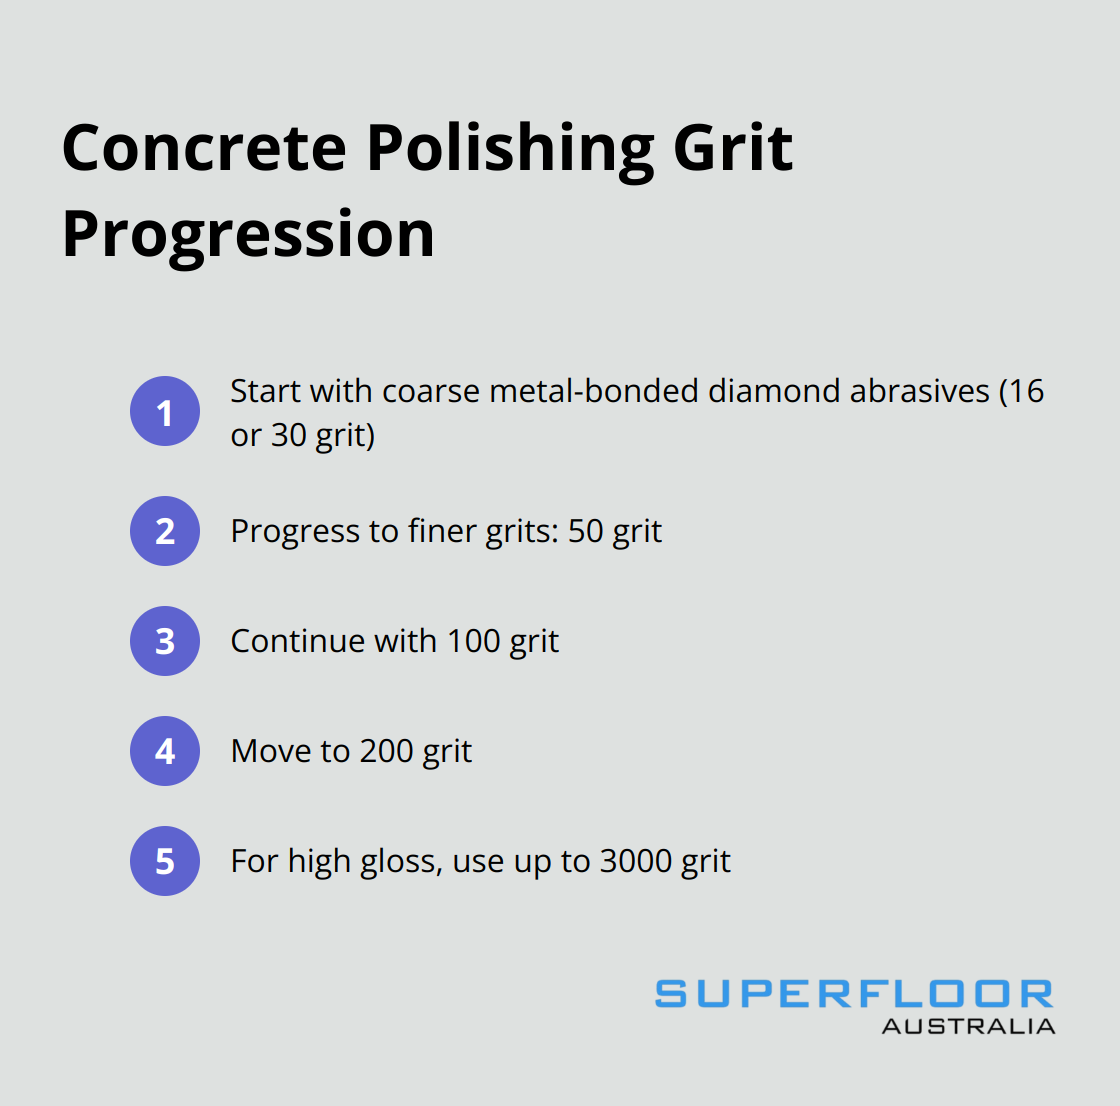
Polishing concrete involves a multi-step process that transforms ordinary concrete slabs into stunning, durable surfaces. The journey begins with coarse diamond grinding. We use metal-bonded diamond abrasives (typically 16 or 30 grit) to remove minor imperfections and open up the concrete surface. This initial grinding also determines the level of aggregate exposure, ranging from a cream finish with no exposed aggregate to a full exposure showing the largest aggregates.
As the process advances, we switch to finer grits, usually in a sequence of 50, 100, 200, and up to 3000 grit for an ultra-high gloss finish. Each step eliminates the scratches left by the previous grit, resulting in an increasingly smooth surface. This process can take several days, depending on the area size and desired finish.
Surface Hardening
After the initial grinding stages, we apply a concrete densifier. This liquid penetrates the concrete and reacts with the calcium hydroxide to form calcium silicate hydrate, which significantly increases the surface density and hardness. The gel binds to the concrete and dries hard, making the concrete more durable and denser than it was before the application of the densifier. This step is essential for achieving a high-quality polish and enhancing the floor’s durability.
We typically apply the densifier after the 100 or 200 grit grinding step. It cures for several hours or overnight before we continue with finer grinding and polishing. This step creates a surface that withstands heavy foot traffic and resists staining.
Achieving the Perfect Shine
The final polishing stages reveal the floor’s true beauty. We use resin-bonded diamond pads in progressively finer grits to achieve the desired level of gloss. For a matte finish, we might stop at 400 grit, while a high-gloss finish could go up to 3000 grit or beyond.
The choice of final grit depends on the client’s preferences and the intended use of the space. In a high-traffic commercial area, we might recommend a semi-gloss finish (around 800 grit) for a balance of aesthetics and practicality.
Protecting Your Investment
The final step in our process involves applying a stain guard or sealer. This protective layer helps resist stains and makes the floor easier to maintain. We use penetrating sealers that don’t form a film on the surface, allowing the concrete to breathe while still providing protection.
For areas with high exposure to chemicals or frequent spills, we might recommend a more robust sealer. However, it’s important to note that even with sealer, polished concrete floors require proper maintenance to keep them looking their best.
The polishing process transforms ordinary concrete into a work of art. But the journey doesn’t end here. The next step involves exploring the various customisation options that can truly make your polished concrete floor unique and tailored to your specific needs and preferences.
Personalising Your Polished Concrete Floor
Infusing Colour into Concrete
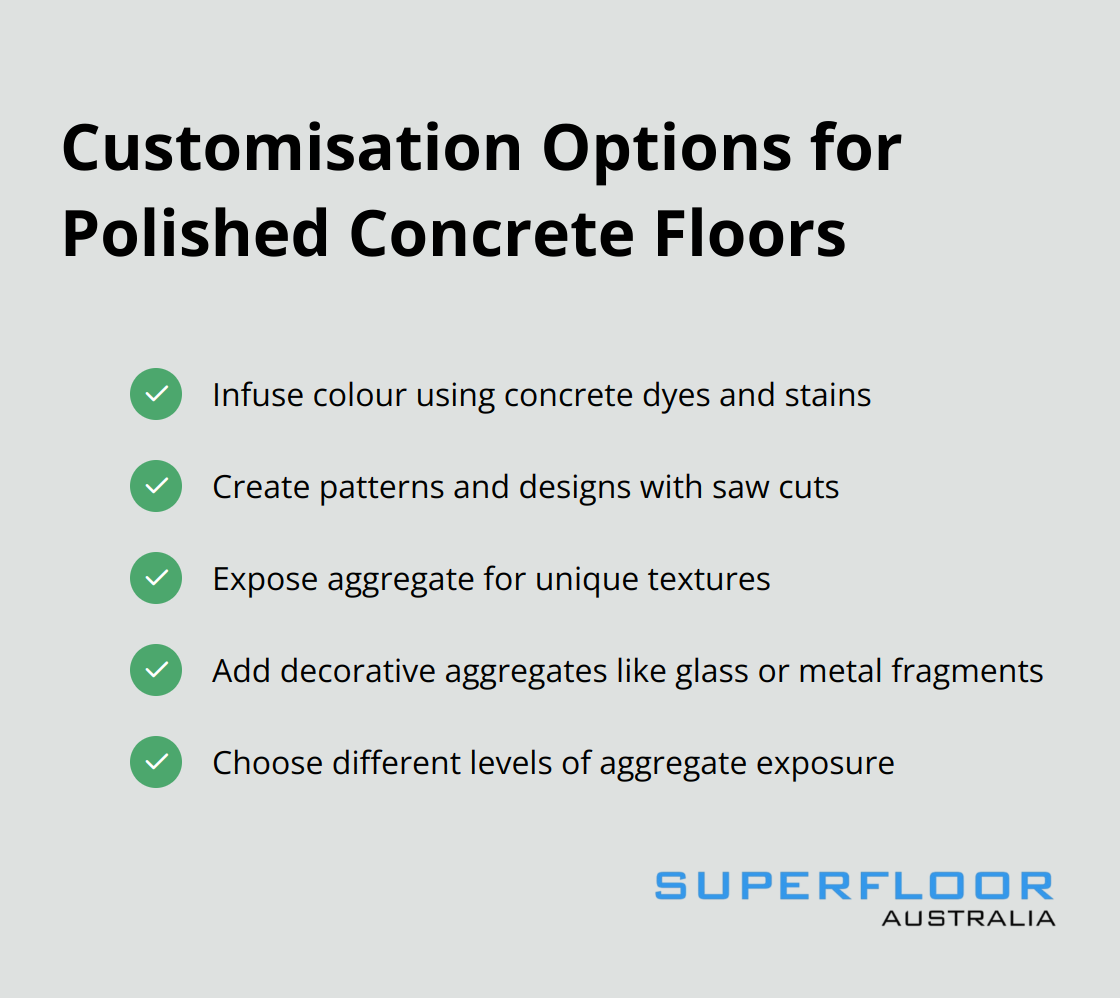
Concrete dyes and stains offer a popular method to customise your floor. This guide will walk you through the process of creating stunning polished concrete floors, from preparation to customisation. We’ll explore the various options available for personalising your concrete floor.
Crafting Patterns and Designs
Saw cuts provide an excellent solution for more intricate designs. Wire cutting is a specialised technique used in sawcut concrete work. It allows for intricate cuts to be made with exceptional precision. This technique can be used to create unique patterns and designs in your concrete floor.
The depth and width of the cuts can vary, allowing for subtle lines or more pronounced grooves. Once cut, they can be filled with coloured epoxy or left as-is for a more industrial look.
Exposing Aggregate for Unique Textures
Exposing the aggregate in concrete creates a striking, terrazzo-like finish. The process involves several steps:
- Preparation: Whether working with a new or existing concrete slab, ensure the surface is even.
- Grinding: Depending on the desired aggregate exposure level, different grinding techniques are used.
The type of aggregate in the original concrete mix significantly impacts the final appearance. River rocks create a natural, organic look, while crushed granite or marble yields a more refined aesthetic. Some clients choose to add decorative aggregates (like glass or metal fragments) for a truly unique floor.
The level of aggregate exposure impacts the project timeline and cost. Full exposure requires more intensive grinding and often necessitates additional steps to ensure a smooth, polished finish.
Successful customisation requires careful planning and expert execution. We recommend discussing your vision in detail with your contractor to ensure the best possible outcome for your polished concrete floor.
Final Thoughts
Polished concrete floors on existing slabs transform old spaces into stunning, durable surfaces. The process involves thorough preparation, meticulous grinding, and customisation options that reflect personal style or brand identity. These floors offer exceptional durability, stain resistance, and longevity, while enhancing natural light and reducing energy costs.
Maintenance of polished concrete floors is straightforward but essential for their longevity. Regular dust mopping and occasional damp mopping with pH-neutral cleansers will keep the surface clean and shiny. Prompt cleanup of spills and reapplication of sealer every few years will maintain optimal protection.
Superfloor Australia offers expert polishing services for those in Brisbane who want to transform their existing concrete slabs. Their team’s precision and craftsmanship ensure high-quality results tailored to specific needs (whether for residential, commercial, or industrial spaces). Polished concrete floors on existing slabs provide a beautiful, sustainable solution that will enhance your space for years to come.