At Superfloor Australia, we know that concrete counter polishing can transform your kitchen or bathroom.
Polished concrete benchtops offer a sleek, modern look that’s both durable and easy to maintain.
In this guide, we’ll walk you through the step-by-step process of achieving a stunning finish on your concrete counters.
How to Prepare Your Concrete Surface for Polishing
Deep Clean Your Counter
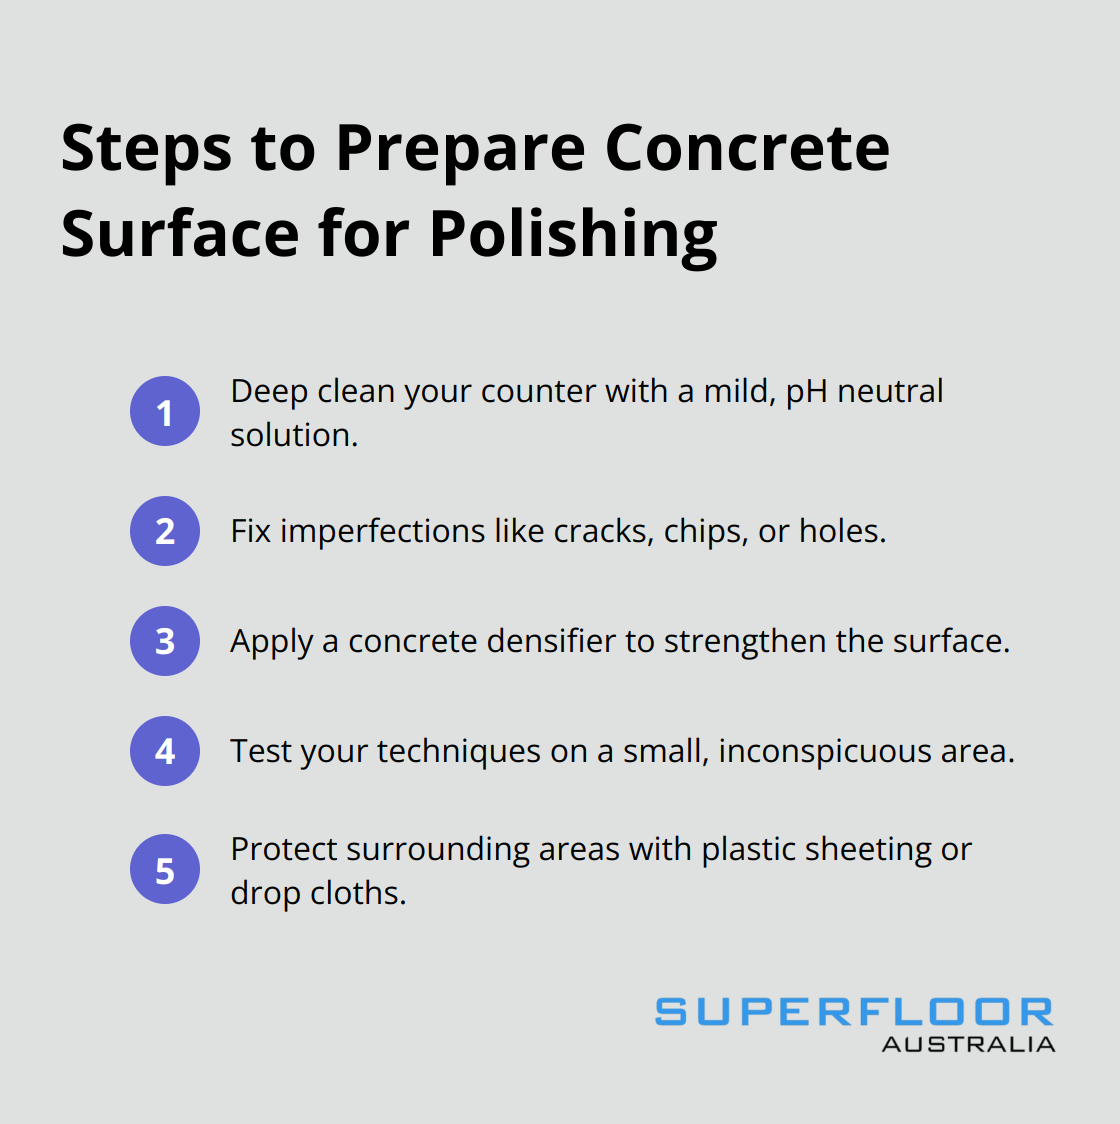
Start with a thorough cleaning of your concrete counter. Use a mild, pH neutral cleaning solution with no abrasives and a soft cloth or sponge to clean the surface. This step removes dirt, grease, and residue that could interfere with the polishing process. Rinse the counter completely and allow it to dry. For tough stains, you might need to use a poultice or specialised concrete cleaner.
Fix Imperfections
Inspect your counter for cracks, chips, or holes. Fill these imperfections before you begin polishing. The most common method is to grind and polish using a wet polisher and diamond polishing pads. For hairline cracks, apply a concrete crack filler. Spread the filler with a putty knife, making sure it’s level with the surrounding surface. Let it cure according to the manufacturer’s instructions (typically 24 to 48 hours).
Apply a Concrete Densifier
A concrete densifier is an important step that many people overlook. This liquid treatment penetrates the concrete, fills in microscopic pores, and strengthens the surface. Apply the densifier evenly with a low-pressure sprayer or a microfibre mop. Work in small sections to ensure complete coverage. The densifier needs about 24 hours to react with the concrete. This step not only makes the polishing process more effective but also enhances the durability of your finished benchtop.
Test a Small Area
Before you proceed with the full polishing process, test your techniques on a small, inconspicuous area of the counter. This test allows you to see how the concrete responds to the polishing process and helps you adjust your approach if needed. It’s a small step that can save you time and potential frustration later.
Protect Surrounding Areas
Cover any nearby surfaces (cabinets, appliances, floors) with plastic sheeting or drop cloths. Polishing concrete can create dust and debris, so it’s important to protect your surroundings. Tape off any areas of the counter that you don’t want to polish (such as edges or backsplashes).
Proper preparation sets the foundation for a successful polishing project. With your surface clean, repaired, and strengthened, you’re ready to move on to the actual polishing process. In the next section, we’ll break down the steps of polishing your concrete counter to achieve that stunning, professional finish.
How to Polish Concrete Counters Step by Step
At Superfloor Australia, we’ve refined our techniques to achieve stunning results on concrete counters. Here’s our step-by-step guide to polish your concrete counters like a pro.
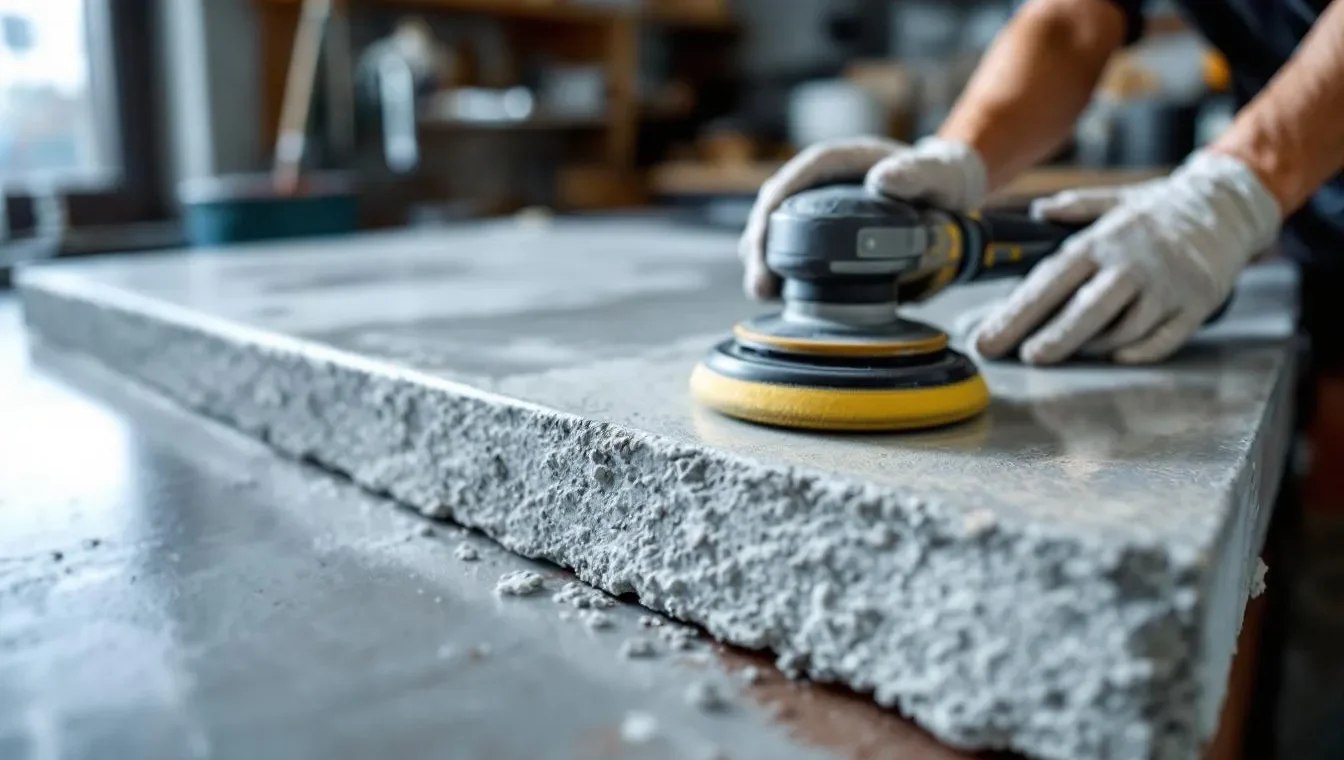
Start with Coarse-Grit Polishing
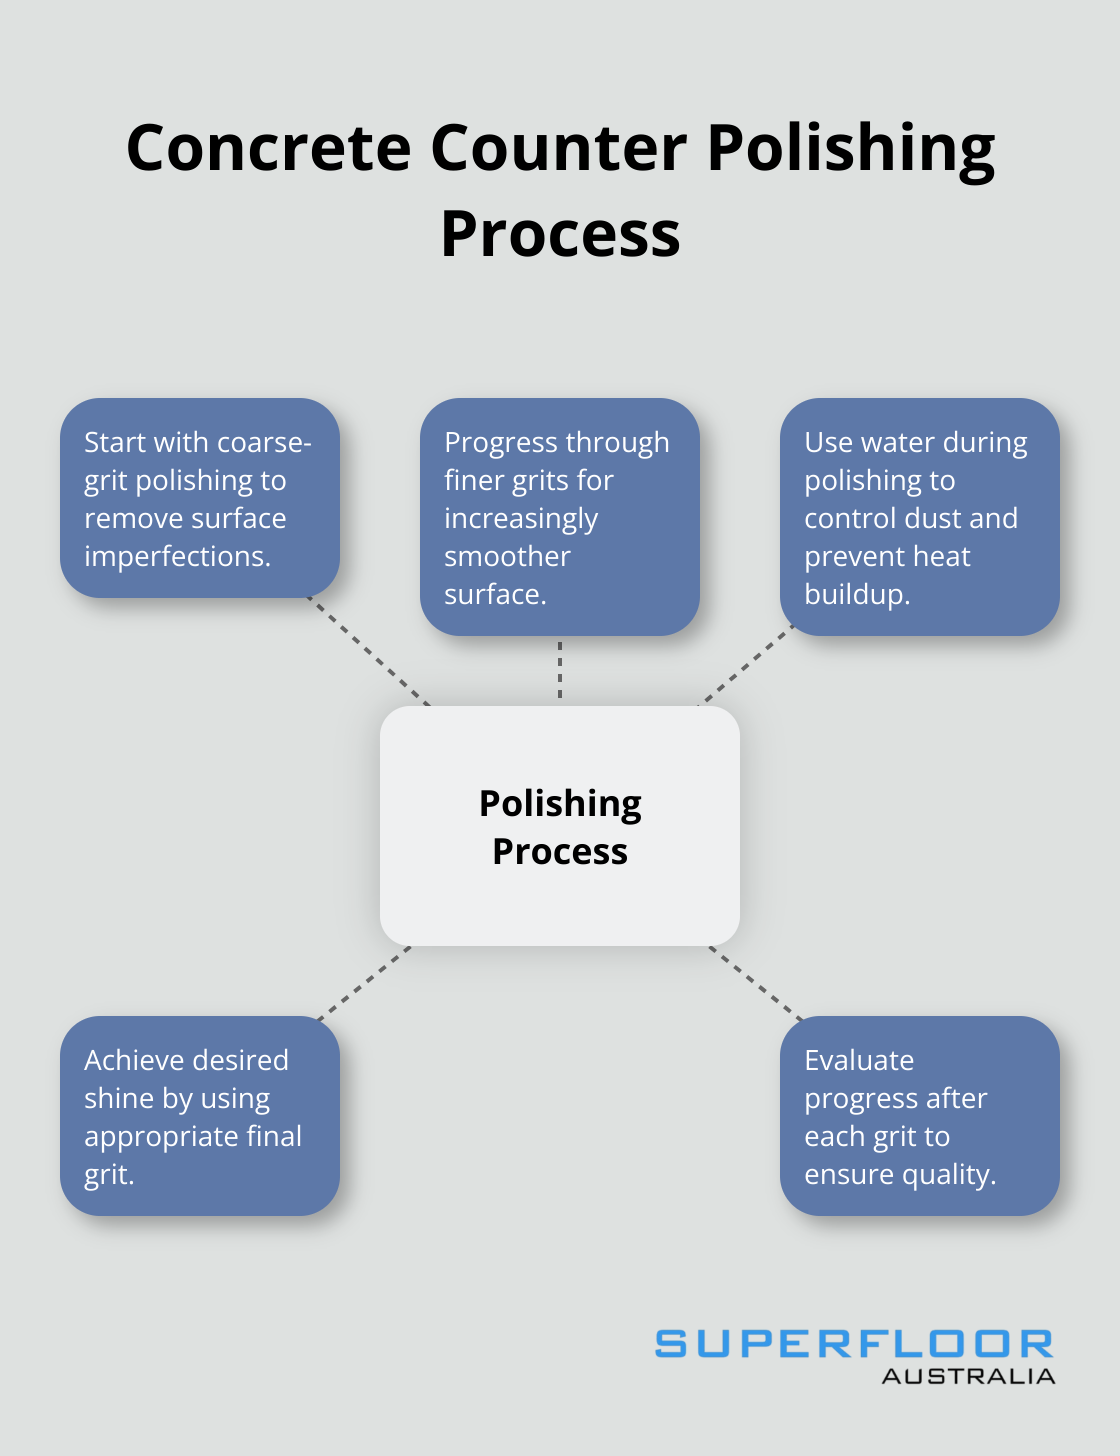
Begin with a diamond polishing pad. This coarse grit removes surface imperfections and smooths out the concrete. Work in small sections (about 2 feet by 2 feet), moving the polisher in a circular motion. Overlap each section slightly to ensure even coverage. This initial step typically takes about 30 minutes per 10 square feet of counter space.
Progress Through Finer Grits
After the coarse-grit pad, move to progressively finer grits. Each progression removes the scratches left by the previous grit, resulting in an increasingly smoother surface. Spend about 15-20 minutes per 10 square feet with each grit. Between each grit change, clean the surface thoroughly to remove all debris.
Use Water During Polishing
Always use water during the polishing process. This wet polishing method not only controls airborne dust but also prevents excessive heat accumulation, leading to a smoother, higher-gloss finish. Use a spray bottle to keep the surface damp, but not soaking wet. Too much water can dilute the slurry created during polishing, which actually helps in achieving a smoother finish.
Achieve the Desired Shine
The level of shine you achieve depends on the final grit you use. For a satin finish, stop at a lower grit. For a high-gloss shine, continue with higher grits like 3000-grit pads. The final polishing step with the highest grit pad should take about 10 minutes per 10 square feet. The higher the grit, the more time and effort required, but the results are worth it.
Evaluate Your Progress
After each grit, step back and evaluate your work. Run your hand over the surface to feel for any rough spots. If you find any, go back over those areas before moving to the next grit. Good lighting is essential for this step – use a bright, portable work light to spot any imperfections.
Polishing concrete counters is a skill that improves with practice. Don’t feel discouraged if your first attempt isn’t perfect. With each project, you’ll gain more insight into the nuances of concrete polishing. Now that you’ve achieved that perfect polish, it’s time to protect your hard work. In the next section, we’ll discuss how to seal and maintain your newly polished concrete counter to ensure its longevity and beauty.
How to Seal and Protect Your Polished Concrete Counter
Select the Right Sealer
We at Superfloor Australia recommend a high-quality, food-safe penetrating sealer for polished concrete benchtops. Avoid generic sealers from hardware stores. In 2020, CCI developed Ovation Concrete Countertop Sealer, the first single component, food safe and water based sealer that also offers excellent protection.
Apply the Sealer Correctly
Ensure your counter is completely clean and dry before application. Any dust or moisture will compromise the sealer’s effectiveness. Apply the sealer with a microfibre pad or a low-pressure sprayer. Work in small sections, overlapping slightly to ensure full coverage.
Most sealers require two coats for optimal protection. Wait at least 30 minutes between coats (some sealers might need up to 24 hours between applications). Always check the manufacturer’s instructions for specific guidance.
Allow Proper Curing Time
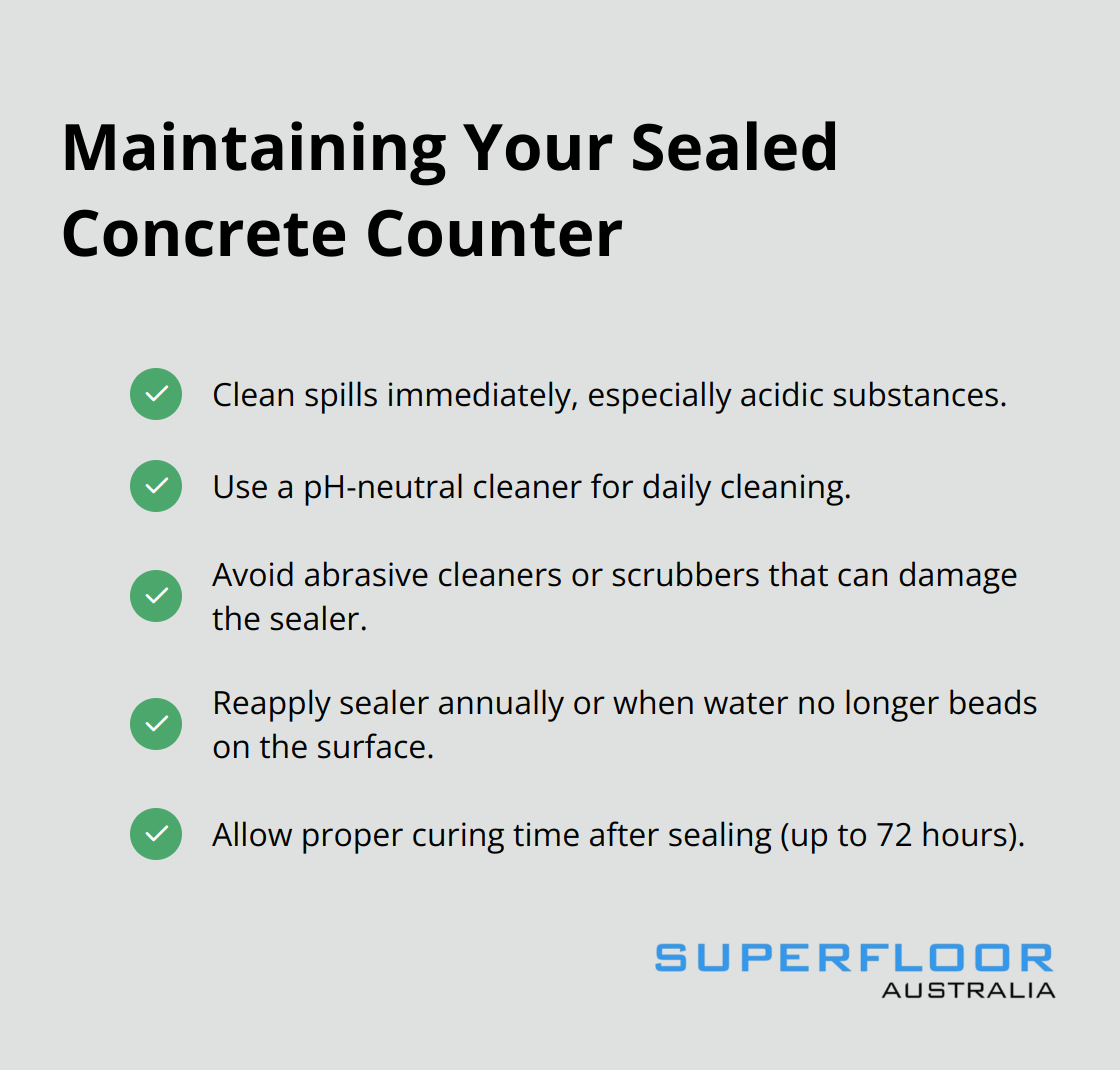
Patience is key during the curing process. While most sealers dry to the touch within a few hours, full curing can take up to 72 hours. During this time, avoid placing any objects on the counter or exposing it to water.
For the best results, wait a full week before subjecting your newly sealed counter to heavy use. This extra time allows the sealer to fully bond with the concrete, providing maximum protection.
Maintain Your Sealed Counter
Clean spills immediately, especially acidic substances like wine or lemon juice. Use a pH-neutral cleaner for daily cleaning. Avoid abrasive cleaners or scrubbers that can damage the sealer.
Reapply sealer annually or as needed. You’ll know it’s time when water no longer beads on the surface. With proper care, your polished concrete counter will remain a beautiful focal point in your space for decades.
Final Thoughts
Concrete counter polishing transforms ordinary surfaces into stunning focal points. This process creates sleek, modern benchtops that resist stains, scratches, and daily wear. The smooth surface also simplifies cleaning and maintenance, making it a practical choice for any space.
DIY polishing requires patience, skill, and proper tools. Professional help ensures flawless results and faster completion. We at Superfloor Australia specialise in high-quality polished concrete solutions for benchtops and other surfaces (using advanced techniques and top-grade materials).
Polished concrete counters offer a unique combination of style, durability, and practicality. Our expertise at Superfloor Australia can help you achieve the perfect finish for your concrete counters. With proper care, your polished concrete counter will remain a beautiful centrepiece in your home for years to come.