At Superfloor Australia, we’ve seen a growing interest in DIY concrete floor polishing. This trend has homeowners and small business owners eager to transform their spaces with a sleek, durable finish.
Polishing concrete floors DIY can be a rewarding project, offering significant cost savings and a sense of accomplishment. However, it requires careful planning, the right tools, and a good understanding of the process.
What Is Concrete Polishing?
The Transformation Process
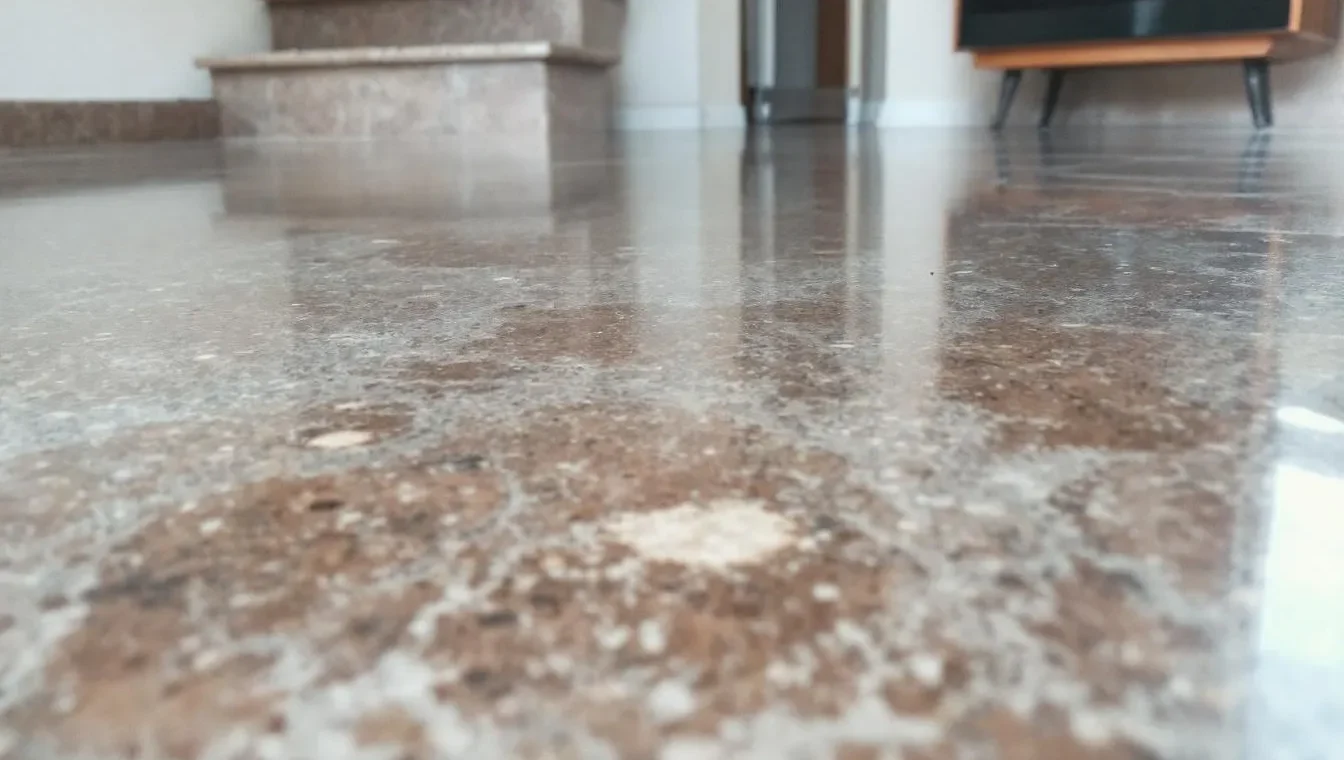
Concrete polishing transforms ordinary concrete floors into smooth, glossy surfaces. The process involves grinding down the surface of the concrete to a desired level of smoothness. This multi-step process dramatically changes the look and feel of a space. It starts with grinding the concrete surface using progressively finer diamond abrasives. We typically start with coarse 30-grit diamonds and work up to 3,000-grit or higher for an ultra-smooth finish. This gradual refinement creates that mirror-like shine many desire.
Advantages of Polished Concrete
Polished concrete floors offer numerous benefits:
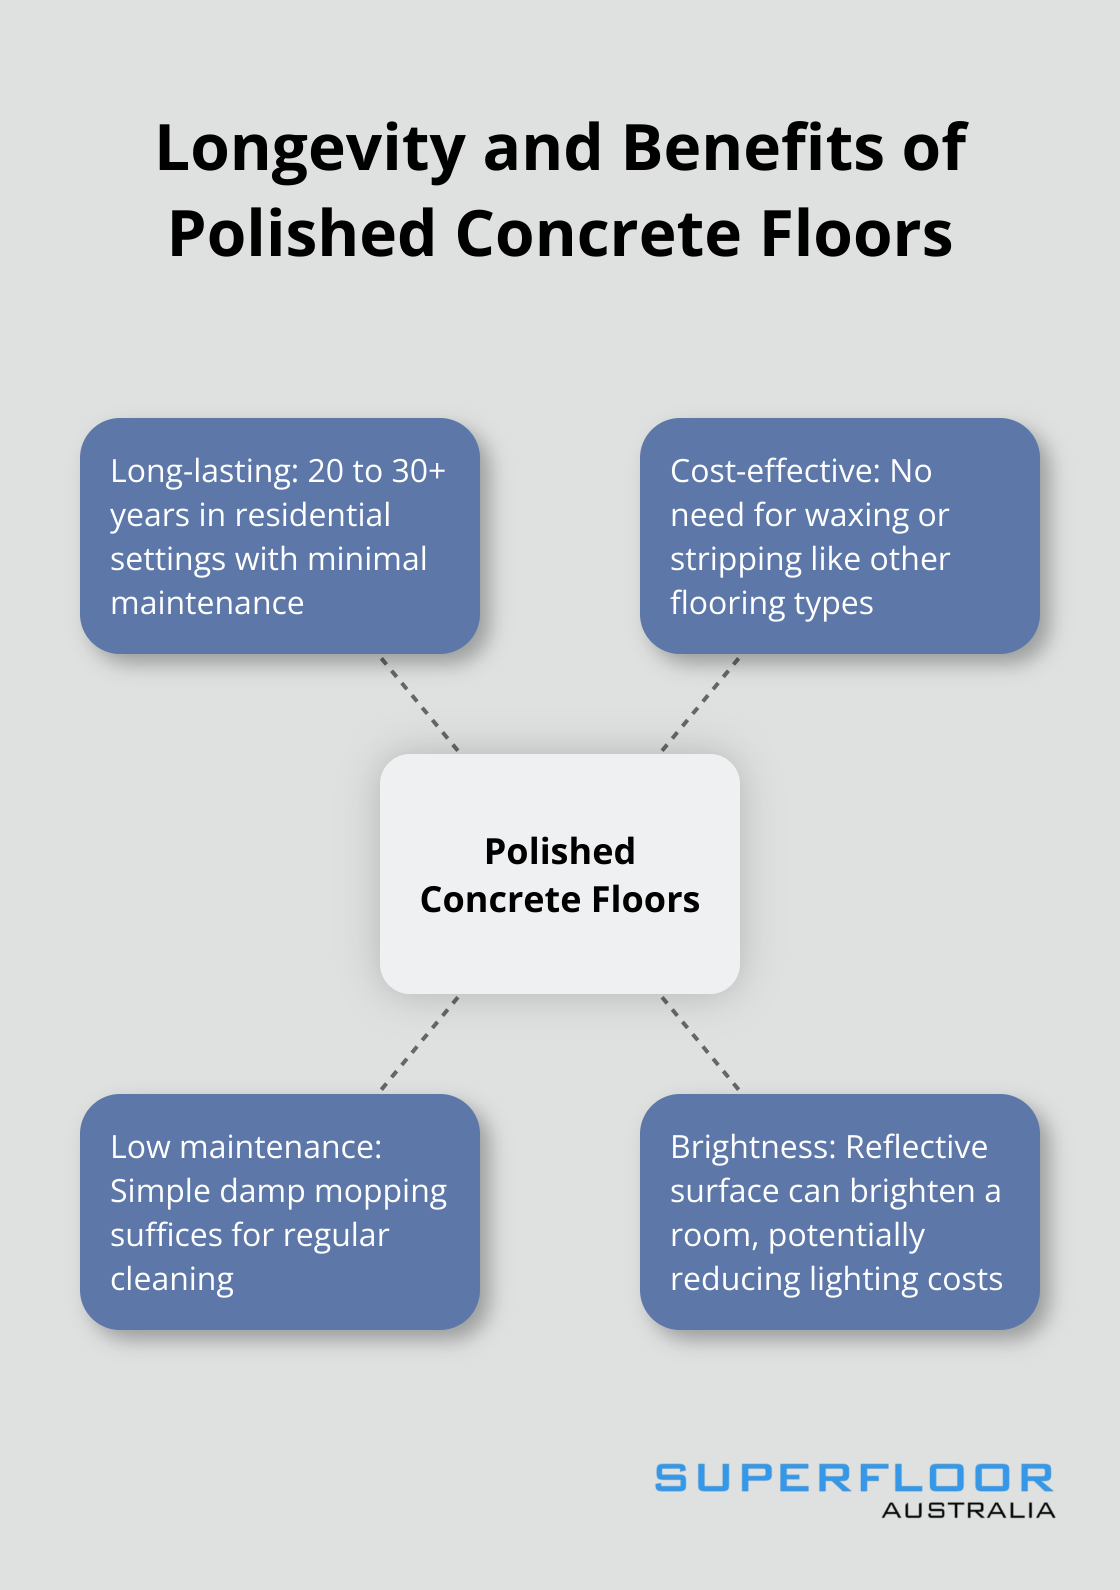
- Durability: They often last anywhere from 20 to 30 years or more with minimal maintenance in residential settings.
- Cost-effectiveness: They don’t require waxing or stripping like other flooring types.
- Low maintenance: A simple damp mop usually suffices for regular cleaning.
- Brightness: The reflective surface can brighten a room (potentially reducing lighting costs).
Essential Tools for DIY Enthusiasts
If you consider a DIY approach, you’ll need specific equipment:
- Concrete grinder (trade quality concrete, cement, floor grinders and polishers are available in 250mm and 480mm)
- Set of grinding discs to suit
- Concrete densifier
- High-quality concrete sealer
- Safety gear (protective goggles, dust mask, ear protection)
- Vacuum system (for dust control)
Skill Level and Time Investment
DIY concrete polishing requires patience, attention to detail, and a significant time investment. Most DIY enthusiasts spend several days to a week on a single room, depending on the size and condition of the concrete.
For those new to concrete work, we suggest starting with a small, less visible area to practise your technique. This approach allows you to get a feel for the process without risking damage to your main floor space.
Professional vs. DIY Considerations
While DIY concrete polishing can save money, it’s not always the best choice for everyone. Complex projects or large areas might benefit from professional expertise. Companies like Superfloor Australia offer specialised knowledge and equipment that can ensure a high-quality finish, especially for challenging surfaces or specific design requirements.
As we move forward, let’s explore the step-by-step process of polishing concrete floors, providing you with a comprehensive guide to tackle this project successfully.
How to Polish Concrete Floors Step by Step
Surface Preparation: The Foundation of Success
Clean the concrete surface thoroughly. Remove all dirt, dust, and debris with a heavy-duty vacuum. For stubborn stains or old adhesives, use a concrete grinder with a coarse diamond pad (30-40 grit). Fill any cracks or holes with an epoxy filler and allow it to cure completely. This step forms the basis for a smooth, even finish.
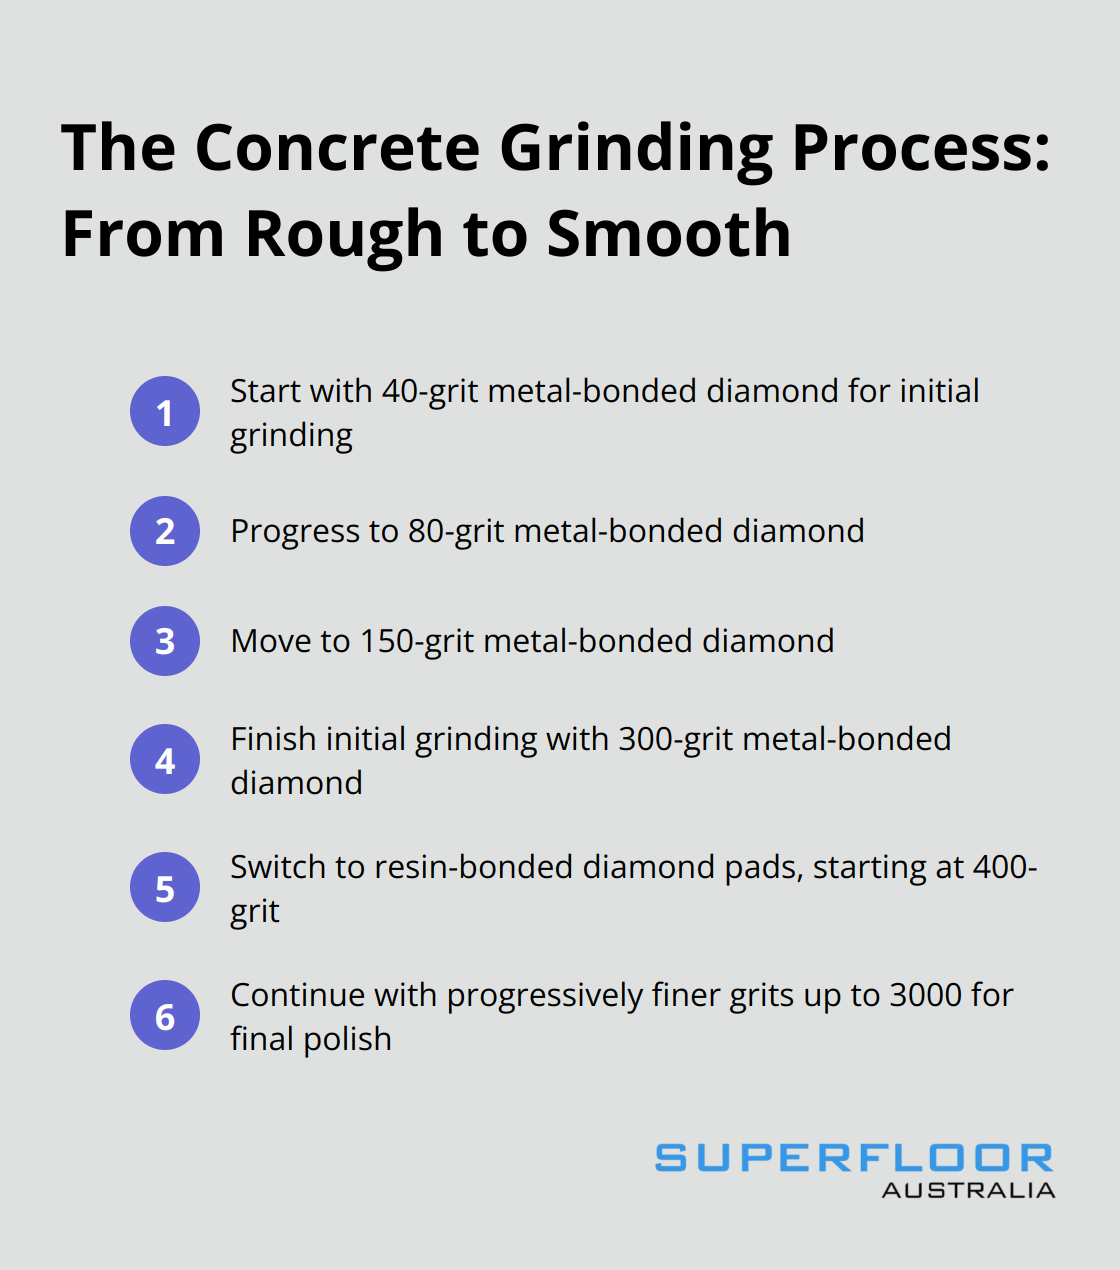
The Grinding Process: From Rough to Smooth
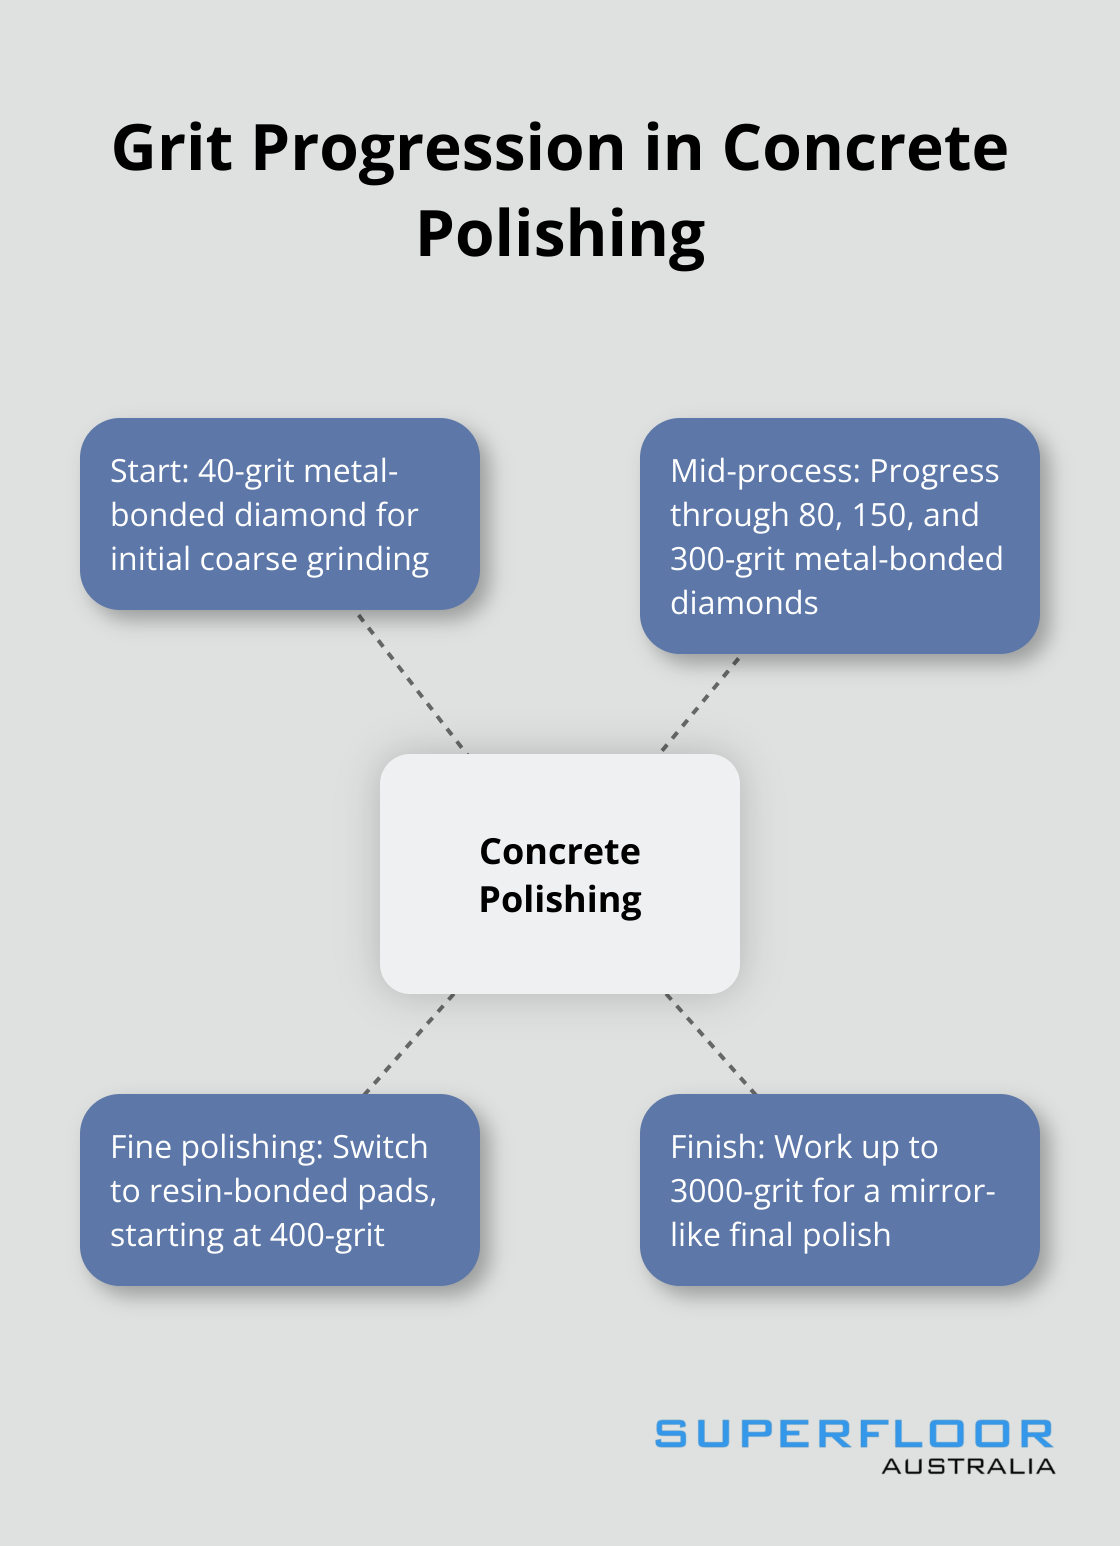
Start grinding with a 40-grit metal-bonded diamond. Work in overlapping passes to cover the entire floor. Vacuum thoroughly between each grit change. Progress through 80, 150, and 300-grit metal-bonded diamonds. This process typically requires 3-4 passes (depending on the concrete’s hardness and condition).
Densifying: Strengthening the Concrete
After the initial grinding, apply a concrete densifier. This liquid penetrates the concrete, increasing its hardness and stain resistance. Use a pump sprayer to apply the densifier evenly, then work it into the surface with a microfibre pad. Allow it to dry completely (usually 24 hours) before moving to the next step. It’s important to note that densifier should only be applied after stain or dye application has been completed, and after the 200-grit resin-bond diamond polishing step.
Fine Polishing: Achieving the Desired Sheen
Switch to resin-bonded diamond pads. Begin with 400-grit and work your way up to higher grits for a finer polish. Each pass will increase the floor’s shine. Vacuum between grits to remove all dust and debris.
Sealing: The Final Protective Layer
Once you achieve the desired polish, apply a penetrating sealer for polished concrete. This protects the concrete from stains and enhances its appearance. Use a microfibre mop to apply the sealer in thin, even coats. Allow each coat to dry completely before applying the next. Most floors need 2-3 coats for optimal protection.
Throughout this process, maintain consistent pressure and speed with your grinder. This ensures an even finish across the entire floor. While DIY polishing can produce impressive results, complex projects or large areas often benefit from professional expertise. Companies with specialised equipment and experience can handle challenging surfaces and achieve superior results.
As we move forward, let’s explore some essential tips for achieving professional-looking results in your DIY concrete polishing project.
Mastering DIY Concrete Polishing Techniques
At Superfloor Australia, we’ve observed many DIY enthusiasts successfully polish their concrete floors. This chapter provides key techniques to help you achieve the best results.
Equipment Selection
The right equipment plays a vital role in concrete polishing. Select a walk-behind grinder with adjustable speed settings for better control and consistent results. (For smaller areas, a handheld grinder might suffice, but it requires more effort.)
When choosing diamond pads for concrete polishing, invest in high-quality options. Cheap pads wear out quickly and can leave scratches. Twister pads are ideal for wet or dry polishing on concrete floors and other surfaces. They are highly effective in cleaning and polishing. Begin with a 40-grit metal-bonded diamond for initial grinding, then progress through higher grits. Use resin-bonded pads up to 3000-grit for the final polish to achieve a mirror-like finish.
Pressure and Speed Consistency
Consistency is key to achieving a uniform finish across the entire concrete surface. Maintain a steady and even pressure when grinding and move the grinder across the floor at a steady pace. Avoid lingering in one spot, as this can create dips or uneven areas. Apply uniform pressure on the grinder. Excessive pressure can cause gouging, while insufficient pressure results in inadequate polishing.
For large areas, divide the floor into manageable sections. This approach helps ensure you maintain consistent speed and pressure throughout the process. It also makes it easier to track your progress and avoid missing spots.
Imperfection Management
Addressing cracks and imperfections requires patience. Use a two-part epoxy filler for small cracks (less than 1/4 inch wide). Larger cracks may need a more robust solution, such as a concrete patching compound.
Always slightly overfill cracks, then grind them flush with the surrounding concrete during the initial grinding stage. This method ensures a seamless finish. For deeper imperfections, you might need to repeat the filling process after the first round of grinding.
Cleaning Between Steps
Proper cleaning between polishing steps is often overlooked but essential for a high-quality finish. Use a high-powered vacuum to remove all dust and debris after each grinding stage. Follow up with a damp mop to pick up any remaining particles.
Pay special attention to corners and edges where dust tends to accumulate. Any leftover debris can cause scratches in subsequent polishing steps, compromising the final result.
Time and Patience
Achieving a professional-looking polished concrete floor takes time and patience. Don’t rush the process. Each step builds on the previous one, contributing to the final glossy finish that makes polished concrete so appealing.
Final Thoughts
Polishing concrete floors DIY transforms spaces with sleek, durable finishes. The process demands careful preparation, grinding, densifying, and sealing to achieve professional-looking results. Patience plays a key role throughout the polishing process, as rushing any stage can compromise the overall quality of your polished concrete floor.
For complex projects or large areas, professional services offer significant advantages. Experts possess specialised equipment and extensive experience to handle challenging surfaces and achieve superior results. At Superfloor Australia, we provide high-quality polished concrete flooring in Brisbane, enhancing both aesthetics and durability.
The end result of polishing concrete floors DIY or through professional services is a beautiful, low-maintenance floor that can last for decades. With proper care and attention, your polished concrete floor will continue to impress and add value to your space for years to come (while requiring minimal upkeep).