
Polished concrete slabs transform ordinary floors into sleek, professional surfaces that work in warehouses, retail spaces, and homes alike. At superfloor australia, we’ve seen firsthand how the right polishing technique makes all the difference between a mediocre finish and a stunning result.
The process isn’t complicated, but it does demand attention to detail. Skip the wrong steps, and you’ll waste time and money-follow the right approach, and your concrete will shine for years.
Why Polished Concrete Pays Off
Polished concrete slabs command higher resale value and attract commercial tenants willing to pay premium rates. The National Ready Mixed Concrete Association reports that well-maintained polished concrete floors last over 100 years, which means you avoid replacing flooring every decade like you would with carpet or vinyl. This longevity directly impacts your wallet. A polished slab costs around $100 per square metre upfront, but when spread across a century of use, the annual cost becomes negligible compared to alternatives that require replacement every 15 to 25 years. The reflective surface also reduces your lighting costs because it bounces ambient light throughout the space, lowering energy consumption in warehouses and retail environments.
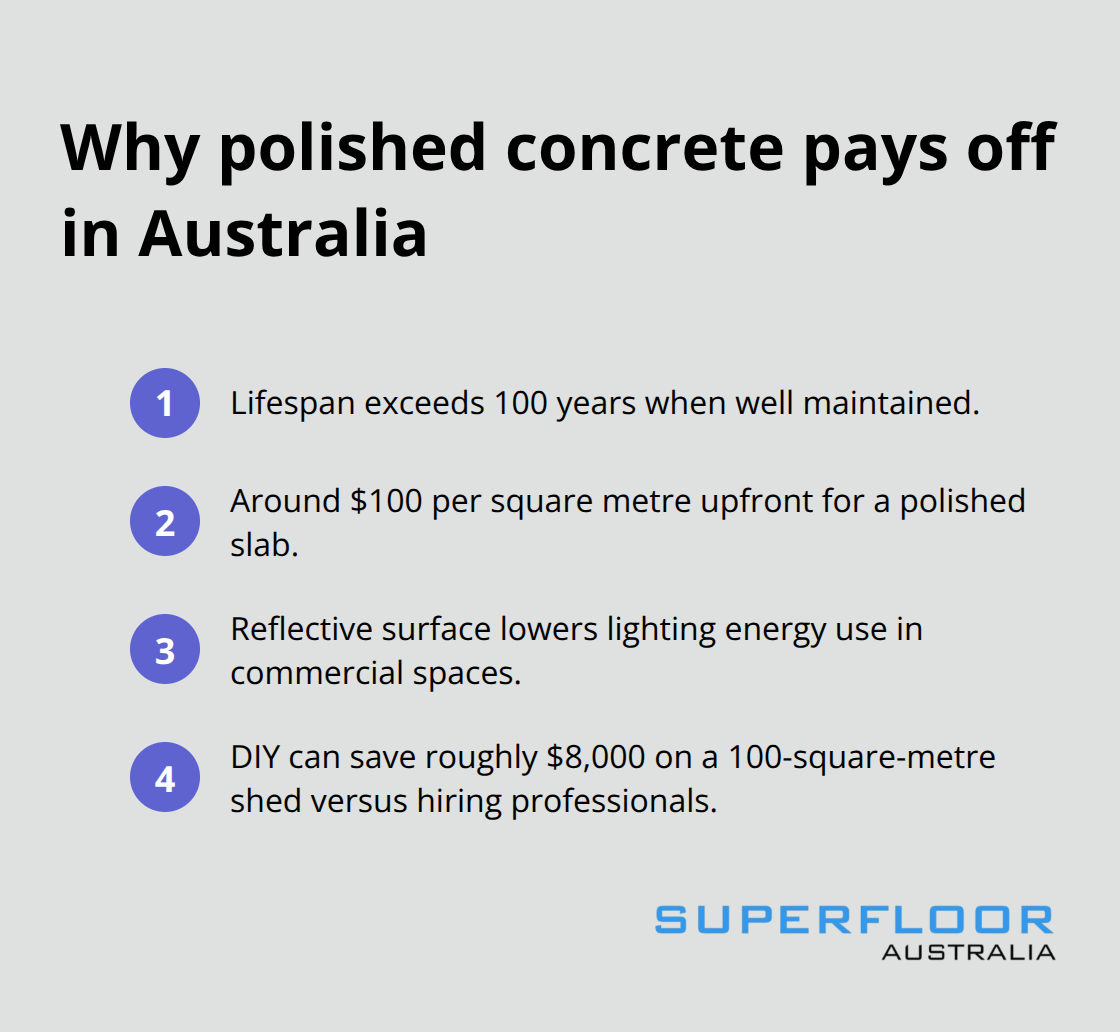
For a 100-square-metre shed, the difference between hiring professionals and renting equipment for DIY work sits around $8,000-a significant saving if you’re willing to invest the time.
The Look That Lasts Without Fuss
Polished concrete eliminates the need for waxing, stripping, or chemical treatments that plague other flooring types. You sweep, dust mop, and clean with pH-neutral cleaner-that’s it. Spills wipe away instantly because the sealed surface doesn’t absorb liquids, and stains that do occur respond to a simple baking-soda poultice left overnight. High-traffic areas hold up because the densified concrete hardens during the polishing process, making it tougher than the original slab. This resistance to wear means your floor maintains its appearance for years without the degradation you’d see in unsealed concrete or softer surfaces. The finish also adapts to your space: grind-and-seal delivers a rustic-industrial aesthetic perfect for cafes and warehouses, while fully polished concrete creates a mirror-like sheen suitable for showrooms and offices.
Real Durability Beats Hidden Costs
Maintenance on polished concrete runs roughly $200 to $400 annually for resealing every 6 to 12 months in standard conditions, with professional re-polishing needed only every 12 to 18 months in high-traffic zones. Compare that to vinyl flooring (which requires replacement every 10 years) or carpet that needs professional cleaning multiple times yearly plus eventual replacement. Polished concrete also eliminates allergen traps-the sealed surface doesn’t harbour dust mites, mould, or pollen, making it genuinely allergy-friendly rather than just marketed that way. For industrial spaces where machinery moves across floors constantly, the durability advantage becomes undeniable. A concrete slab that can withstand decades of heavy equipment movement without cracking or degrading justifies the initial investment faster than any alternative flooring solution available today.
Why Surface Preparation Determines Your Results
The polishing process begins long before you touch a diamond pad to concrete. Surface preparation separates floors that shine for a century from those that fail within years. Cracks, chips, and existing coatings must all come off before grinding starts, otherwise they telegraph through your final finish and compromise the seal. A poorly prepared slab forces you to restart work halfway through, wasting both time and money-follow the right approach, and your concrete will shine for years. The next section walks through exactly how to prepare your surface and execute each polishing stage so you avoid these costly mistakes.
Getting the Surface Ready and Polishing Step by Step
Prepare Your Slab Before You Start
The polishing sequence starts with ruthless honesty about your slab’s current state. If paint, sealers, or coatings cover the concrete, you must remove them first using a coarse 16 to 30 grit resin-bonded diamond pad before any polishing work begins. Cracks and chips need filling with a patching compound, then sanded flush with the same coarse grit so they don’t sabotage your final finish. Clean the entire surface thoroughly and inspect for high spots or low areas that will affect how the diamond pads make contact. This prep stage feels tedious, but it directly determines whether your polished floor lasts 100 years or fails within a decade.
Execute the Grit Progression Correctly
Once the slab is clean and repairs are complete, you’re ready to start the grinding sequence that exposes fresh concrete and builds shine. The actual polishing follows a strict grit progression through 50, 100, 200, 400, 800, 1500, and 3000 grit for a mirror-like finish. Between each grit stage, apply a chemical densifier and let it penetrate for about 20 minutes to harden the concrete’s surface and improve its ability to take a polish.
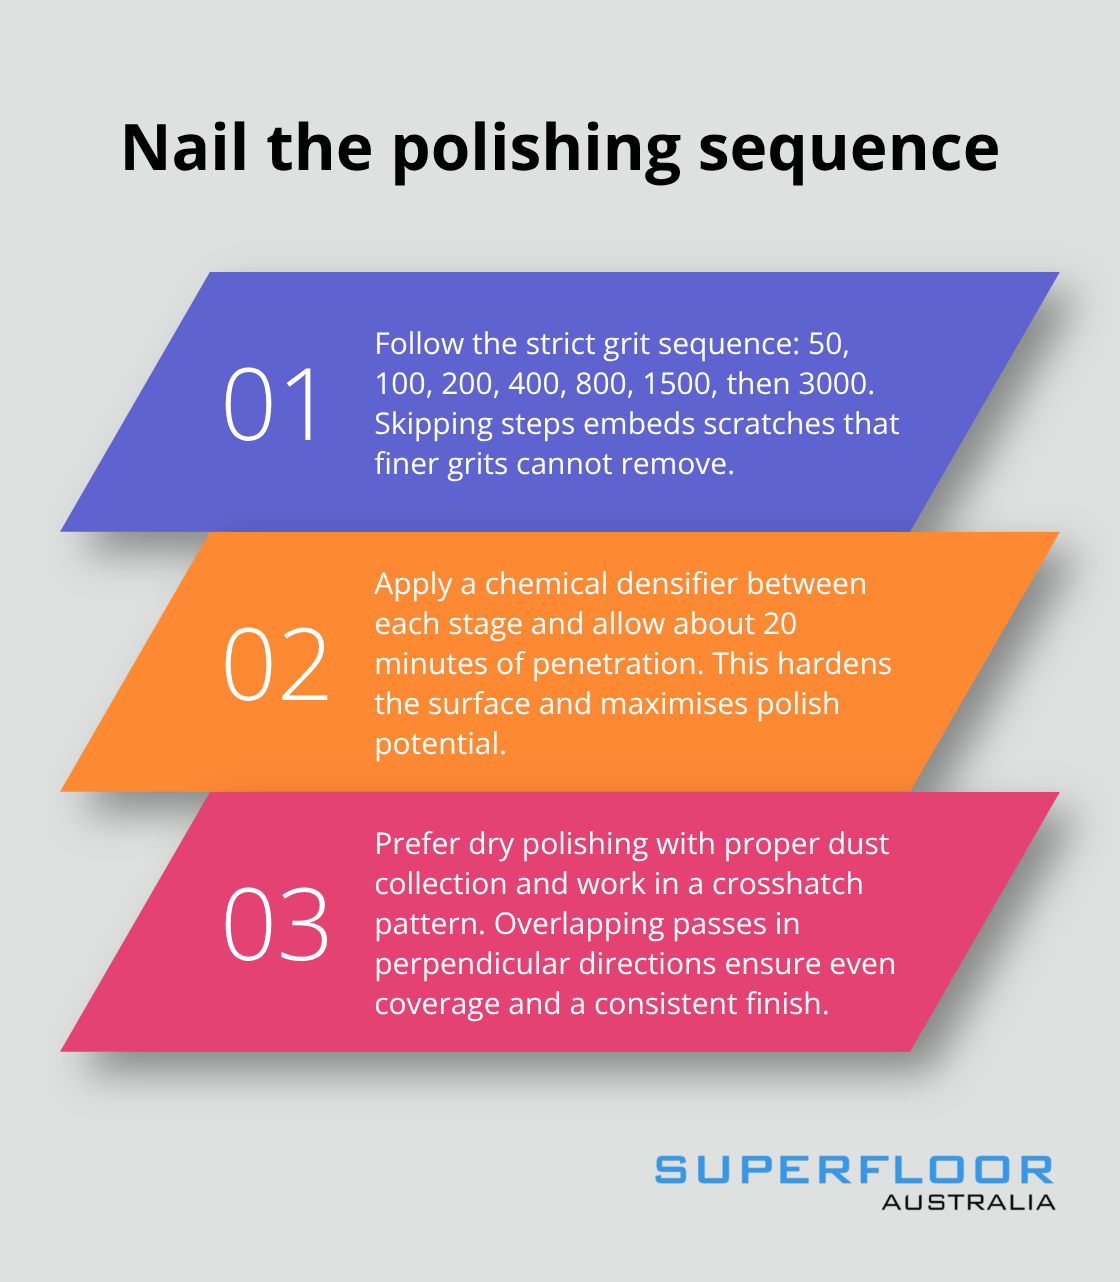
Dry polishing is the industry standard because it’s faster and uses a dust-collection system to keep your workspace clean, unlike wet polishing which generates wastewater and cools the diamonds unnecessarily.
Work in smooth, overlapping passes in one direction, then rotate 90 degrees and repeat to guarantee complete coverage across the entire slab. This crosshatch pattern prevents missing strips that stand out visibly in the finished floor. The progression from coarse to fine grits transforms raw concrete into a surface that reflects light and resists wear.
Handle Corners and Edges With Precision
Corner work demands specific attention because edges that don’t match the main slab create a disjointed appearance. Use a corner grinding cone mounted to a 7.8mm drill attachment for efficient edge prep, then finish corners with matching grit diamond pads so they blend seamlessly with the main slab. This targeted approach ensures your entire floor-from wall to wall-maintains consistent shine and texture.
Seal and Protect Your Finished Floor
After you reach 3000 grit and apply the final densifier coat, seal the floor within hours using either a film-forming sealer like acrylic or epoxy for a high-gloss wet look, or a penetrating silane sealer that preserves the natural appearance and typically lasts longer between reapplications. Your choice of sealer affects both the aesthetic and the maintenance schedule you’ll follow going forward, making this decision as important as the polishing itself.
What Kills a Polished Concrete Floor Before It Starts
Most concrete polishing failures happen before you ever touch a diamond pad to the slab. Countless DIY projects collapse because people rush through preparation, grab whatever grit sequence seems logical, or skip sealing entirely. These aren’t small oversights-they’re the difference between a floor that lasts 100 years and one that fails within months. The concrete industry has learned these lessons the hard way, and the data backs up why cutting corners costs far more than doing it right the first time.
Prep Work Determines Everything Else
Skipping proper surface preparation is the single most common mistake, and it’s also the most expensive to fix. If your slab has paint, epoxy, or old sealer coating it, that layer sits between your diamond pads and the actual concrete, preventing any real polishing from happening. You’ll grind away for hours, spend money on equipment rental, and end up with a dull, uneven surface because the pads never actually contact the concrete beneath. Existing coatings must come off first using resin-bonded diamonds, no exceptions. Cracks and chips demand the same ruthlessness-fill them with patching compound, sand them flush, and inspect the entire slab for high spots before you start the polishing sequence. A single missed crack or low area will create a shadow line that runs through your final finish, telegraphing the problem to anyone who walks across the floor. Projects where this oversight occurred forced contractors to restart from scratch, doubling labour costs and rental time. Thorough surface preparation takes 15 to 20 per cent of your total project time, but it prevents 90 per cent of polishing disasters.

Grit Sequence Mistakes Cost Time and Money
Using the wrong grit progression is where many DIYers waste rental money without understanding why. The correct sequence moves through 50, 100, 200, 400, 800, 1500, and 3000 grit, with a chemical densifier applied between each stage to harden the surface and improve polish potential. Skipping grits or jumping straight from 100 to 400 grit leaves scratches from the coarser pad embedded in the concrete, and finer grits cannot remove these deeper marks. You end up backtracking, re-grinding with the grit you skipped, and burning through both time and equipment rental hours. The densifier application matters just as much-if you skip it or apply it for less than 20 minutes of penetration time, the concrete surface remains soft and won’t accept a proper polish. Dry polishing is the only method that makes sense for most projects because it’s faster and uses dust collection to keep your workspace functional, while wet polishing creates disposal problems and cools the diamonds unnecessarily. Work in smooth overlapping passes in one direction, rotate 90 degrees, and repeat this crosshatch pattern across the entire slab. Missing this pattern leaves visible strips where coverage is incomplete, creating a floor that looks patchy and unfinished.
Sealing Failure Destroys Your Investment
Neglecting to seal your polished concrete is like building a house and leaving the roof off. The moment your floor reaches 3000 grit, you must apply a penetrating sealer within hours or moisture reabsorbs into the concrete, dulling the shine and inviting stains. Choose between film-forming sealers like acrylic or epoxy, which deliver a high-gloss wet look, or penetrating silane sealers that preserve the natural appearance and typically last longer between applications. Many DIYers apply sealer and assume the job is finished, then skip maintenance entirely. This negligence causes the sealer to degrade, leaving the concrete vulnerable to staining and moisture damage within 12 to 18 months. High-traffic areas need professional re-polishing every 12 to 18 months to maintain the original shine, yet most people never budget for this ongoing care. Water-based spills must be wiped immediately, oil spills need absorption with kitty litter before cleaning, and stubborn stains respond to a baking-soda poultice left overnight. Resealing costs roughly $200 to $400 annually in maintenance, which is far cheaper than replacing degraded flooring or paying contractors to rescue a neglected slab. The difference between a stunning floor that lasts a century and one that fails prematurely comes down to whether you treat sealing and maintenance as part of the project or an afterthought.
Final Thoughts
Polished concrete slabs deliver results that justify the effort and investment, but only when you follow the process correctly from start to finish. Prepare your surface ruthlessly, execute the grit progression without shortcuts, and seal your floor immediately after polishing completes. Skip any of these steps and you’ll waste money on equipment rental, labour, and materials without achieving the stunning finish you’re after.
DIY polishing works for smaller projects where you can rent equipment for a week and commit the time to proper technique. For larger commercial spaces, industrial warehouses, or if you’re uncertain about the process, hiring professionals saves frustration and guarantees results. We at superfloor australia specialise in delivering high-quality polished concrete flooring with precision preparation and expert craftsmanship tailored to your specific needs, whether your project is residential, commercial, or industrial.
Long-term care determines whether your polished concrete maintains its shine or degrades within years. Sweep and dust mop regularly, wipe spills immediately, and reapply sealer every 6 to 12 months depending on traffic levels (high-traffic areas need professional re-polishing every 12 to 18 months to restore the original gloss). Contact superfloor australia in Brisbane if you need professional guidance or want expert installation for your next project.