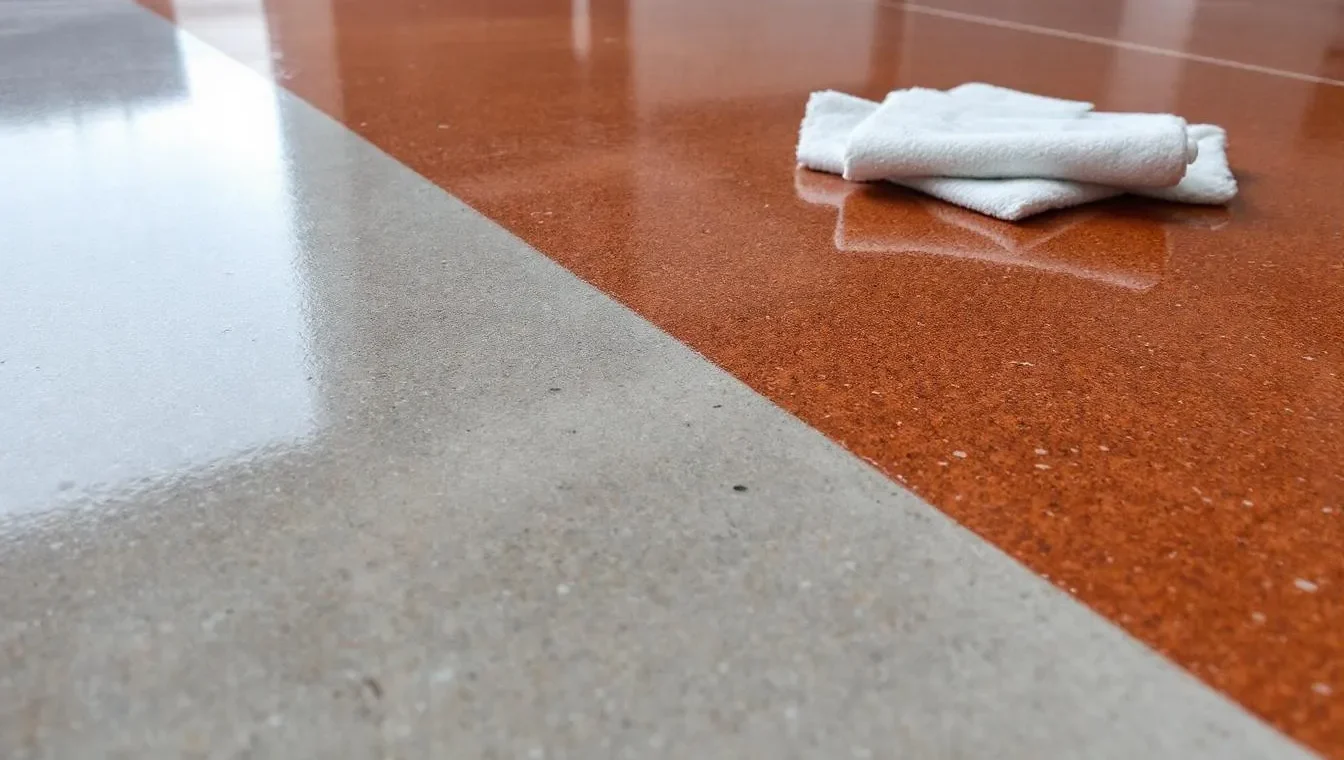
Staining and polishing concrete floors can transform dull surfaces into stunning, durable masterpieces.
At Superfloor Australia, we’ve perfected this art, turning ordinary concrete into extraordinary flooring solutions.
Our step-by-step guide will walk you through the process, from preparation to the final polish. Whether you’re a DIY enthusiast or considering professional help, this post will equip you with essential knowledge for achieving remarkable results.
How to Prepare Concrete Floors for Staining and Polishing
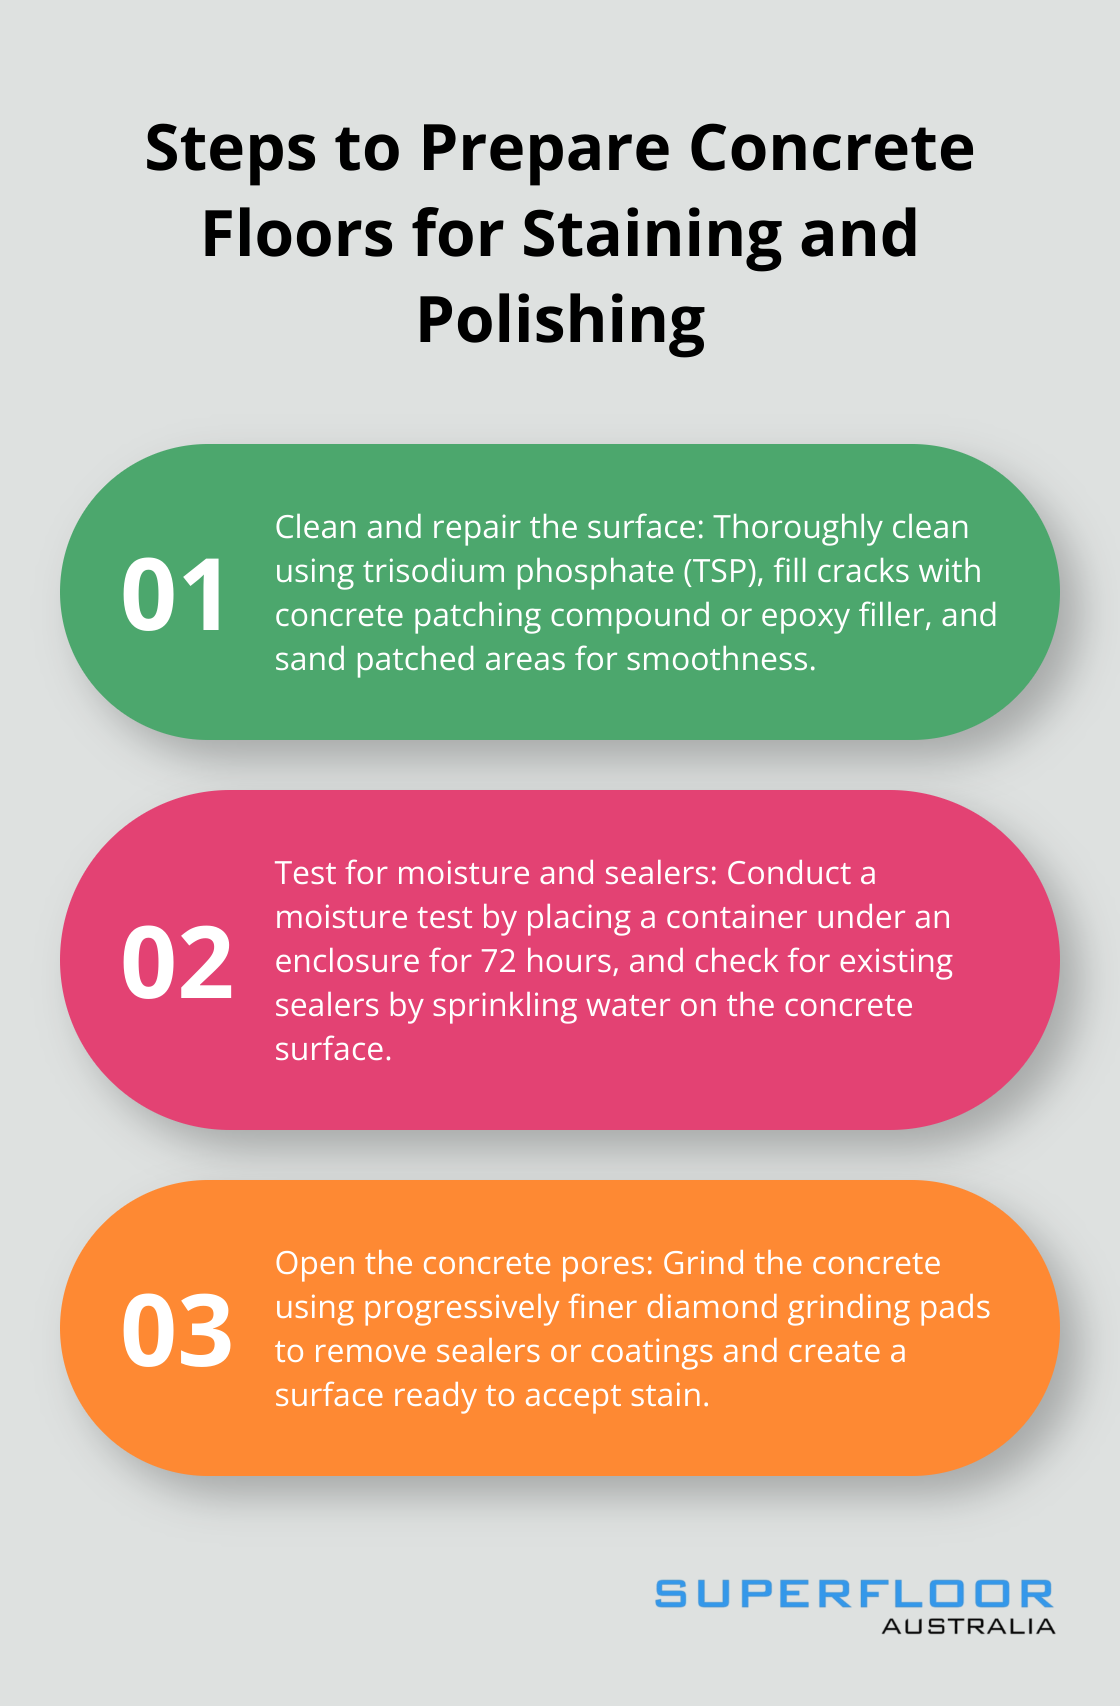
Preparing concrete floors for staining and polishing is a critical process that can significantly impact the final result. This chapter outlines the essential steps to ensure your concrete surface is ready for transformation.
Clean and Repair the Surface
Start by thoroughly cleaning the concrete surface. For general-purpose cleaning and degreasing, sweep the floor and then scrub it thoroughly using trisodium phosphate (TSP). Allow the surface to dry completely before proceeding.
Next, inspect the floor for damage. Fill small cracks with a concrete patching compound. For larger issues, use an epoxy filler. Sand down any patched areas to create a smooth surface.
Test for Moisture and Sealers
Moisture can severely impact your staining and polishing efforts. Conduct a simple moisture test by placing a container on the concrete under an enclosure and leaving it open to the air for 72 hours. After this time, check for condensation.
To test for existing sealers, sprinkle water on the concrete. If it beads up, there’s likely a sealer present. Remove this with a chemical stripper or by grinding before staining can be effective.
Open the Concrete Pores
The final prep step involves grinding the concrete to open its pores. This process removes any remaining sealers or coatings and creates a surface that will readily accept stain. If shotblasting or scarifying is used to remove the top of the concrete surface to profile the concrete, this opens the pores of the concrete.
Start with a coarse diamond grinding pad and progress to a finer grit. This progression ensures a smooth surface while maintaining enough texture for the stain to adhere properly.
Always wear proper safety gear during this process, including a dust mask, safety glasses, and ear protection. Use a vacuum attachment on your grinder to minimise dust (this is essential for maintaining a clean work environment).
Consider Professional Help
While DIY enthusiasts can tackle this preparation process, it’s worth noting that professional services can ensure optimal results. Professionals have access to industrial-grade equipment and possess the expertise to handle any unexpected issues that may arise during preparation.
With your concrete floor now properly prepared, you’re ready to move on to the exciting process of staining. The next chapter will guide you through selecting the right type of stain and applying it evenly for stunning results.
How to Stain Concrete Floors
Selecting the Right Stain
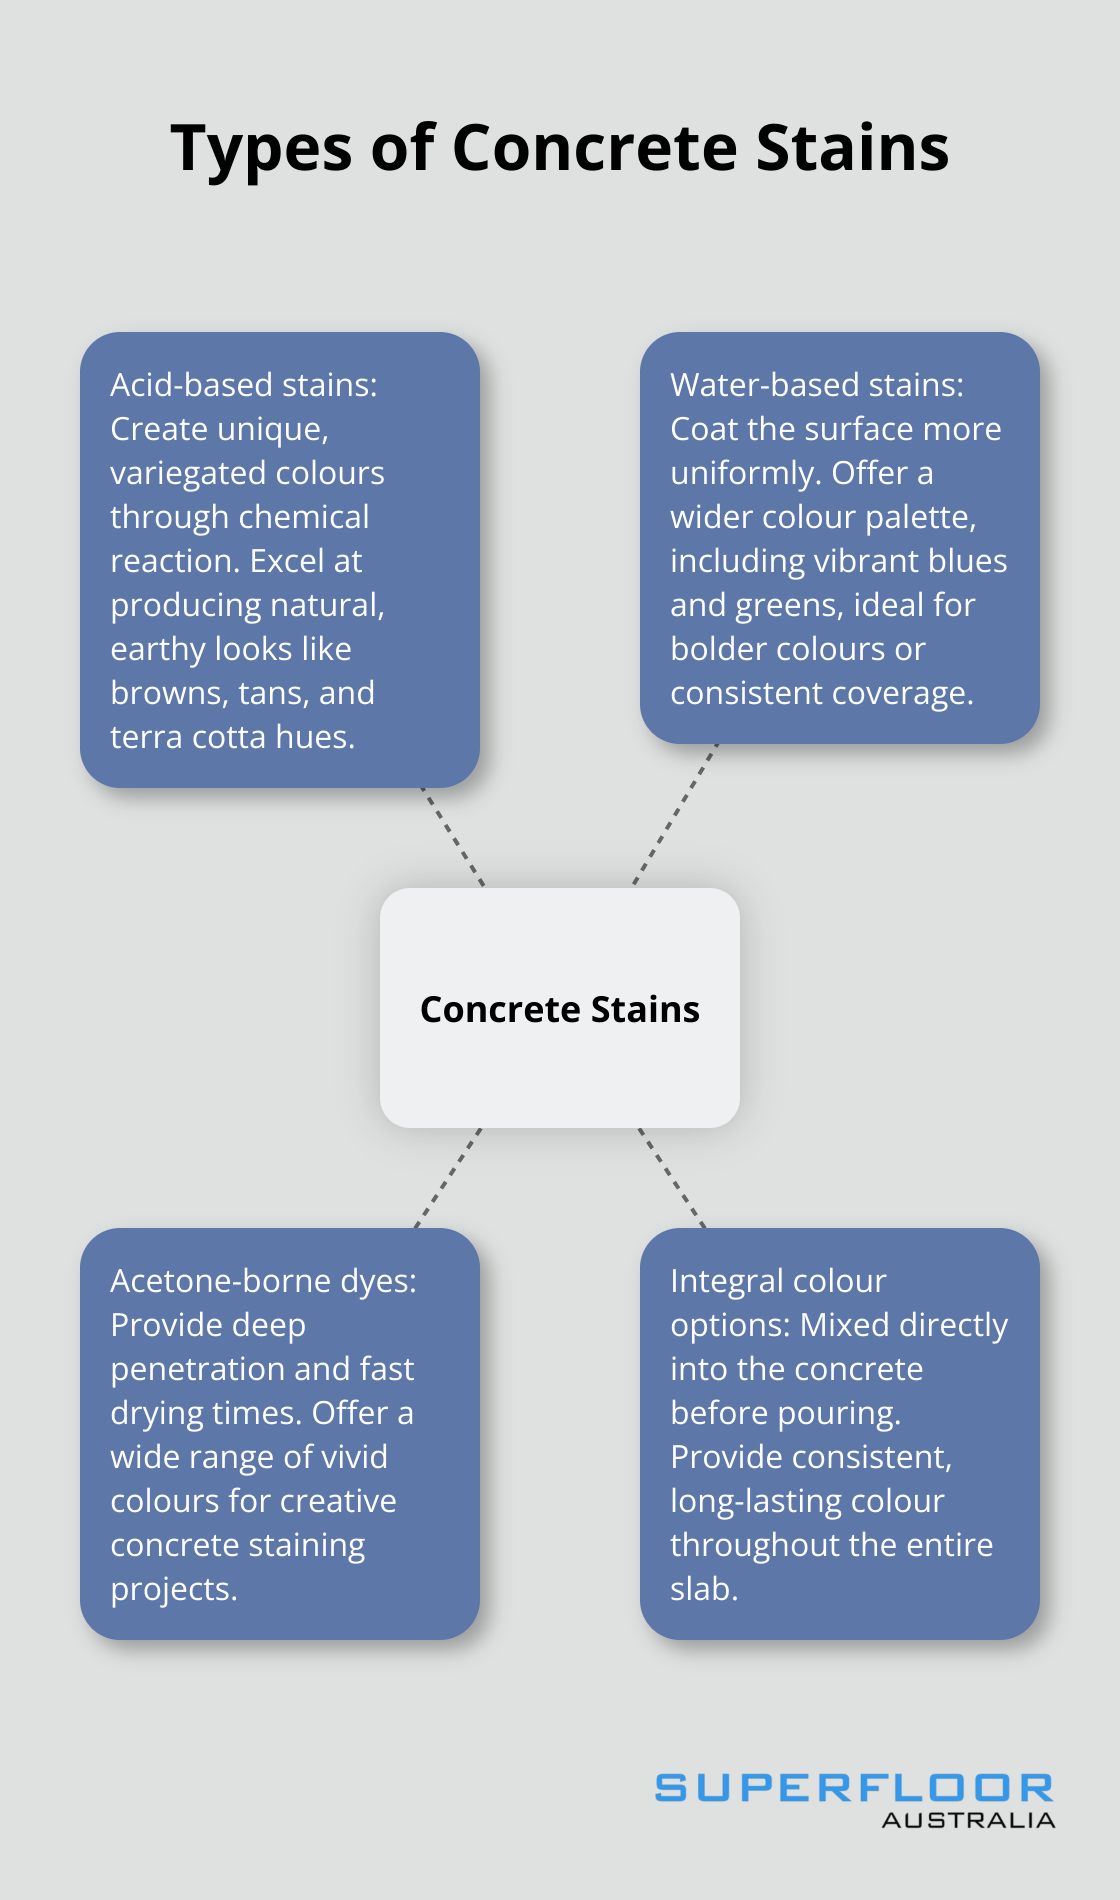
The first step in staining concrete floors is to choose the appropriate stain. Acid-based and water-based stains are two main types available. Acid stains create unique, variegated colours through a chemical reaction with the concrete. Water-based stains coat the surface more uniformly. Additionally, acetone-borne dyes and integral colour options are available for staining concrete floors.
Acid stains excel at producing natural, earthy looks. They typically offer browns, tans, and terra cotta hues. For bolder colours or more consistent coverage, water-based stains are the superior choice. These provide a wider colour palette, including vibrant blues and greens.
Application Techniques
After selecting your stain, it’s time to apply it. For acid stains, use a pump sprayer to distribute the product evenly. Work in small sections, moving in a circular motion to avoid lines and streaks. Water-based stains apply well with a microfibre mop or a high-volume, low-pressure (HVLP) sprayer.
Always begin in a corner and progress towards an exit to avoid walking on freshly stained areas. Apply thin, even coats instead of one thick layer. This method ensures better absorption and a more consistent finish.
Drying and Curing Process
The drying time varies depending on the type of stain used. Acid stains typically need 4-6 hours to react fully with the concrete. Water-based stains often dry faster, usually within 2-4 hours. (Always check the manufacturer’s instructions for specific drying times.)
After the initial drying period, neutralise acid stains with a mixture of water and either baking soda, TSP, or ammonia, then rinse twice with clean water. For both stain types, allow at least 24 hours of curing time before applying a sealer or moving on to the polishing stage.
Ventilation and Safety
Proper ventilation is essential during the staining and drying process. Open windows and use fans to circulate air, especially when working with acid stains. (This step is particularly important for maintaining a safe working environment.)
Wear protective gear such as gloves, safety goggles, and a respirator when applying stains, particularly acid-based ones. These precautions will protect you from potential chemical exposure and fumes.
Professional Assistance
While DIY enthusiasts can tackle concrete staining, professional services often yield optimal results. Professional services understand how different stains react with various types of concrete and can achieve the desired look more effectively than a DIY approach. Their experience can be particularly valuable when dealing with large areas or complex staining patterns.
The next step in creating your stunning concrete floor is polishing. This process will enhance the beauty of your newly stained surface and provide additional durability. Let’s explore how to achieve a professional-grade polish in the next chapter.
How to Polish Stained Concrete Floors
Polishing stained concrete floors transforms a dull surface into a stunning, durable masterpiece. This process enhances the stain’s colour, increases the floor’s strength, and adds a beautiful shine.
Selecting the Right Equipment
The success of polishing depends on using the right tools. A walk-behind concrete grinder with diamond abrasive pads is essential. These machines come in various sizes (larger ones for open areas and smaller ones for edges and corners).
For optimal results, use a planetary grinder. This machine has multiple heads that rotate in different directions, ensuring a more even polish.
The Polishing Process
Start polishing with coarse diamond pads, typically 30 or 50 grit. These remove minor imperfections left after staining. Progress through medium grits (100, 200) to finer grits (400, 800). Each step refines the surface further, gradually increasing the shine.
The number of passes needed varies based on the concrete’s hardness and the desired finish. Softer concrete often requires more passes with each grit to achieve the same level of polish as harder concrete.

Applying a Concrete Densifier
After the initial grinding stages, apply a concrete densifier. This liquid penetrates the concrete and chemically reacts to improve surface hardness, durability, and resistance to wear and moisture.
Apply the densifier evenly using a pump sprayer or microfibre mop. Allow it to dry completely before continuing the polishing process. This step improves the floor’s durability and helps achieve a high-gloss finish.
Achieving a High-Gloss Finish
The final polishing stages use ultra-fine diamond abrasives, typically 1500 to 3000 grit. These create the signature high-gloss finish that makes polished concrete so appealing. Some professionals use resin-bonded diamond pads as a final step for an even higher shine.
To further enhance the gloss, apply a guard product. The Ameripolish 3D HS Hybrid Silicate Densifier improves the abrasion resistance for new or aged concrete. It’s ideal for use on exposed and polished concrete, as well as cements with integral colour. Apply this product thinly and evenly, then burnish it into the surface with a high-speed burnisher.
Achieving a perfect polish takes time and patience. Each step builds on the previous one, creating a cumulative effect that results in a truly stunning floor.
Final Thoughts
Staining and polishing concrete floors transforms ordinary surfaces into extraordinary works of art. This process elevates the aesthetics of any space while providing unparalleled durability and easy maintenance. The result is a gleaming, long-lasting floor that resists stains and allergens, making it suitable for homes, commercial spaces, and industrial environments.
While DIY enthusiasts can tackle this project, professional assistance often yields superior results. Experts have access to specialised equipment and possess the knowledge to handle unexpected challenges (which can arise during the process). Their precision and craftsmanship ensure lasting results tailored to specific needs.
At Superfloor Australia, we specialise in delivering high-quality polished concrete flooring in Brisbane. Our team’s expertise can help you achieve stunning stained and polished concrete floors that will impress for years to come. This investment in your space will provide beauty and longevity that goes beyond a simple home improvement project.