At Superfloor Australia, we’ve seen a surge in homeowners wanting to transform their spaces with polished concrete floors. These sleek, durable surfaces are becoming increasingly popular in residential settings.
Creating a polished concrete floor in your house can dramatically enhance its aesthetic appeal and functionality. In this guide, we’ll walk you through the process of achieving a stunning polished concrete floor, from preparation to the final seal.
What is Polished Concrete?
Polished concrete transforms ordinary concrete into a stunning, durable surface. At Superfloor Australia, we’ve witnessed the residential market embrace this flooring solution with enthusiasm.
The Polishing Process
The transformation from raw concrete to a polished masterpiece involves multiple steps. We start by grinding the concrete surface with progressively finer diamond abrasives. This step removes imperfections and exposes the aggregate within the concrete. We then apply chemical hardeners to densify the concrete, which increases its strength and stain resistance.
Levels of Polish
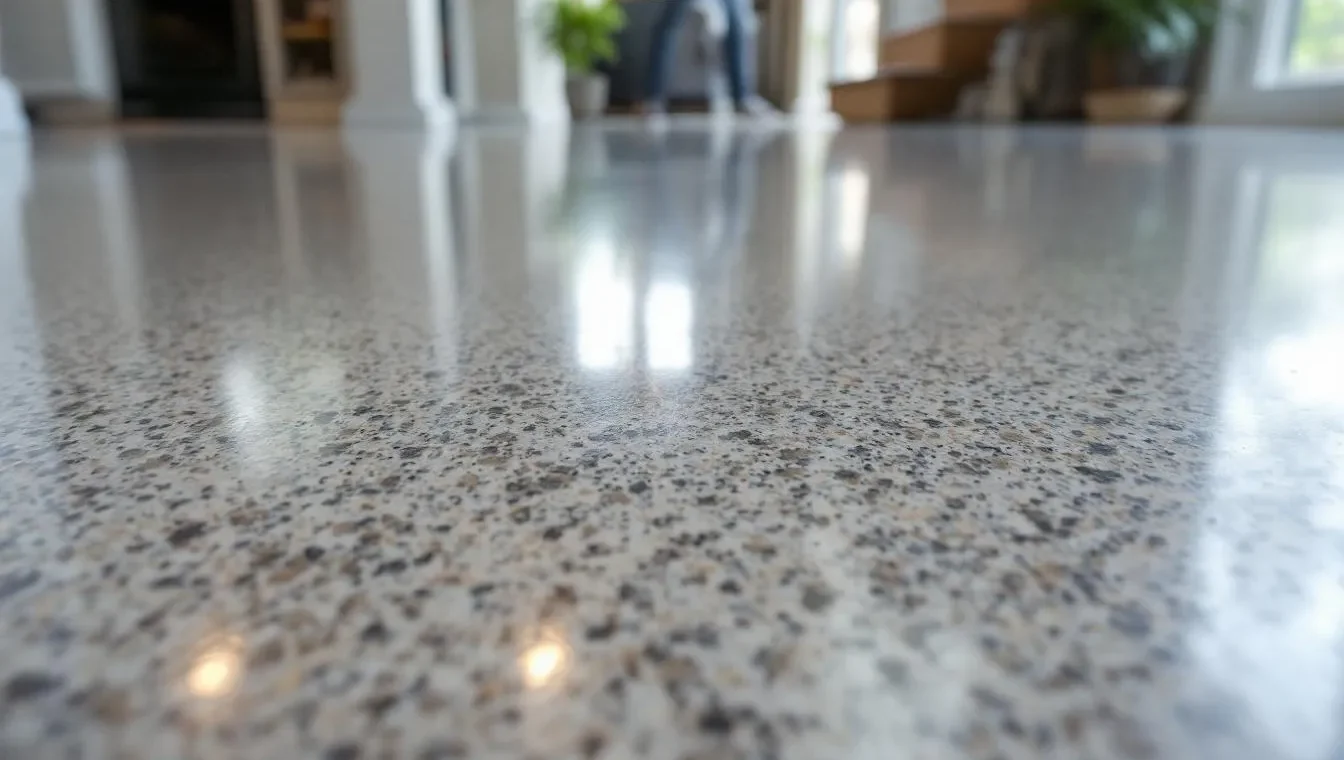
Polished concrete offers various finish options. We provide different levels of polish, ranging from a matte finish to a high-gloss shine. The final polishing pad’s grit determines the level of shine. A 400-grit finish creates a low-sheen satin look, while a 3000-grit finish produces a mirror-like surface.
Outstanding Benefits
Polished concrete floors boast numerous advantages. Their incredible durability often results in a lifespan of a century with proper maintenance and professional care every two to three years. This longevity makes them a cost-effective choice in the long run. They also contribute to energy efficiency; the reflective surface can reduce lighting needs significantly, which is particularly beneficial in commercial buildings where lighting accounts for 30-50% of energy consumption.
Maintenance of polished concrete is straightforward. Regular sweeping and occasional mopping typically suffice to keep the floor looking pristine. This easy upkeep particularly benefits allergy sufferers, as polished concrete doesn’t trap dust, mould, or pollen.

Customisation Options
The versatility of polished concrete excites many homeowners. We can add colour to the concrete during the mixing process or apply stains and dyes during polishing. This allows for a wide range of aesthetic options (from subtle earth tones to bold, vibrant hues).
For those seeking a unique look, we can expose aggregate in the concrete, creating a terrazzo-like appearance. We can control the size and type of aggregate exposed, offering further customisation possibilities.
The Superfloor Australia Difference
Our expertise in polished concrete ensures that each floor we create isn’t just a surface, but a lasting piece of functional art. We enhance the beauty and value of your home through our precision and craftsmanship.
As we move forward, let’s explore how to prepare your space for the polished concrete transformation. The next section will guide you through the essential steps to ensure your concrete surface is ready for its stunning makeover.
How to Prepare Your Concrete for Polishing
At Superfloor Australia, we know that proper preparation forms the foundation of a stunning polished concrete floor. This essential step can determine the final result, so it’s important to execute it correctly.
Assessing Your Concrete
Before we start any polishing work, we examine the existing concrete surface thoroughly. We search for signs of damage, such as cracks, chips, or spalling. We also check for any previous treatments or coatings that might interfere with the polishing process.
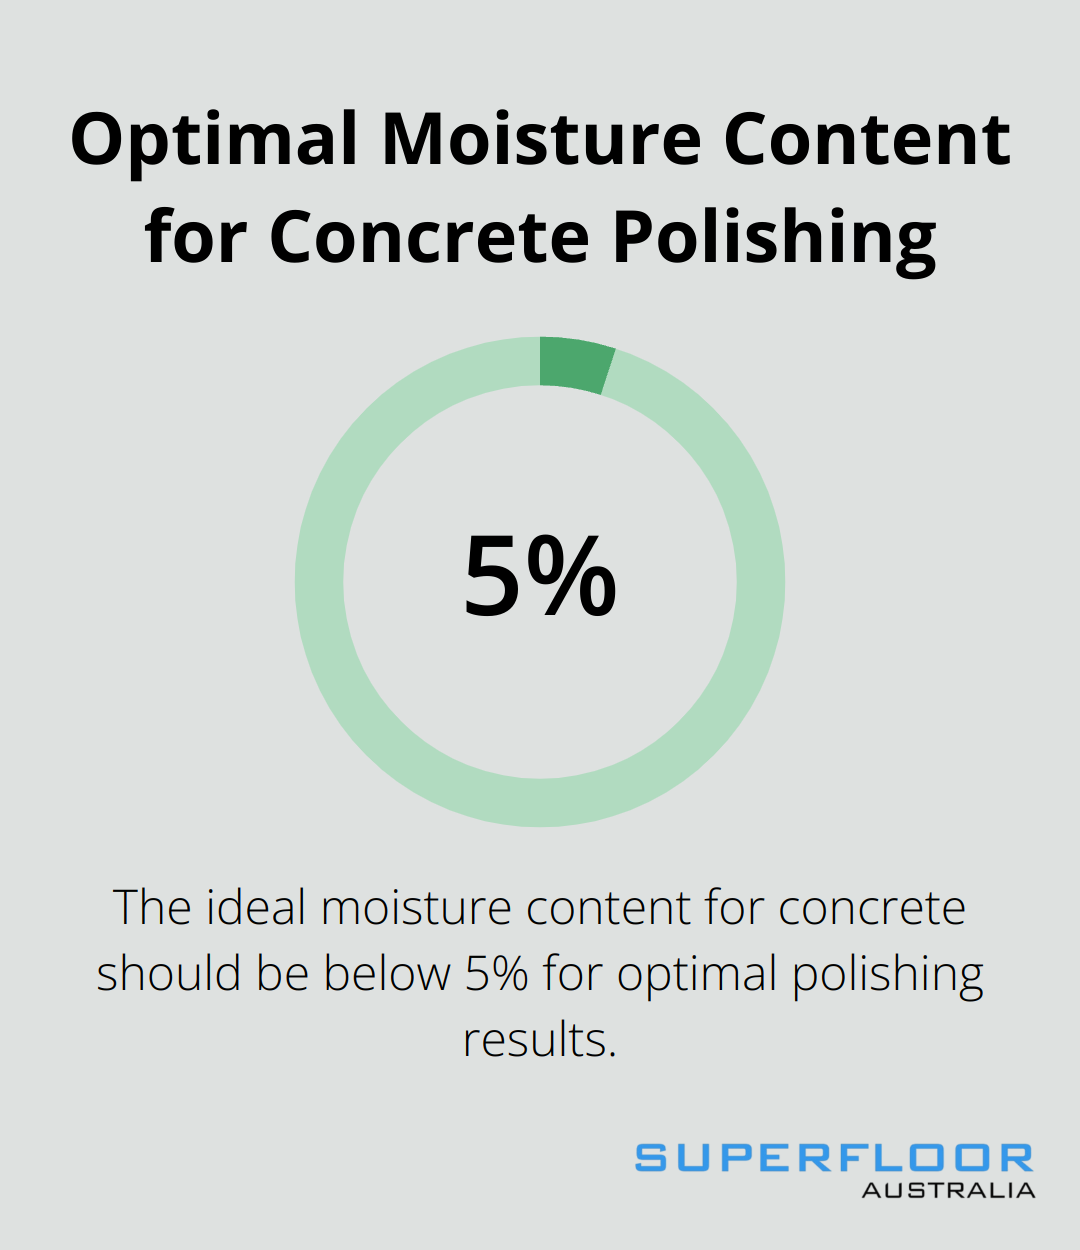
During our assessment, we use a moisture meter to measure the concrete’s moisture content. The moisture level should ideally be below 5% for optimal polishing results. If the moisture content exceeds this level, we might need to delay the project or apply a moisture barrier.
We also perform a hardness test. Various tests can measure the hardness of concrete, including the Knoop test, the Rosiwal test, the Shore test, and the Roswell test. This helps us determine the appropriate diamond tooling for the grinding process. Softer concrete requires different tools than harder concrete to achieve the best finish.
Repairing Imperfections
After we assess the surface, we address any imperfections. We fill small cracks with a high-quality epoxy or polyurea filler. For larger cracks or extensive damage, we might recommend a more substantial repair or even replace sections of the concrete.
We typically grind down spalling areas and patch them with a cement-based overlay. We ensure that the patching material matches the surrounding concrete in both colour and texture for a seamless finish.
If there are any old coatings or adhesives on the floor, we remove them using specialised grinding equipment. This step is crucial for achieving a uniform polish across the entire surface.
Cleaning and Degreasing
The final preparation step involves a thorough cleaning of the concrete surface. We start by sweeping and vacuuming to remove loose debris. Then, we use a high-pressure washer to clean the surface, paying special attention to any stained or heavily soiled areas.
For floors with oil or grease stains, we apply a degreasing solution and scrub it into the concrete. This process may need repetition several times for stubborn stains. After degreasing, we rinse the floor thoroughly to remove any residue.
Once the floor is clean and dry, we perform a final inspection to ensure it’s ready for polishing. This attention to detail in the preparation phase is what sets quality polishing services apart and ensures a superior end result.
The meticulous preparation of the concrete surface sets the stage for a polishing process that will transform your floor into a durable, beautiful, and long-lasting surface. Now that we’ve covered the essential preparation steps, let’s move on to the actual polishing process and how it brings out the true beauty of your concrete floor.
How Does the Polished Concrete Process Work?
Grinding: The Foundation of Polish
At Superfloor Australia, we start the polishing process with grinding. We use specialised machines equipped with diamond-embedded metal bonded abrasives. These grinders have segments that are either welded or cold-pressed on a metal body, often made of steel or aluminium. The initial grinding typically uses a coarse grit to level the floor and remove major imperfections.
We switch to finer grits as we progress, gradually smoothing the surface. This step-by-step approach creates a uniform finish. Each pass with a finer grit removes the scratches left by the previous one, resulting in an increasingly smooth surface.
Densification: Strengthening the Concrete
After the initial grinding stages, we apply a chemical hardener (also known as a densifier). This is a proprietary, water-based, ready-to-use, clear silicate liquid, formulated with chemically reactive raw materials to harden and dustproof concrete.
The densification step is essential for achieving a high-quality polish. It not only strengthens the concrete but also helps to close the pores, reducing the floor’s porosity. This makes the surface more resistant to stains and easier to maintain in the long run.
Progressive Polishing: Revealing the Shine
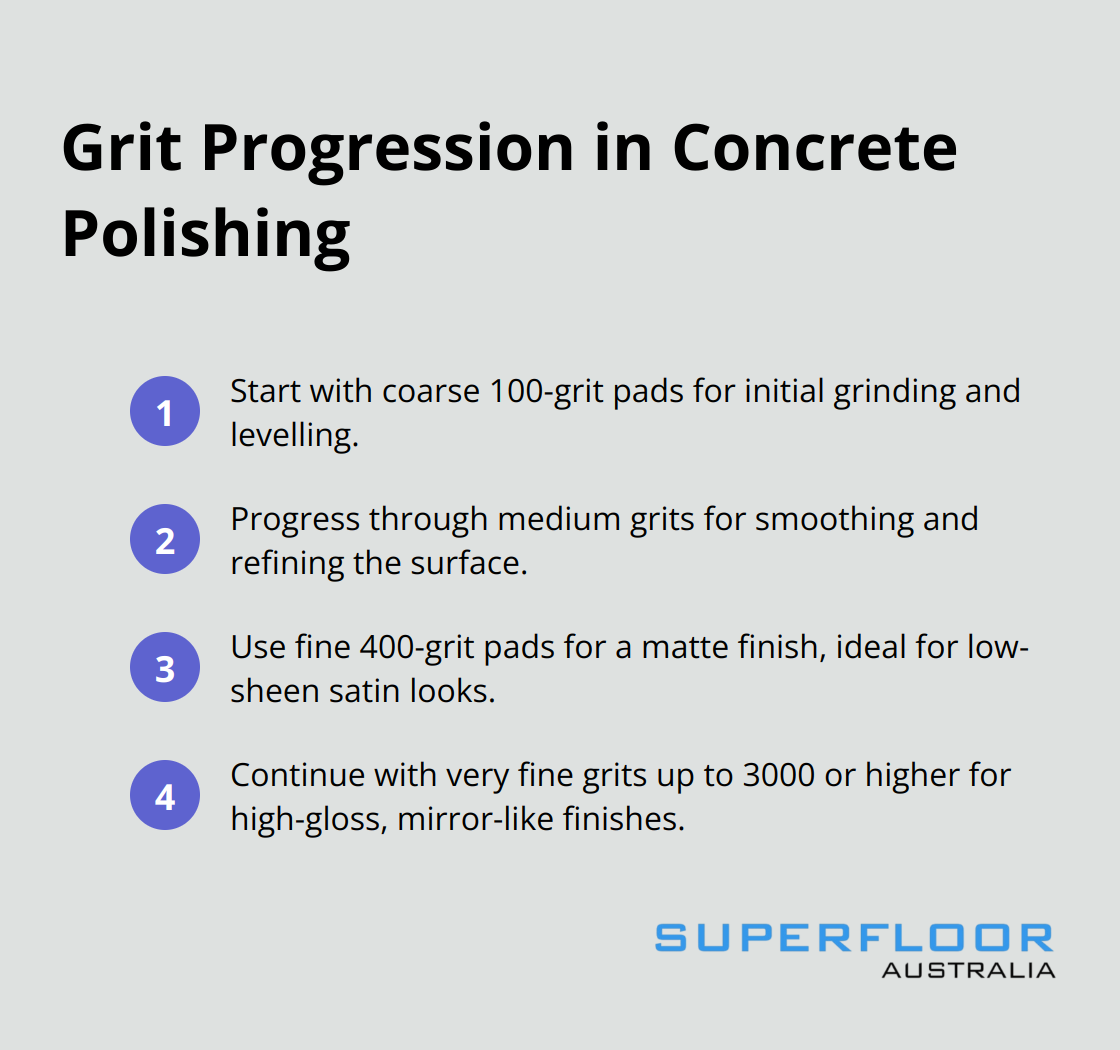
With the densifier applied and cured, we move on to the polishing stage. This involves the use of progressively finer resin-bonded diamond abrasives. We typically start with a 100-grit pad and work our way up to 3000-grit or higher (depending on the desired level of shine).
Each polishing step further refines the surface, increasing its reflectivity. The higher the grit number, the finer the abrasive and the higher the shine. For a matte finish, we might stop at 400-grit, while a high-gloss mirror finish could require 3000-grit or beyond.
Sealing: The Final Touch
The last step in our process is the application of a penetrating sealer. This sealer helps to enhance the shine, reduce the risk of staining, and improve the durability of the floor. There are different types of sealers available, each suited to specific needs and conditions.
We carefully select our sealers to ensure they don’t alter the appearance of the polished concrete. The goal is to enhance the natural beauty of the concrete while providing long-lasting protection.
Throughout the entire process, dust control is a top priority. We use high-efficiency particulate air (HEPA) filters on our equipment to minimise dust, ensuring a cleaner work environment and a better final result.
The polishing process typically takes several days (depending on the size of the area and the level of polish desired). While it’s possible for DIY enthusiasts to tackle this project, the complexity of the process and the specialised equipment required often make professional polishing the most cost-effective and reliable option.
Final Thoughts
Polished concrete floors transform houses into stunning, durable spaces. The process involves thorough preparation, meticulous grinding, and expert polishing techniques. Regular maintenance with gentle cleaning methods ensures the floor’s longevity and preserves its beauty for years to come.
While DIY enthusiasts might attempt this project, professional installation often produces superior results. Specialised equipment and technical expertise play a significant role in achieving the desired finish. Professional installers can navigate challenges and deliver exceptional outcomes.
Superfloor Australia offers top-quality polished concrete flooring services in Brisbane (with precision preparation and expert craftsmanship). Our team’s knowledge and skill can elevate your polished concrete floor from good to exceptional. A polished concrete floor in your house is an investment that combines style and practicality, impressing for decades to come.