Polished concrete flooring finish transforms ordinary concrete into a stunning, durable surface that rivals premium materials. The process requires precise techniques and professional-grade equipment to achieve optimal results.
We at Superfloor Australia have perfected the multi-stage approach that delivers consistent, high-quality finishes. This guide covers the essential steps from surface preparation through final sealing.
Surface Preparation for Polished Concrete
Proper surface preparation forms the foundation of any successful polished concrete project. The concrete surface must be mechanically ground to remove existing coatings, adhesives, and surface contaminants that prevent proper bonding of chemical hardeners. Professional grinding equipment uses 16-30 grit metal-bonded diamond pads to remove approximately 1-3mm of surface material, exposing fresh concrete and creating the proper profile for subsequent treatments.
Floor Levelness Requirements
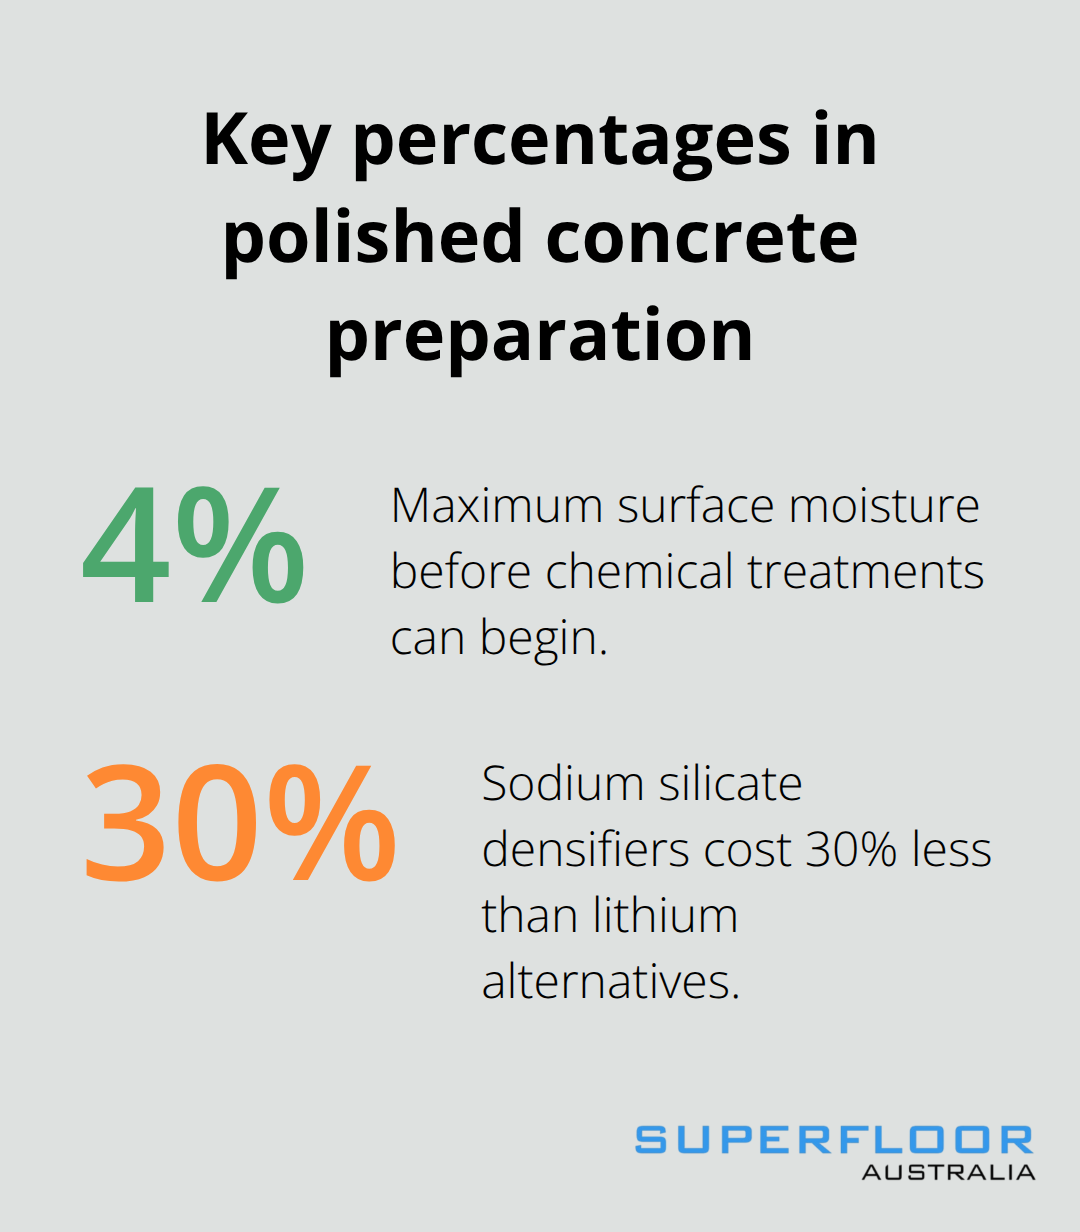
Floor levelness directly impacts the final appearance and performance of polished concrete. Australian Standard AS 1884 requires floors to be within 4mm over 2 metres for resilient flooring applications. Self-levelling compounds fill low spots and depressions, while high spots require aggressive grinding with coarse diamond tooling. The grinding process must progress systematically from 30 grit to 100 grit to eliminate scratch patterns and achieve uniform surface texture. Surface moisture content must remain below 4% before chemical treatments can begin.
Crack Repair and Defect Treatment
All cracks wider than 0.5mm require repair with polyurethane or epoxy injection systems before polishing begins. Structural cracks need engineering assessment, while surface crazing can be filled with colour-matched repair compounds. Surface defects including oil stains, rust marks, and embedded debris must be completely removed through chemical treatment or mechanical grinding. Proper crack repair and defect treatment are essential for professional results, as inadequate surface preparation can lead to polishing failures.
Cleansing and Contamination Removal
Complete debris removal prepares the surface for optimal chemical penetration. Industrial vacuum systems extract all loose particles, dust, and grinding residue from the concrete pores. Chemical degreasers eliminate oil-based contaminants that can interfere with densifier absorption. The surface must be completely dry and free from all foreign materials before the polishing process advances to the diamond grinding stages.
Polishing Process and Techniques
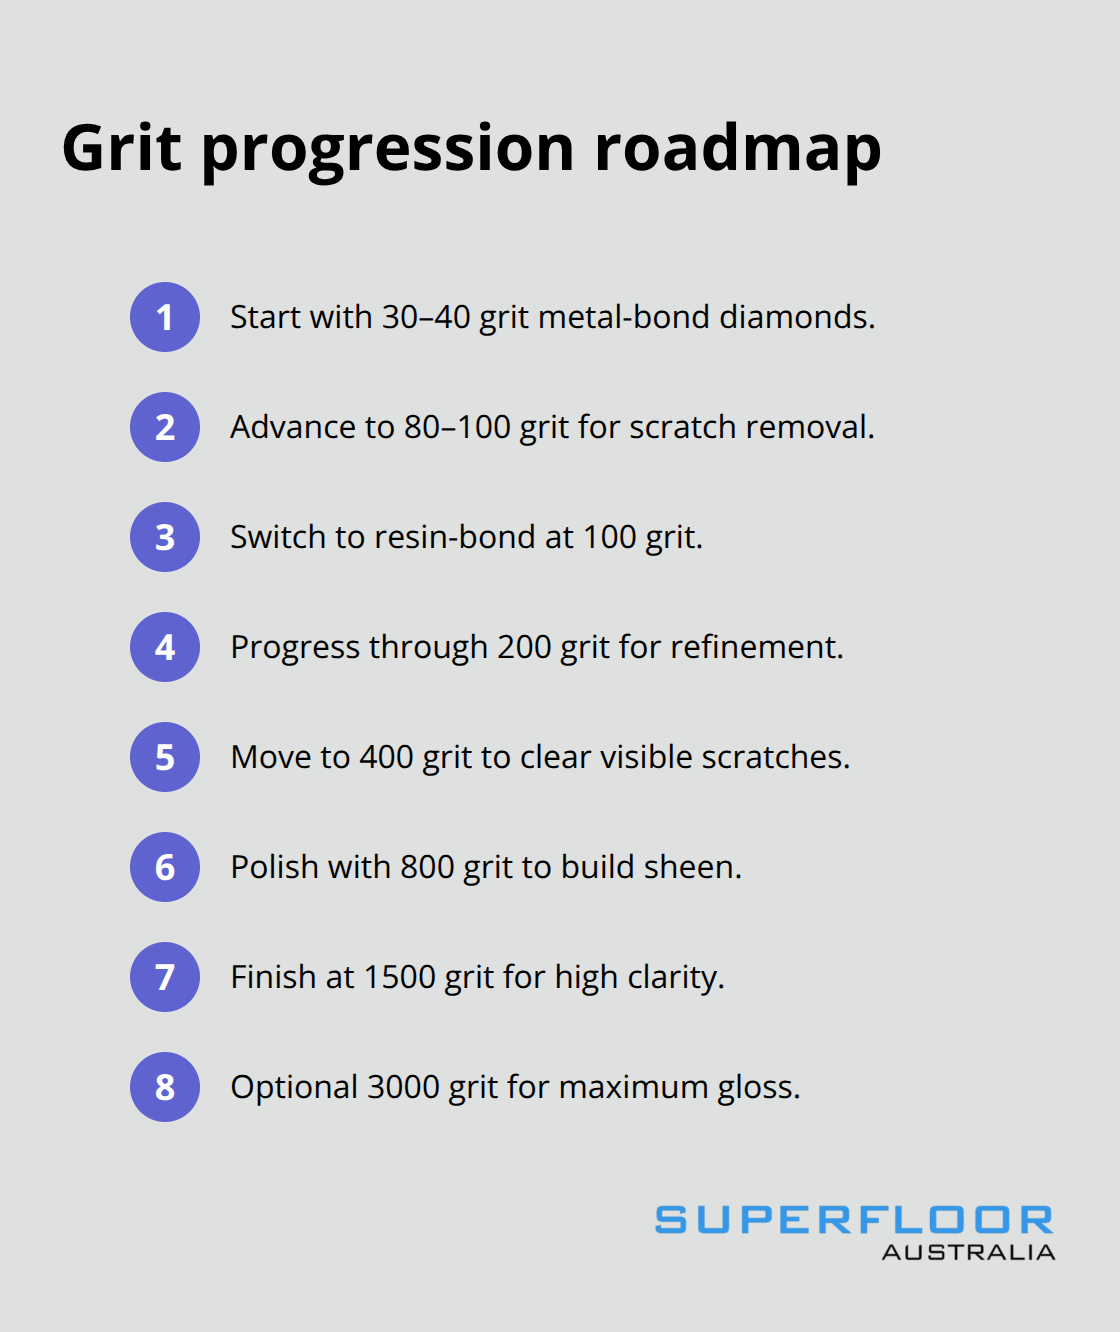
The polishing process follows systematic diamond grinding stages that progress through specific grit sequences. Metal-bonded diamond tooling starts at 30-40 grit for initial surface preparation and advances to 80-100 grit for scratch removal. Each stage requires complete overlap patterns to eliminate previous grit marks before progression occurs. Resin-bonded diamonds replace metal bonds at 100 grit and continue through 200, 400, 800, 1500, and 3000 grit stages.
Proper grit progression significantly impacts final surface quality outcomes. Wet grinding reduces dust generation but requires water management systems, while dry grinding offers better visibility and faster cleanup. Machine speed settings must decrease as grit size increases – operators set 800 RPM for coarse grits and drop to 400 RPM for fine polishing stages.
Diamond Grinding Stages and Grit Progression
Professional contractors execute each grinding stage with precision timing and technique. Metal-bonded diamonds cut aggressively through the initial 30-100 grit stages, removing surface imperfections and creating uniform texture. Operators must maintain consistent pressure and speed to prevent gouging or uneven wear patterns.
Resin-bonded diamonds take over at 100 grit and provide smoother cutting action through the remaining stages. Each grit level removes scratches from the previous stage while preparing the surface for finer abrasives. The 200-400 grit range eliminates visible scratch patterns, while 800-1500 grit stages develop the desired sheen level.
Chemical Hardener Application Methods
Lithium silicate densifiers penetrate concrete pores between 100-200 grit stages for surface preparation applications. Application requires spray equipment that delivers 150-200 square feet coverage per gallon at 0.1 gallon per square foot rates. The densifier must cure for 2-4 hours before mechanical polishing resumes.
Sodium silicate alternatives cost 30% less but require neutralisation steps that extend project timelines. Temperature affects penetration rates significantly (optimal application occurs between 60-80°F ambient conditions). Proper timing and environmental control maximise densifier effectiveness and surface hardness development.
Final Polishing and Sealing Steps
Topical sealers applied after 1500 grit polishing provide stain resistance and enhance light reflection properties. Penetrating sealers offer 5-7 years protection compared to 2-3 years for topical systems. Application rates vary from 250-400 square feet per gallon depending on concrete porosity.
Two thin coats outperform single heavy applications, with 4-6 hour cure times between coats. Surface preparation with 3000 grit pads maximises sealer adhesion and eliminates micro-scratches that reduce gloss levels. Proper sealing techniques protect the investment and maintain appearance standards that quality control measures will evaluate in the next phase.
Quality Control and Finish Standards
Professional gloss measurement requires calibrated equipment that delivers consistent readings across different surface areas. Digital gloss metres measure specular reflection at 60-degree angles, with readings that range from 20 units for matte finishes to 90+ units for high-gloss surfaces. The Concrete Polishing Association of America establishes industry standards where cream finishes measure 20-40 gloss units, while full polish exceeds 70 units.
Surface hardness tests use Mohs scale measurements, where properly densified concrete achieves 6-7 hardness compared to untreated surfaces. Rebound hammer tests measure compressive strength, with polished concrete after chemical hardener application.
Gloss Level Assessment Methods
Contractors take multiple readings across each 100 square foot section to verify consistent results. Light reflection patterns reveal surface irregularities that standard measurements might miss. Professional inspectors check gloss levels under both natural and artificial light conditions (fluorescent and LED sources produce different reflection characteristics). Surface contamination from foot traffic or construction dust can reduce gloss readings by 15-20 units within hours of completion.
Surface Defect Identification and Solutions
Micro-scratches appear as cloudy areas under direct light and indicate insufficient grit progression or contaminated diamond tools. Operators must restart from the previous grit stage to eliminate these defects completely. Swirl marks result from incorrect machine speeds or worn pads, which require pad replacement and speed adjustment to 350-400 RPM for final stages.
Colour variations across the surface indicate uneven densifier penetration. Additional chemical application at 0.05 gallons per square foot solves this issue. Joint lines become visible through the polish when saw cuts telegraph through the surface, which requires specialised joint compounds applied before 200 grit stages.
Equipment Calibration Standards
Machine maintenance directly affects finish quality, with worn drive systems that create vibration patterns transferred to the concrete surface. Planetary grinders require bearing inspection every 200 hours to maintain smooth operation. Diamond tools lose efficiency after 5,000-8,000 square feet of use, depending on concrete hardness and aggregate type.
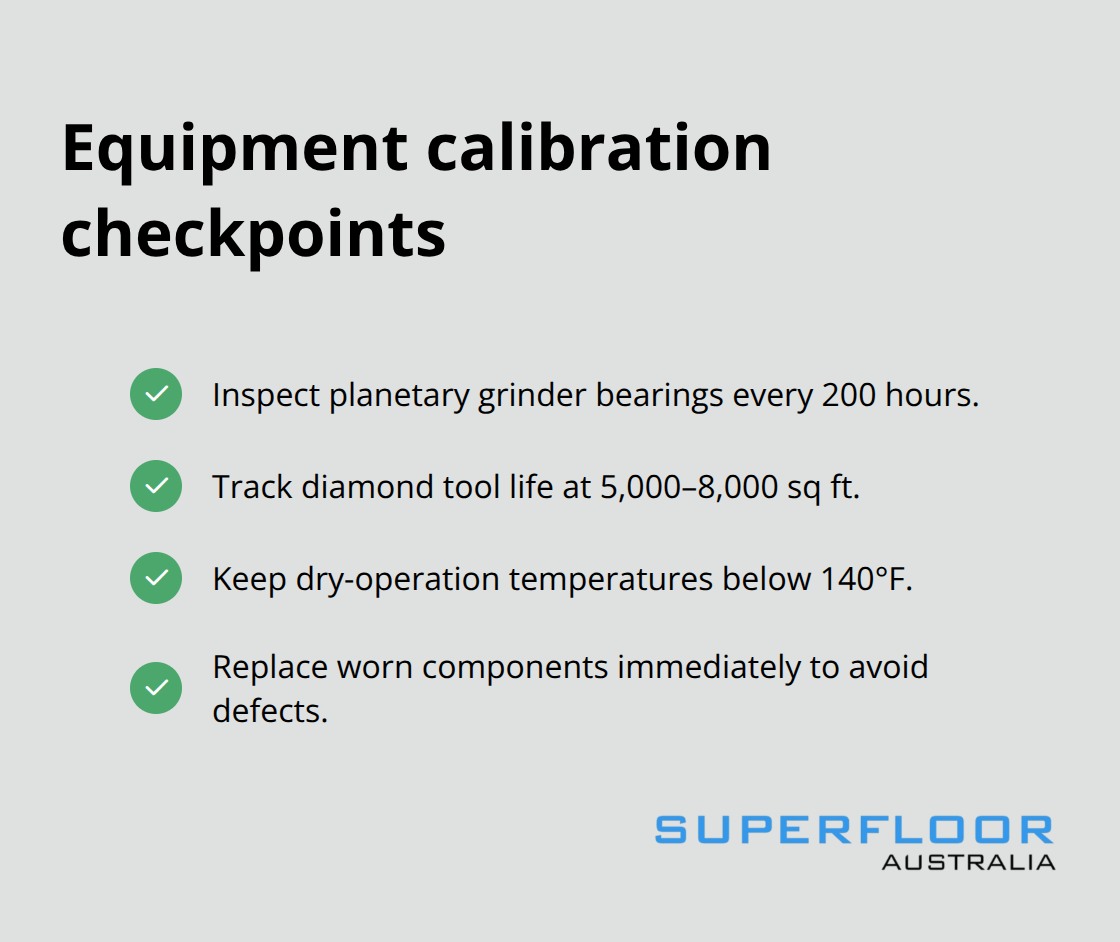
Temperature monitoring prevents overheating that can burn the concrete surface. Optimal temperatures stay below 140°F during dry operations. Contractors replace worn components immediately to prevent surface defects that compromise the final finish quality.
Final Thoughts
Professional polished concrete flooring finish demands systematic execution of surface preparation, precise grit progression, and quality control measures. The multi-stage process requires specialised equipment and technical expertise to deliver consistent results that meet industry standards. Contractors must understand concrete chemistry, equipment calibration, and environmental factors that affect project outcomes.
Regular maintenance extends the lifespan of polished concrete surfaces significantly. Daily sweeping removes abrasive particles that can dull the finish, while weekly damp mopping with pH-neutral cleaners maintains the surface lustre. Periodic resealing every 3-5 years protects against stains and preserves the reflective properties that make polished concrete attractive.
Professional installation services eliminate common mistakes that compromise surface quality and durability. We at Superfloor Australia deliver high-quality polished concrete services, combining precision preparation with expert craftsmanship to achieve lasting results. The investment in professional installation pays dividends through reduced maintenance costs, enhanced property value, and surfaces that maintain their appearance for decades with proper care (when maintained according to manufacturer specifications).