
A poorly prepared floor is the fastest way to waste money on a commercial flooring project. At superfloor australia, we’ve seen countless businesses skip critical preparation steps and pay the price through premature failure, safety issues, and costly repairs.
This commercial floor preparation guide walks you through the exact process that protects your investment and keeps your space safe for years to come.
Why Floor Preparation Determines Your Commercial Space’s Future
The concrete beneath your commercial space is either an asset or a liability, and preparation determines which one it becomes. Proper floor preparation directly impacts safety compliance, long-term durability, and how clients and staff perceive your business the moment they walk through the door. A single moisture test costs $300 to $500 and prevents tens of thousands in repairs from blistering, peeling, or delamination that occur within months of installation. In Brisbane’s humid subtropical climate where average humidity sits around 60 to 70% annually, moisture testing before coating becomes non-negotiable. Ground-level and below-grade spaces absorb moisture constantly, making skipped testing a false economy that transforms into costly failure. Upfront preparation costs typically run $2 to $5 per square metre for grinding and moisture testing, yet businesses that skip these steps face premature replacement, safety hazards, and operational downtime that far exceed initial savings.
Safety and Liability Protection
A poorly prepared floor creates genuine safety and liability exposure. Slip resistance must meet AS 4586 testing standards, which classify flooring based on performance in dry, wet or greasy environments. Concrete grinding removes surface material, exposing sound concrete and creating uniform texture for coatings to adhere. Inadequately prepared floors in kitchens, workshops, and industrial spaces where chemical spills are common become slip hazards and liability nightmares. Moisture barriers, extended drying time, or temporary dehumidification may be necessary to prevent coating failure in humid conditions, yet these investments protect staff and visitors from preventable accidents.
Durability Extends When Preparation Is Done Right
Preparation methods must match your concrete’s actual condition. Older warehouses require deeper grinding or different techniques than new slabs. Three non-negotiable steps determine durability: moisture testing, grinding to remove laitance and weak layers, and thorough cleaning with vacuum extraction of silica dust and pH-neutral cleaners.
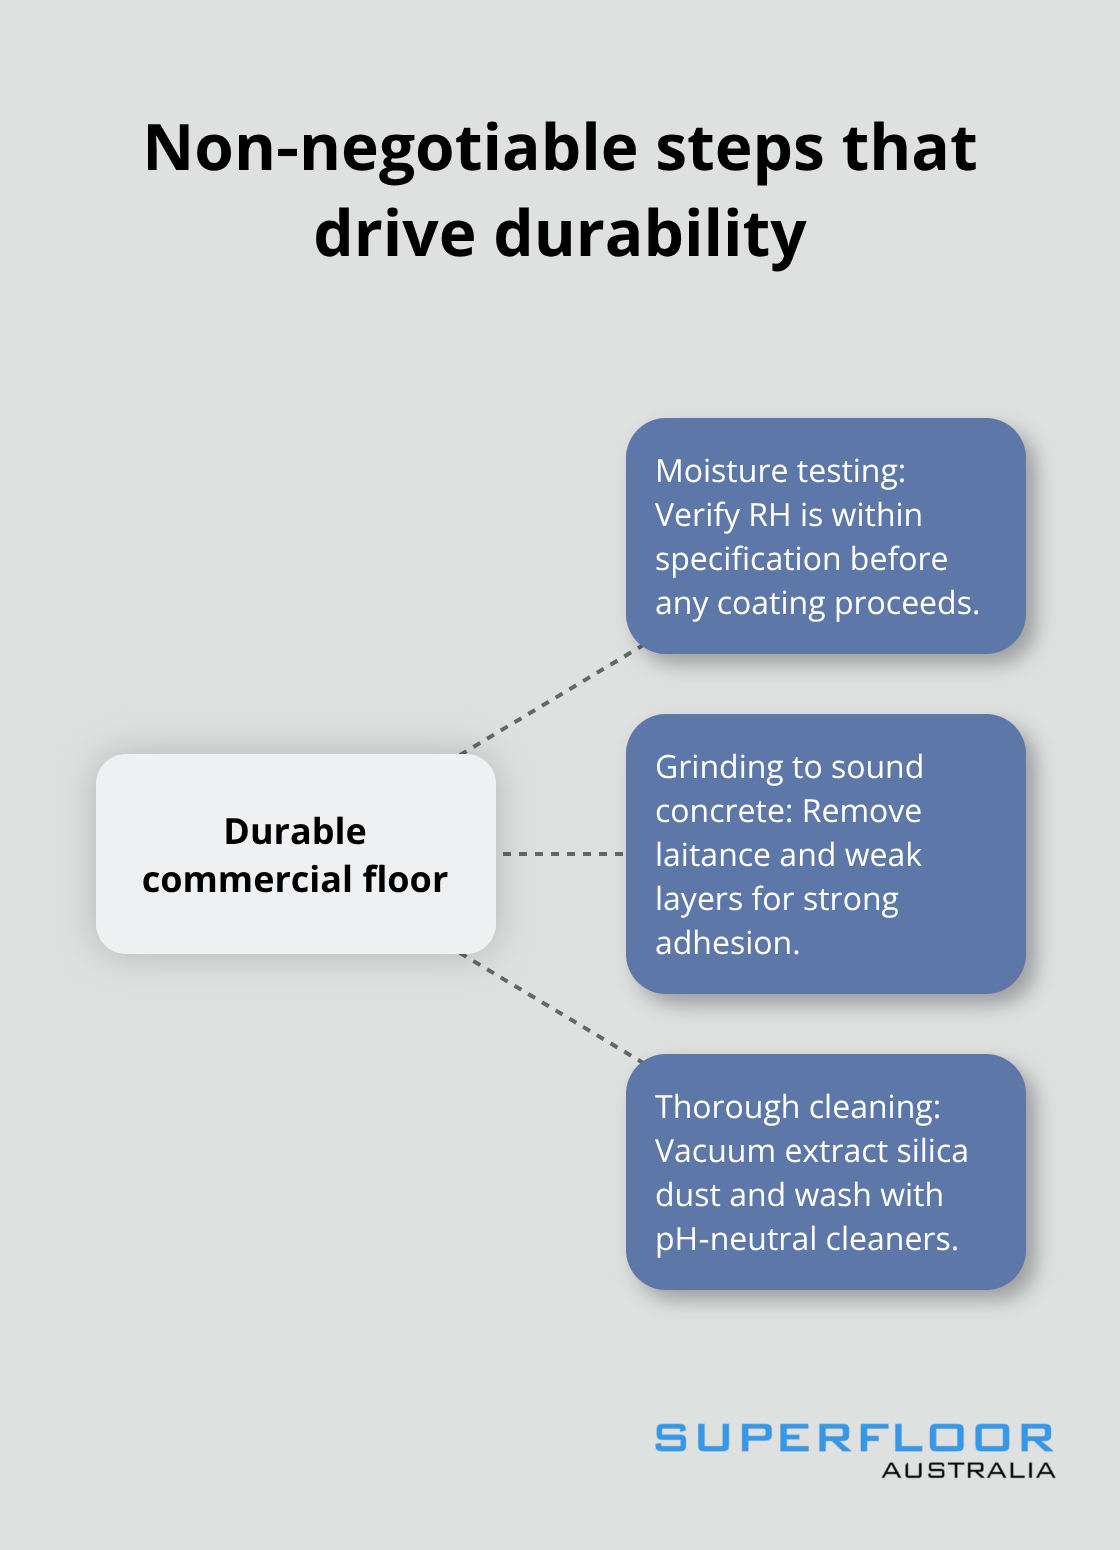
Skipping any single step compromises adhesion and accelerates deterioration. A well-prepared floor resists chemical damage and reduces resurfacing needs across its entire lifespan, whereas rushed preparation leads to incomplete laitance removal, inconsistent texture, and weak adhesion that fails under commercial traffic.
What Happens Next
The assessment and evaluation of your specific floor condition form the foundation for every decision that follows. Understanding your concrete’s current state-its damage, moisture levels, and surface composition-allows you to select the right grinding techniques and cleaning protocols that actually work for your space.
Getting Your Concrete Ready for Installation
Identify Structural Problems Before They Worsen
Start with a thorough site walk to identify what you’re actually dealing with. Look for cracks wider than 3 mm, spalling, or areas actively breaking apart-these aren’t cosmetic issues but structural problems that affect how your floor will perform. Fill chips with concrete patching compound and smooth excess filler with 80-grit diamond after it dries. Next, inspect for old coatings like paint or epoxy and strip them off with coarse 16–30 grit resin-bonded diamond to expose fresh concrete. This step matters because adhesion fails when you coat over old finishes, and peeling starts months after installation when the failure becomes visible. Many businesses think they can skip this step to save time, but removing old coatings takes roughly one to two days per 500 square metres depending on the coating’s age and thickness.
Test Moisture Levels in Brisbane’s Humid Climate
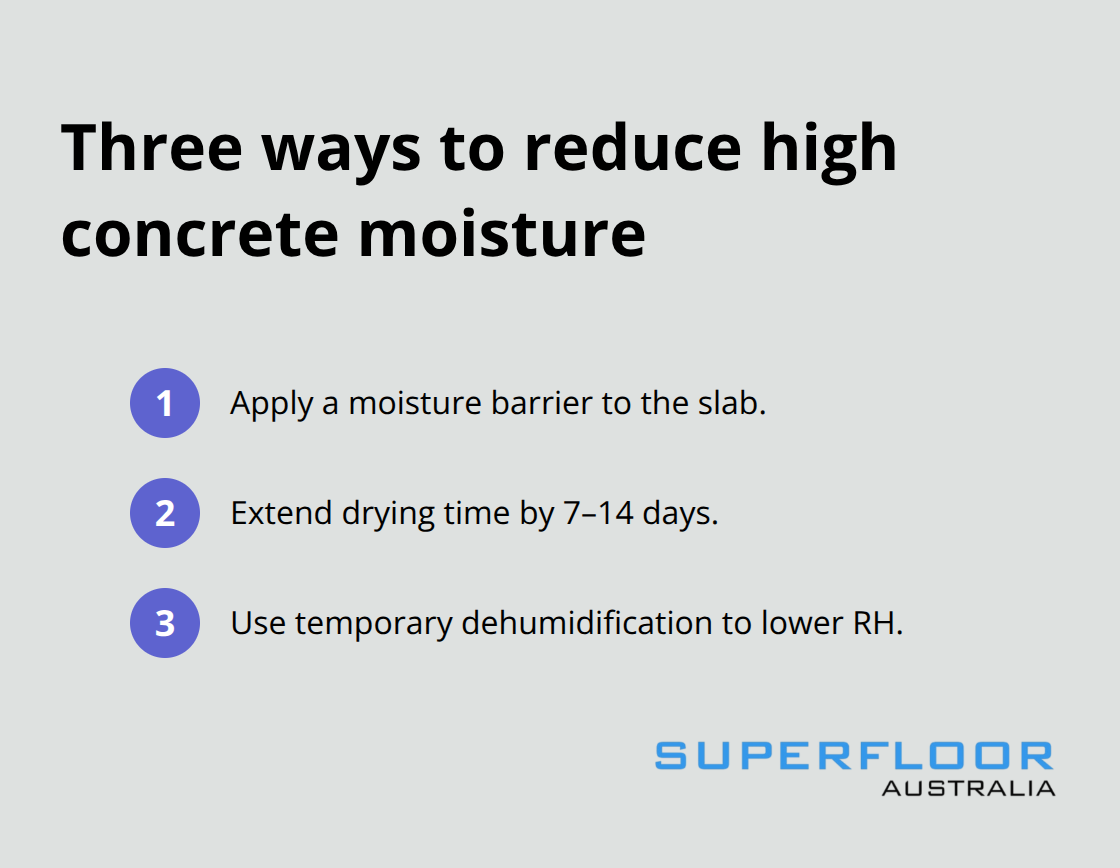
Moisture testing comes next and cannot be skipped in Brisbane’s climate. Use a calcium chloride test or relative humidity test to check concrete moisture levels; epoxy and polyurethane coatings typically require moisture below 75% relative humidity. Ground-level and below-grade spaces absorb moisture constantly, so these areas demand testing before any coating work proceeds. If moisture levels run high, you have three options: apply moisture barriers, extend drying time by 7–14 days, or use temporary dehumidification equipment to bring levels down.
The cost of testing sits between $300 and $500, but blistering or delamination failures cost $20,000 to $50,000 in repairs and replacement.
Grind to the Right Depth and Grit
Concrete grinding removes the top 1–2 mm of surface material along with laitance and weak layers, creating uniform texture that coatings actually bond to. Match your starting grit to floor condition: use 80 grit for freshly exposed concrete, 16–30 grit for heavily coated floors, and 40 grit for severely worn surfaces. Test a small area first to decide progression rate. For large areas over 500 square metres, planetary grinders reduce swirl marks and save time compared to single-head machines, though walk-behind grinders deliver consistency and control for smaller spaces. Heavier machines weighing 80–100 kg apply more even pressure and require fewer passes, while lighter machines need multiple passes and demand more operator skill.
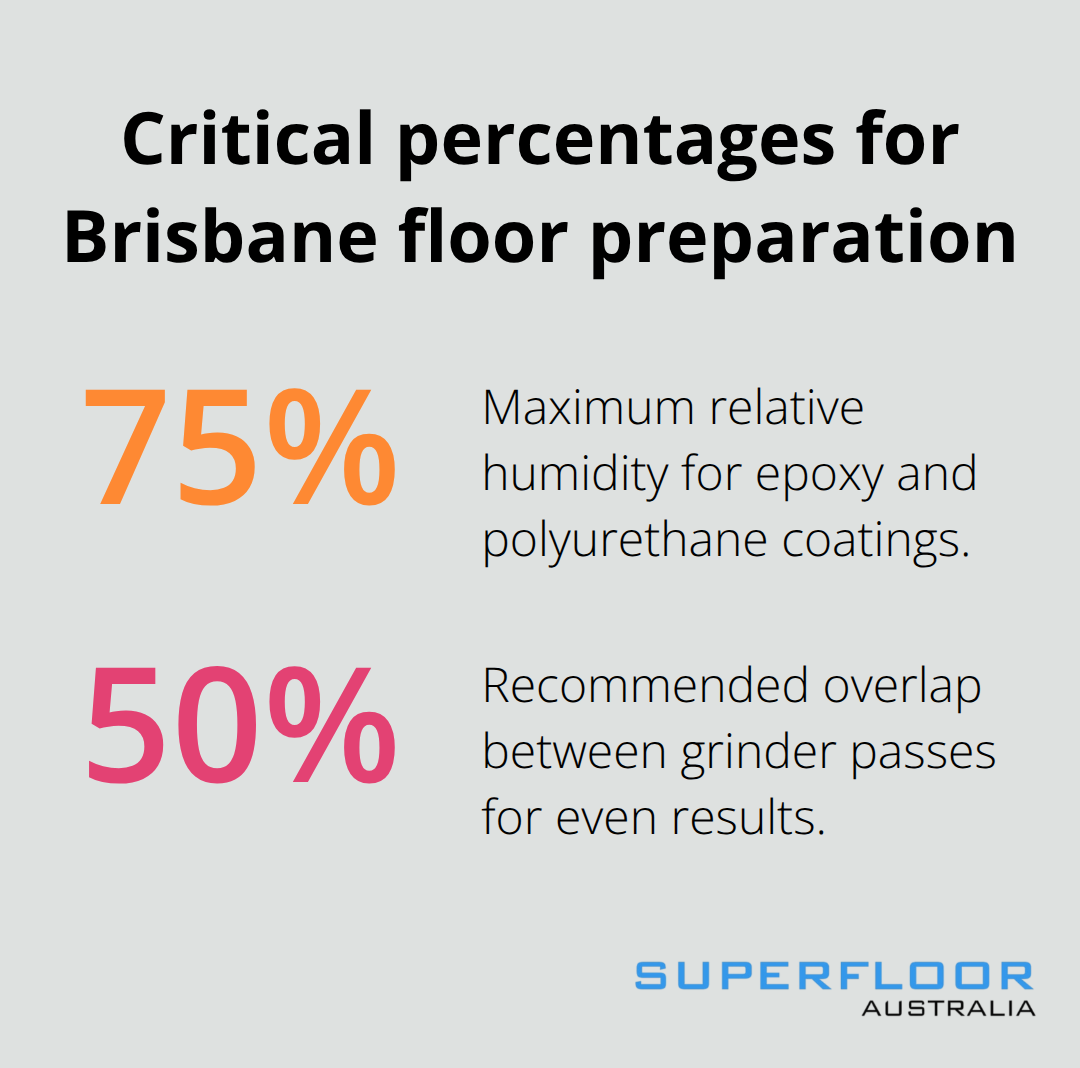
Use smooth overlapping passes with about 50% overlap and rotate the machine 90 degrees on the second pass to break up directional marks; never stop the grinder while it’s in contact with the floor. Progress through grit steps in order-40, 80, 120, 200, 400, 800, 1500–3000-and vacuum between grits to prevent cross-contamination of dust.
Control Dust and Clean Thoroughly
Industry standards allocate 30–40% of total project time to preparation alone, which means rushing this phase almost guarantees adhesion failures and weak finishes. After grinding finishes, thorough cleaning with vacuum extraction of silica dust and pH-neutral cleaners removes all debris and dust that prevents coatings from bonding properly. Dust control during grinding is non-negotiable; follow the Australian Code of Practice 2022 and use an integrated water delivery system or dust collection system rated M-Class or H-Class per AS/NZS 60335.2.69 with HEPA filtration to 0.3 microns. Install hoses, sealed shrouds, and dust extractors before starting and verify the extractor’s airflow matches the grinder’s requirements to prevent airborne dust and clogged filters that slow work. With your concrete properly prepared and cleaned, you’re ready to move into the finishing stage where densifiers and sealers transform your prepared surface into a durable, polished floor.
Three Mistakes That Destroy Commercial Floors Before They Even Start
Incomplete Surface Inspection Sabotages Everything That Follows
Surface inspection demands more than a quick visual scan or delegating the task to an untrained eye. We at Superfloor Australia watch businesses inspect their concrete for five minutes, miss critical damage, and then watch their new finish fail within months because the foundation was compromised from the start. A proper site walk takes 30 to 45 minutes and requires you to look for cracks wider than 3 mm, spalling, areas actively breaking apart, and old coatings that will sabotage adhesion.
Many facility managers assume paint or epoxy peeling away on its own means the concrete underneath is ready, but that assumption is exactly wrong. Old coatings must be stripped with 16–30 grit resin-bonded diamond to expose fresh concrete, or your new coating will peel within months just like the last one did. This stripping phase takes one to two days per 500 square metres depending on coating age and thickness, yet rushing or skipping it is the single fastest way to guarantee failure.
Moisture testing is equally non-negotiable, and Brisbane’s 60 to 70% average annual humidity makes this step mandatory rather than optional. Epoxy and polyurethane coatings fail catastrophically when moisture exceeds 75% relative humidity, causing blistering and delamination that cost $20,000 to $50,000 to repair. A $300 to $500 moisture test prevents this disaster, yet businesses routinely skip it thinking they’ll save money-they don’t, they just defer the cost until repairs become unavoidable. Ground-level and below-grade spaces absorb moisture constantly, making testing in these areas absolutely critical before any coating proceeds.
Rushing the Grinding Phase Leaves Weak Layers Behind
Industry standards allocate 30 to 40% of total project time to preparation work, which means compressing grinding into a single day almost guarantees incomplete laitance removal, inconsistent texture, and weak adhesion that fails under commercial traffic. Grinding must progress through grit steps in order-40, 80, 120, 200, 400, 800, 1500–3000-with vacuum extraction between each grit to prevent cross-contamination of dust particles that prevent coatings from bonding properly.
Many contractors push through multiple grits in a day thinking they’re efficient; instead, they leave residual dust and weak layers that adhesion cannot overcome. Your grinding depth matters too: the process removes only 1–2 mm of surface material, so matching your starting grit to actual floor condition determines whether you succeed or fail. A heavily coated floor needs 16–30 grit to expose fresh concrete, while severely worn surfaces demand 40 grit, and freshly exposed concrete starts at 80 grit.
Test a small area first to decide progression-this isn’t wasted time, it’s insurance against discovering halfway through that your approach won’t work. Never stop the grinder while it’s in contact with the floor, use 50% overlap on passes, and rotate the machine 90 degrees on alternate passes to break up directional wear patterns that create visible lines or gouges.
Dust Control and Safety Compliance Protect Your Team
Dust control during grinding must follow the Australian Code of Practice 2022 with integrated water delivery or dust collection systems rated M-Class or H-Class per AS/NZS 60335.2.69 with HEPA filtration to 0.3 microns-this isn’t optional safety theatre, it’s mandatory respiratory protection that prevents silica-related illness and keeps your site compliant. Install hoses, sealed shrouds, and dust extractors before starting and verify the extractor’s airflow matches the grinder’s requirements to prevent airborne dust and clogged filters that slow work.
Final Thoughts
Floor preparation separates commercial spaces that perform reliably for years from those that fail within months. The steps outlined in this commercial floor preparation guide-surface assessment, moisture testing, grinding, and dust control-aren’t optional extras or cost-cutting opportunities. They form the foundation that determines whether your investment survives Brisbane’s humid climate and heavy foot traffic or becomes a liability that drains your budget through premature repairs. Proper preparation protects your investment in three concrete ways: it eliminates safety hazards by ensuring slip resistance meets AS 4586 standards, it extends floor life dramatically by resisting chemical damage and moisture failure, and it saves money by preventing the $20,000 to $50,000 repair costs that follow blistering or delamination caused by skipped moisture testing.
The businesses that succeed with commercial flooring projects treat preparation as a strategic investment rather than a cost to minimize. They allocate 30 to 40% of project time to preparation work, test moisture levels before coating, strip old finishes completely, and follow dust control standards that protect their teams. A $300 to $500 moisture test prevents catastrophic failure, and grinding to the correct grit depth with proper overlap creates adhesion that lasts for years.
Schedule a site assessment with Superfloor Australia to evaluate your concrete’s actual condition, moisture status, and damage. Their precision preparation and expert craftsmanship ensure your floor receives the foundation it needs to perform reliably for years. Whether your space requires polished concrete, honing, or specialised finishes, proper preparation determines success from day one.