
Concrete polishing techniques transform raw concrete into a sleek, durable surface that works in warehouses, showrooms, and homes alike. The difference between a brushed, honed, or polished finish isn’t just visual-it affects how your floor performs, how much maintenance it needs, and what you’ll spend over time.
At superfloor australia, we’ve seen too many projects fail because the wrong technique was chosen or the preparation was rushed. This guide walks you through exactly what works, what doesn’t, and how to avoid costly mistakes.
Three Finishes, Three Different Floors
Brushed, honed, and polished concrete sound similar but deliver completely different results on your floor. The distinction matters because each finish performs differently under foot traffic, responds to spills in unique ways, and demands different maintenance routines. Understanding what separates them helps you choose the right finish for your space instead of guessing and regretting the decision later.
What Each Finish Actually Looks Like
Brushed concrete sits at the matte end of the spectrum, typically finished around 80 grit with a slightly textured surface that feels almost like sandpaper underfoot. Honed concrete pushes further, reaching 200 to 400 grit for a smooth, flat appearance without the shine-think of a polished stone that reflects almost no light. Polished concrete goes all the way, hitting 1,500 to 3,000 grit and using a silicate densifier to create a mirror-like surface that bounces light around the room.
The depth of appearance matters too. Brushed finishes expose minimal aggregate, showing mostly cement fines. Honed reveals fine to medium aggregate depending on how deep you cut. Polished exposes whatever aggregate depth you choose, from a cream-coloured surface at 1/16 inch exposure to a coarse, speckled look at 1/4 inch. This aggregate exposure is measurable and controllable, which means your final appearance depends on decisions made during the polishing process, not luck.
Performance Under Real Conditions
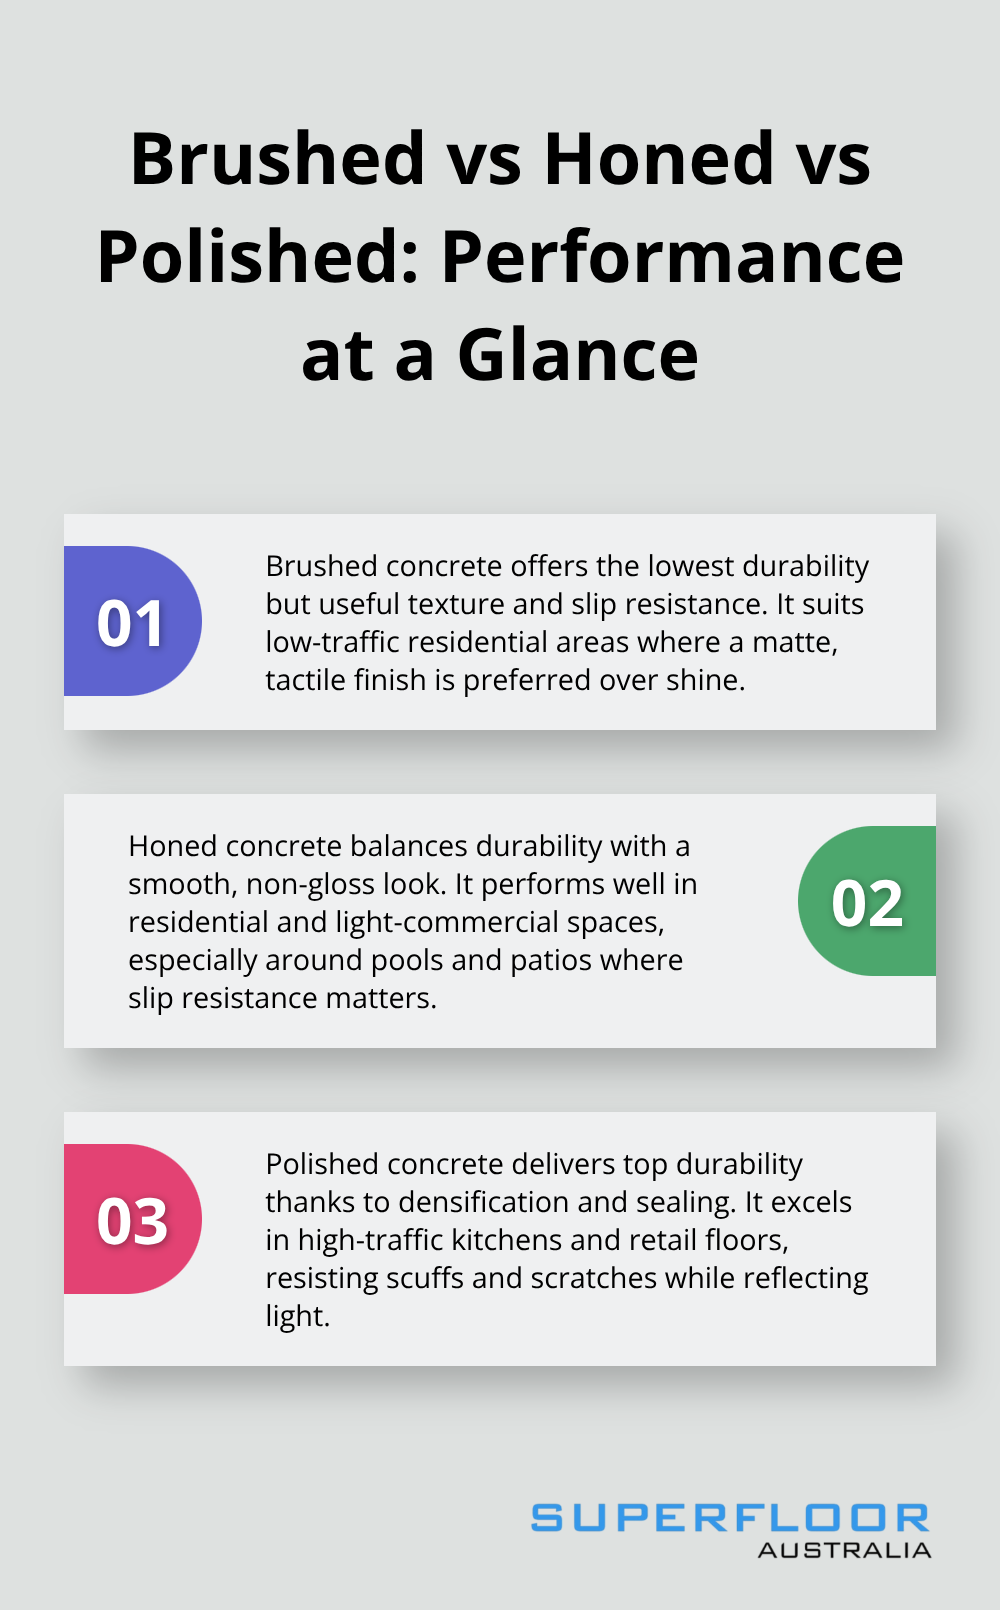
Durability rankings are straightforward: polished wins for heavy-traffic commercial spaces like kitchens and retail floors because the densified, sealed surface resists scratches and scuffs far better than brushed or honed alternatives. Honed concrete ranks second, offering solid durability for residential and light-commercial use, particularly in pool areas and patios where slip resistance matters more than mirror shine. Brushed concrete is the least durable of the three, prone to visible wear in high-traffic zones, though it works adequately in low-traffic residential spaces.
Maintenance and Long-Term Costs
Maintenance costs flip the durability ranking upside down. Brushed concrete requires regular sweeping and occasional damp mopping with a pH-neutral cleaner-straightforward and cheap. Honed concrete needs the same basic routine but benefits from periodic resealing every 12 to 24 months to maintain stain resistance. Polished concrete demands the least ongoing work: a vacuum and damp microfibre mop handle daily cleaning, with occasional repolishing every few years to refresh the shine rather than repair damage.
The sealed surface of polished concrete resists moisture absorption far better than brushed or honed alternatives, making it superior in humid climates or flood-prone areas. Installation costs run roughly 4 dollars per square foot for brushed finishes, 4 to 8 dollars per square foot for honed with sealing, and 4 to 10 dollars per square foot for polished depending on aggregate exposure and customisation.
The 20-Year Picture
Long-term value shifts dramatically when you factor in a 20-year lifespan. Brushed concrete might require complete refinishing after 10 years in commercial settings, costing thousands. Polished concrete typically outlasts this timeline with minimal intervention, making the higher upfront cost irrelevant when spread across decades of use. These performance differences become critical when you move into the preparation and execution phase-each finish demands a specific approach to achieve the results you want.
How to Prepare, Grind, and Seal Each Finish Correctly
Surface Assessment Sets the Foundation
The right finish starts weeks before you touch a grinder. Surface assessment determines everything that follows, so spend time identifying what you’re working with. Walk the concrete slab and look for cracks, chips, high spots, and coatings like paint or epoxy. Use a straightedge to check flatness; uneven surfaces cause inconsistent polishing and visible imperfections in the final look. Fill cracks and chips with patching compound that matches the slab strength, then sand smooth with 16 to 30 grit resin-bonded diamond pads.
This prep phase is where most projects either succeed or fail. Rushed preparation leads to patchy results and wasted time later. For brushed finishes, you can stop after filling and light grinding.
For honed and polished work, flatness becomes non-negotiable because aggregate exposure and mirror reflectivity depend on consistent depth.
Coating Removal and Dust Control
Strip all existing coatings aggressively using 16 to 30 grit pads in overlapping passes, rotating 90 degrees to ensure full coverage. Vacuum thoroughly between passes to reveal the true substrate. Dust control matters from the first pass onward-attach a high-efficiency dust extractor to your equipment and follow Safe Work Australia’s Code of Practice for respirable crystalline silica. Wear a P2 or N95 respirator, safety goggles, and hearing protection throughout the job.
Selecting the Right Diamond Sequence
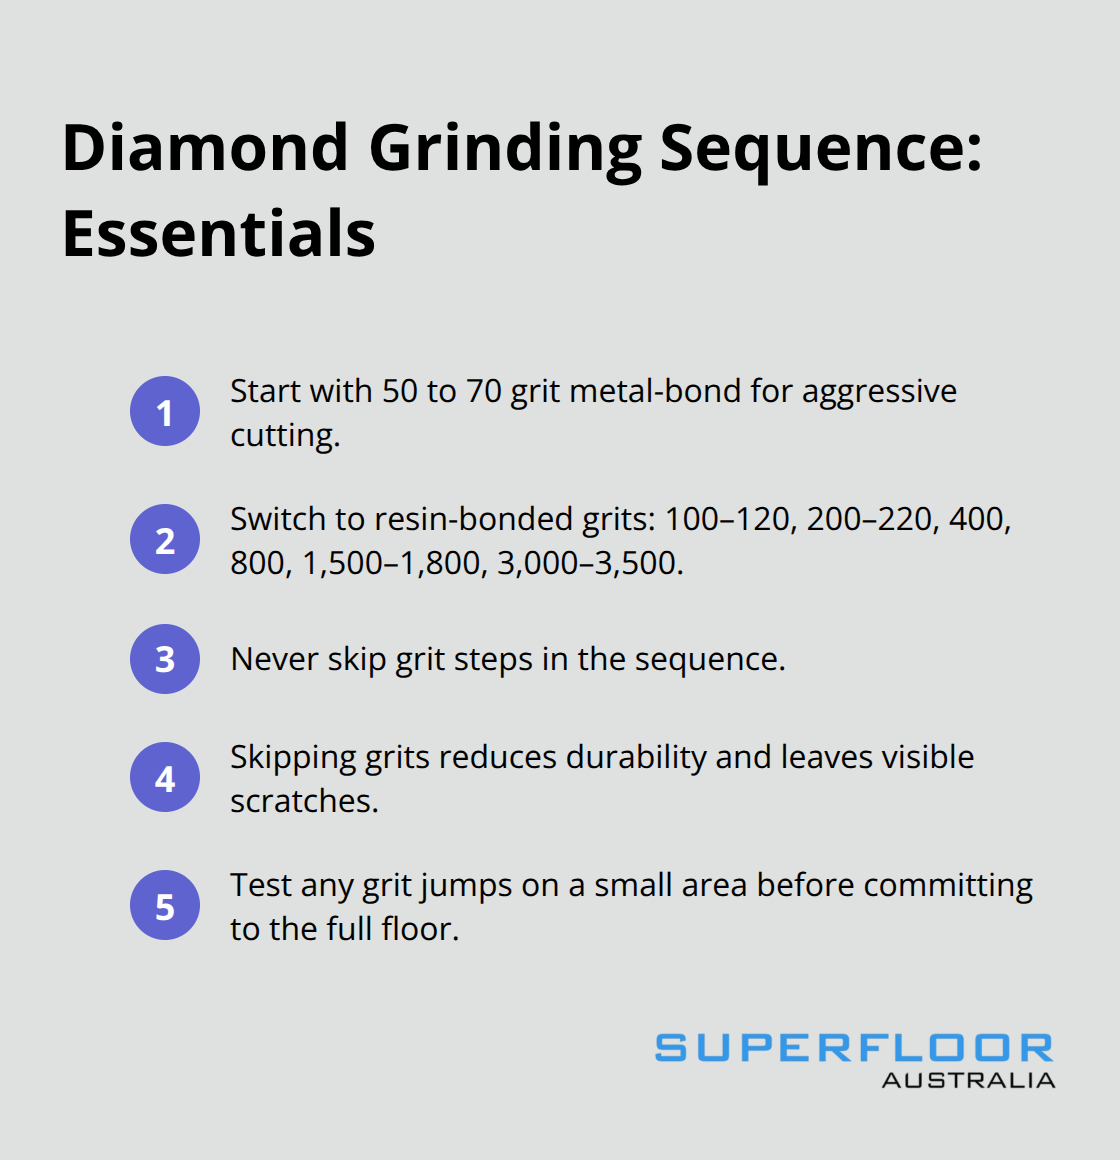
Equipment selection hinges on what finish you want and how much aggregate exposure you’re targeting. Metal-bonded diamonds cut fast on tough or coated slabs, so start with 50 to 70 grit metal-bond, then switch to resin-bonded grits in sequence: 100 to 120, 200 to 220, 400, 800, 1,500 to 1,800, and 3,000 to 3,500. Never skip grit steps. Skipping reduces durability and leaves visible scratches that show through sealers. Test any jumps on a small area first before committing to the full floor.
Tailoring Technique to Your Target Finish
For brushed finishes, stop at 80 grit and apply a basic sealant. For honed concrete, progress to 200 to 400 grit, then apply a penetrating sealer to enhance stain resistance and bring out the natural stone colours. For polished concrete, push all the way to 1,500 to 3,000 grit and apply a silicate densifier between the final grinding steps to harden the surface and enable the mirror effect.
Apply the densifier according to product instructions, typically allowing 24 hours cure time before continuing. After densifier cures, finish with the finest grits and consider non-diamond burnishing pads for added sheen. Concrete strength affects polish progression significantly-commercial slabs polish more reliably than residential ones, so plan for slower progress on weaker slabs and consider extra densifier applications.
Sealing and Curing for Lasting Results
Sealing requires two products applied in sequence: a penetrating sealer that hardens the surface first, followed by a surface sealant. Apply the penetrating sealer and wait at least 45 minutes to dry before applying the top sealant in thin, even coats. Maintain floor temperature between 10 and 27 degrees Celsius and humidity below 85 percent during sealing. Never seal on humid days or in poorly ventilated spaces. Allow 24 to 48 hours cure time before use, and restrict heavy traffic or water contact for about a week if possible.

These preparation and sealing steps form the backbone of any successful polished concrete project. The mistakes that derail most jobs happen during these phases, which is why understanding what goes wrong matters just as much as knowing what goes right.
Common Mistakes to Avoid When Polishing Concrete
Preparation Failures That Ruin Results
Preparation failures destroy more polished concrete projects than any other factor. Contractors skip filling cracks properly, fail to remove coatings down to bare substrate, or rush through flatness checks. When you don’t fill cracks with patching compound that matches slab strength, those voids remain and create soft spots where diamonds cut unevenly. Uneven cutting means some areas polish faster than others, producing a patchy, inconsistent surface that looks amateur even under normal lighting.
High spots that contractors don’t level early compound this problem-they polish first, leaving valleys that never catch up. Use a straightedge to check flatness before you start, fill everything properly, then sand smooth with 16 to 30 grit pads. Vacuum between passes so you actually see what you’re working with instead of guessing under a layer of dust. If you skip this phase or cut corners, you’ll spend hours later trying to fix what should have taken an extra day upfront.
Grit Progression Errors and Surface Consolidation
Never skip steps in your diamond sequence-jumping from 80 grit straight to 1,500 grit leaves visible scratches that sealers cannot hide, and durability suffers because the surface isn’t properly consolidated. Metal-bonded diamonds work for aggressive cutting on coated slabs, but switching too late to resin-bonded pads means slower polishing and potential overheating. Follow the full sequence: 50 to 70 metal-bond, then 100 to 120, 200 to 220, 400, 800, 1,500 to 1,800, and 3,000 to 3,500 resin-bonded grits.
Concrete strength affects how reliably each grit performs-commercial slabs polish predictably, while residential concrete may require extra densifier applications to harden the surface enough for proper polish progression. Test any grit jumps on a small area first before committing to the full floor. This approach prevents costly mistakes on large surfaces.
Sealing Shortcuts and Environmental Failures
Sealing shortcuts create the most visible failures. Many contractors apply sealant over dust or debris, trapping particles under the surface and creating a cloudy, scratched appearance that’s irreversible. Vacuum thoroughly and wipe with a dry cloth before sealing. Apply penetrating sealer first, wait 45 minutes minimum to dry, then apply surface sealant in thin, even coats.
Floor temperature must stay between 10 and 32.2 degrees Celsius and humidity below 85 percent-sealing on humid days or in unventilated spaces causes cure failure, leaving a sticky surface instead of a hard, protective barrier. Allow 24 to 48 hours cure time before traffic. Environmental control during sealing determines whether your surface hardens properly or remains compromised.
Final Thoughts
Brushed, honed, and polished concrete each deliver distinct results when you execute the concrete polishing techniques correctly. Brushed finishes work for low-traffic residential spaces where texture and slip resistance matter more than shine, while honed concrete suits pool surrounds and patios where durability balances with a matte appearance. Polished concrete wins for heavy-traffic kitchens and retail floors where a sealed, mirror-like surface resists scratches and demands minimal maintenance over decades.
The techniques that separate success from failure happen during preparation and sealing, not during grinding itself. Proper surface assessment, aggressive coating removal, consistent grit progression, and environmental control during sealing determine whether your floor looks professional or patchy. Professional application matters because experience teaches contractors how concrete strength affects polish progression, when to apply densifiers, and how environmental conditions impact cure times-variables that remain invisible until the sealant hardens incorrectly or the surface shows inconsistent aggregate exposure.
Quality polished concrete flooring delivers measurable benefits beyond appearance. A densified, sealed surface resists moisture absorption far better than brushed or honed alternatives, making it superior in humid climates, while the hard-wearing surface resists scratches that show immediately on softer finishes. We at superfloor australia deliver high-quality polished concrete flooring in Brisbane, combining precision preparation with expert craftsmanship to guarantee the finish you want from assessment through sealing.